Pre Security
Well, I decided to take up this path to brush up on the basics, I see some of the modules have some good content. Without further ado, let’s get to it. Woah that was the first time I typed the word ado , had to google it to confirm the spelling LOL.
Networking
The first iteration of the Internet was within the ARPANET project in the late 1960s. This project was funded by the United States Defense Department and was the first documented network in action. However, it wasn’t until 1989 when the Internet as we know it was invented by Tim Berners-Lee by the creation of the World Wide Web (WWW). It wasn’t until this point that the Internet started to be used as a repository for storing and sharing information, just like it is today.
The IP (Internet Protocol) address is made up of 4 octets. These values are calculated through a technique known as IP Subnetting.
IPv6 is a new iteration of the Internet Protocol addressing scheme to help tackle this issue. Although it is seemingly more daunting, it boasts a few benefits:
- Supports up to 2^128 of IP addresses (340 trillion-plus), resolving the issues faced with IPv4
- More efficient due to new methodologies
Devices on a network will all have a physical network interface, which is a microchip board found on the device’s motherboard. This network interface is assigned a unique address at the factory it was built at, called a MAC (Media Access Control ) address. The MAC address is a twelve-character hexadecimal number (a base sixteen numbering system used in computing to represent numbers) split into two’s and separated by a colon. These colons are considered separators. For example, a4:c3:f0:85:ac:2d. The first six characters represent the company that made the network interface, and the last six is a unique number.
If you look closely, the markdown is a mess in the above paragraph. Now, I’ll be going on a wild detour, learning about the things discussed above in detail. Of course, the OG ChatGPT will be one with all the data.
IP Subnetting is a technique used to divide a larger network into smaller, more manageable sub-networks or subnets. This helps in efficient IP address management, improves network performance, and enhances security.
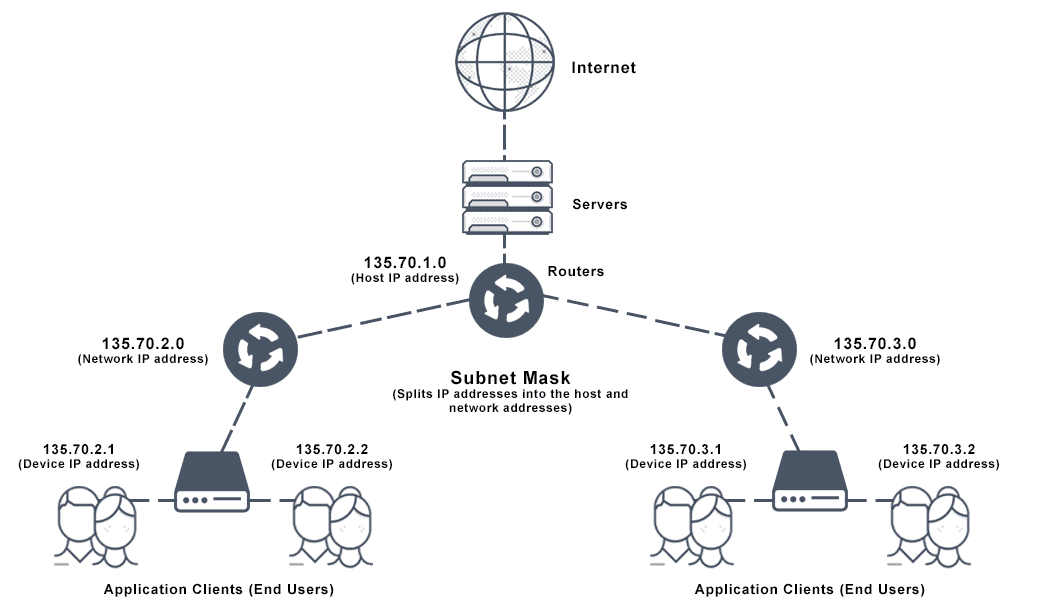
A subnet mask is used to divide the IP address into the network and host portions. It determines which part of the IP address identifies the network and which part identifies the host. The subnet mask also consists of four octets and is written in the same format as an IP address. For example, 255.255.255.0.
Octets and Binary Representation
- Each octet in an IP address or subnet mask is an 8-bit binary number.
- For example, the IP address
192.168.1.1in binary is11000000.10101000.00000001.00000001. - Similarly, the subnet mask
255.255.255.0in binary is11111111.11111111.11111111.00000000.
Subnetting Process
- Determine the Network and Host Portions:
- The subnet mask is used to determine the network and host portions of an IP address.
- For instance, with a subnet mask of
255.255.255.0, the first three octets (255.255.255) represent the network portion, and the last octet (0) represents the host portion.
- Subnetting the Network:
- To create subnets, we borrow bits from the host portion of the address to create additional network bits.
- For example, if we borrow one bit from the host portion in a Class C network (default subnet mask
255.255.255.0), the new subnet mask becomes255.255.255.128(11111111.11111111.11111111.10000000in binary).
- Calculate the Number of Subnets and Hosts:
- The number of subnets is calculated as
2^nwherenis the number of bits borrowed. - The number of hosts per subnet is calculated as
2^h - 2wherehis the number of remaining host bits (subtracting 2 accounts for the network and broadcast addresses). - For example, borrowing one bit in a Class C network creates
2^1 = 2subnets, and each subnet can have2^7 - 2 = 126hosts.
- The number of subnets is calculated as
Example
Given an IP address 192.168.1.0 and a subnet mask 255.255.255.0, let’s subnet it:
- Borrow 2 bits from the host portion:
- New subnet mask:
255.255.255.192(11111111.11111111.11111111.11000000).
- New subnet mask:
- Calculate the number of subnets:
2^2 = 4subnets.
- Calculate the number of hosts per subnet:
2^6 - 2 = 62hosts per subnet.
- Subnets created:
- Subnet 1:
192.168.1.0to192.168.1.63 - Subnet 2:
192.168.1.64to192.168.1.127 - Subnet 3:
192.168.1.128to192.168.1.191 - Subnet 4:
192.168.1.192to192.168.1.255
- Subnet 1:
Each subnet has its own range of IP addresses, with the first address reserved as the network address and the last address reserved as the broadcast address. This subnetting process allows better organization and management of IP addresses within a network.
That explanation was beautiful. Now we’ll look at the types of network Protocols. Juicy content ahead. Be prepared !
Network Protocols
IP addresses operate within a framework of standards and protocols that ensure reliable and consistent communication across networks. These protocols are part of the larger TCP/IP suite, which is fundamental to internet and network communication. Here are some key protocols related to IP addresses:
1. Internet Protocol (IP)
- IPv4 (Internet Protocol Version 4):
- Uses a 32-bit address space, providing about 4.3 billion unique addresses.
- Written in decimal format (e.g., 192.168.1.1).
- Includes features such as addressing, fragmentation, and routing.
- IPv6 (Internet Protocol Version 6):
- Uses a 128-bit address space, providing a virtually limitless number of unique addresses.
- Written in hexadecimal format (e.g., 2001:0db8:85a3:0000:0000:8a2e:0370:7334).
- Designed to address IPv4 exhaustion and includes improvements such as simplified header format and enhanced security.
2. Transmission Control Protocol (TCP)
Ensures reliable, ordered, and error-checked delivery of data between applications.
Establishes a connection before data transfer and ensures that data packets are delivered in the correct order.
3. User Datagram Protocol (UDP)
Provides a connectionless communication method.
Focuses on low-latency and reduced overhead, suitable for applications where speed is critical, such as streaming and gaming.
Does not guarantee delivery, order, or error checking.
4. Address Resolution Protocol (ARP)
Its job is to find the hardware address of a host from a known IP address. ARP has several types: Reverse ARP, Proxy ARP, Gratuitous ARP, and Inverse ARP.
Translates IP addresses to MAC (Media Access Control) addresses within a local network.
Essential for network communication where devices need to identify each other by their physical hardware addresses.
5. Reverse Address Resolution Protocol (RARP)
Used by a device to determine its IP address using its MAC address. Useful for diskless workstations that need to discover their IP address upon booting.
6. Dynamic Host Configuration Protocol (DHCP)
DHCP – Dynamic Host Configuration Protocol is a network management protocol that we use on TCP/IP Network. The DHCP server, automatically assigns IP addresses and other network configurations like Subnet Mask, Default Gateway, DNS Server, and more to the connected devices so they can exchange information. DHCP let the hosts get the necessary TCP/IP configuration data from the DHCP server. Automatic IP Assignment.
A device makes a request for an IP address if it wants to gain access to a network that’s utilizing DHCP. The server replies and provides an IP address to the device. After that, it monitors the use of the address, and when a defined period expires, or the device shuts down, it takes it back to its pool of available IP addresses. It is kept until it has to be reassigned to a different device that wants to access the network.
Using this protocol, the network administrators, don’t need to set a static IP for each device, and later reassign it to another and keep an eye on all the available IPs. They will just set up the DHCP server with all the additional network information, and it will do its work dynamically.
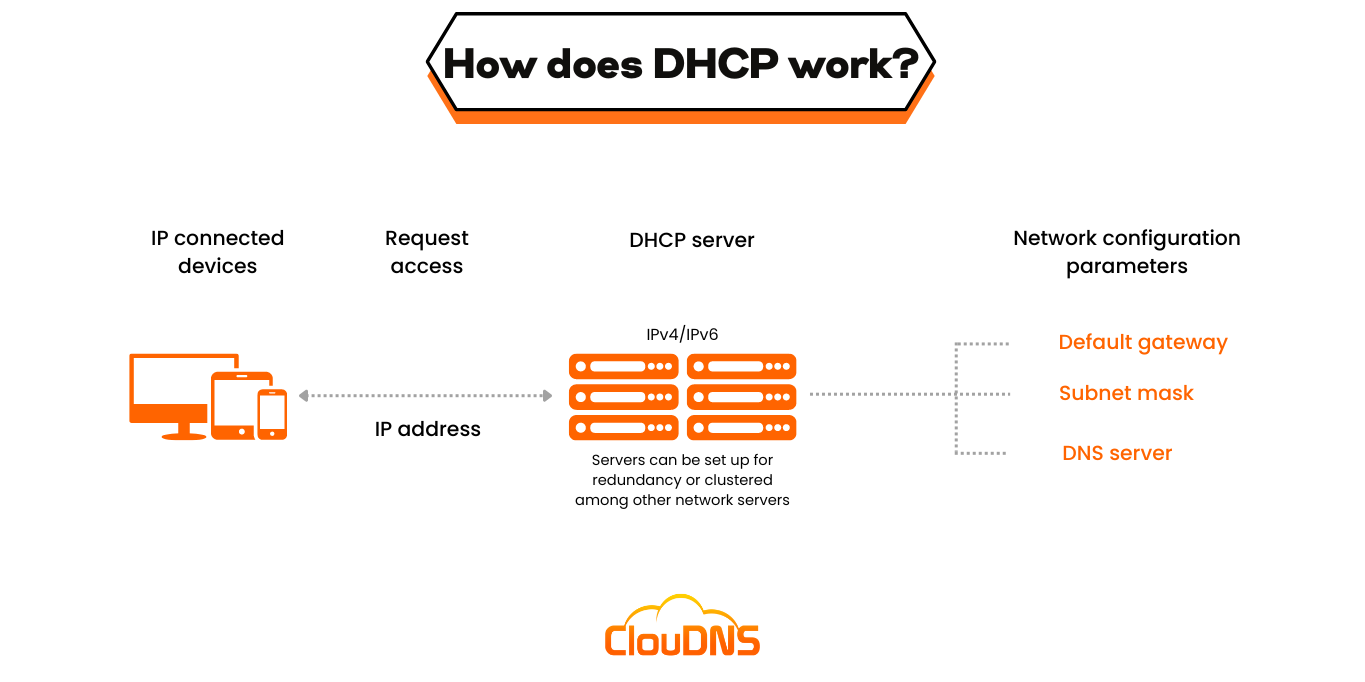
The server gets the accepting message from the device. It will provide the IP address to the device, together with the subnet mask and the DNS server. It will write a record with the information of the newly connected device that usually includes the MAC address of the connected device, the IP address that was assigned, and the expiration date of that IP address. The DHCP leases the IP address for a limited time only. After the time passes, the IP address will go back to the IP pool of available IP addresses and can be assigned to a new device again.
7. Internet Control Message Protocol (ICMP)
Used for diagnostic and error-reporting purposes.
Utilized by tools like ping and traceroute to test connectivity and network performance.
8. Network Address Translation (NAT)
Allows multiple devices on a local network to share a single public IP address.
Modifies network address information in packet headers while in transit, enabling communication between devices in different networks.
9. Simple Network Management Protocol (SNMP)
Used for network management and monitoring. Allows administrators to collect and organize information about managed devices on IP networks.
10. Domain Name System (DNS)
Translates human-readable domain names (e.g., www.example.com) into IP addresses.
Ensures users can access websites using easy-to-remember names rather than numerical IP addresses.
11. Border Gateway Protocol (BGP)
Manages how packets are routed across the internet through the exchange of routing information between ISPs. Ensures data takes the best path through the complex web of networks.
12. Open Shortest Path First (OSPF)
An interior gateway protocol used for routing within a single autonomous system.
Utilizes the shortest path first (SPF) algorithm to determine the most efficient route for data.
These protocols collectively ensure the smooth operation of IP networks, enabling devices to communicate efficiently, securely, and reliably across local and global networks.
Now, let’s go into Public and Private IPs in detail.
Public vs. Private IP Addresses
IP addresses are classified into two main types: public and private. These classifications determine how devices interact within networks and how they connect to the broader internet. Understanding the distinction between public and private IP addresses is crucial for network management, security, and efficient use of address space.
Public IP Addresses
Concept:
- Public IP addresses are globally unique and assigned by Internet Service Providers (ISPs).
- They are used to identify devices that are directly accessible over the internet.
Key Points:
- Uniqueness:
- Each public IP address must be unique across the entire internet to prevent address conflicts.
- Managed by organizations like IANA (Internet Assigned Numbers Authority) and regional registries (e.g., ARIN, RIPE NCC).
- Accessibility:
- Devices with public IP addresses can be accessed from anywhere on the internet.
- Examples include web servers, email servers, and routers.
- Allocation:
- Assigned to devices by ISPs.
- Typically, home users get one public IP address, while businesses may get multiple.
- Address Range:
- Public IP addresses range from 1.0.0.0 to 223.255.255.255, excluding the reserved and private address spaces.
Example:
- A home router with a public IP address like
203.0.113.1connects to the internet, allowing users to access websites and services worldwide.
Private IP Addresses
Concept:
- Private IP addresses are used within private networks (e.g., home, office, enterprise networks) and are not routable on the internet.
- They provide internal network communication and conserve the global IP address space.
Key Points:
- Range:
- Defined by the IETF in RFC 1918.
- There are three private IP address ranges:
- Class A:
10.0.0.0to10.255.255.255 - Class B:
172.16.0.0to172.31.255.255 - Class C:
192.168.0.0to192.168.255.255
- Class A:
- Non-Unique:
- Private IP addresses do not need to be globally unique.
- They can be reused in different private networks without conflict.
- Usage:
- Used for internal communication within a local network.
- Examples include devices like computers, smartphones, printers, and IoT devices in a home or office network.
- Address Translation:
- To communicate with the internet, devices with private IP addresses require Network Address Translation (NAT) provided by a router or gateway.
- NAT translates private IP addresses to a public IP address for internet access.
Example:
- Devices in a home network might have private IP addresses like
192.168.1.2,192.168.1.3, etc. The home router then translates these addresses to a single public IP address for internet communication.
Network Address Translation (NAT)
Concept:
- NAT is a technique used to map private IP addresses to a public IP address for communication with external networks.
Key Points:
- Functionality:
- NAT allows multiple devices on a local network to share a single public IP address.
- Translates internal private IP addresses to the public IP address of the router for outgoing traffic.
- Maintains a translation table to route incoming traffic to the correct private IP address.
- Types:
- Static NAT: Maps a single private IP address to a single public IP address.
- Dynamic NAT: Maps a private IP address to a public IP address from a pool of public addresses.
- PAT (Port Address Translation): Also known as “NAT overload,” maps multiple private IP addresses to a single public IP address using different ports.
- Advantages:
- Conserves the global IP address space.
- Adds a layer of security by hiding internal network structure from the outside world.
Example:
- A home network with multiple devices (e.g.,
192.168.1.2,192.168.1.3) uses NAT to share a single public IP address (e.g.,203.0.113.1) provided by the ISP. The router handles the translation of internal addresses to the public address for internet access.
Summary
- Public IP addresses are globally unique, assigned by ISPs, and necessary for devices directly accessible over the internet.
- Private IP addresses are used within local networks, not routable on the internet, and allow for internal communication without consuming global address space.
- NAT enables devices with private IP addresses to communicate with the internet by translating private addresses to a public address, conserving IP addresses, and providing an additional security layer.
Well, that was a clean explanation, well point to note is about NAT, you would really care about it when you configure your VMs ( Virtual Machines ) to have a specific class of IP, or making it connect to the internet with NAT or Bridged Adapter features and so on. We’ll explore that later.
Next, We’ll learn about ISPs and how they provide IP services,
ISP Services
When you subscribe to an internet service from an Internet Service Provider (ISP), they assign you a public IP address that is used for all your devices within your local network to communicate with the broader internet. Here’s a detailed explanation of how this process works:
Dynamic IP Assignment by ISP
- Dynamic IP Allocation:
- ISPs typically use Dynamic Host Configuration Protocol (DHCP) to assign public IP addresses dynamically.
- When you connect your modem or router to the ISP’s network, it sends a request to the ISP’s DHCP server.
- The DHCP server assigns a public IP address to your modem/router from a pool of available IP addresses.
- This IP address can change periodically or remain the same for extended periods, depending on the ISP’s policies.
Role of the Router and NAT
- Router Functionality:
- Your modem connects to the ISP’s network and receives the public IP address.
- The modem is often connected to a router, which manages your local network (LAN).
- Network Address Translation (NAT):
- The router uses a technology called Network Address Translation (NAT) to enable multiple devices on your local network to share the single public IP address assigned by the ISP.
- Each device within your local network is assigned a unique private IP address (e.g., 192.168.1.2, 192.168.1.3) by the router using its own DHCP server.
- How NAT Works:
- When a device in your local network sends data to the internet, the router translates the private IP address of the device to the public IP address assigned by the ISP.
- The router also keeps track of the original private IP address and port number in a NAT table, so it knows how to route the return traffic back to the correct device.
- For example, if device A (192.168.1.2) sends a request to a web server, the router replaces the private IP address with the public IP address and forwards the request. When the web server responds, the router uses the NAT table to map the incoming response back to device A.
Example of NAT in Action
- Internal Network Communication:
- Device A (192.168.1.2) and Device B (192.168.1.3) communicate directly using their private IP addresses without involving NAT or the public IP address.
- External Communication:
- Device A wants to access a website on the internet.
- Device A sends a request to the router.
- The router translates Device A’s private IP (192.168.1.2) to the public IP (e.g., 203.0.113.1) and sends the request to the website.
- The website sends a response to the public IP address (203.0.113.1).
- The router receives the response, checks the NAT table, and forwards the response to Device A (192.168.1.2).
Benefits of This Approach
- IP Address Conservation:
- By using NAT, multiple devices on your local network can share a single public IP address, which helps conserve the limited number of available IPv4 addresses.
- Security:
- NAT provides an additional layer of security because external devices on the internet can only see the public IP address and not the individual private IP addresses of devices within your local network.
- This makes it harder for potential attackers to directly target individual devices within your network.
ISP's Role and Billing
- ISP Assignment:
- ISPs manage large pools of public IP addresses and assign them to customers as needed.
- The IP address allocation can be static (fixed) or dynamic (changing periodically).
- Billing:
- ISPs charge customers for internet service, which typically includes the assignment of a public IP address.
- The cost may vary based on the type of service, speed, and additional features like a static IP address or enhanced security.
In summary, your ISP assigns a public IP address to your modem/router, and your router uses NAT to enable multiple devices in your local network to share this public IP address for internet access. This setup allows efficient use of IP addresses and adds a layer of security for your local network.
Well, that is that for the brief detour on IPs, NATs and DHCPs. We’ll be continuing on THM.
Ping(ICMP)
Ping is one of the most fundamental network tools available to us. Ping uses ICMP (Internet Control Message Protocol) packets to determine the performance of a connection between devices, for example, if the connection exists or is reliable.
The time taken for ICMP packets travelling between devices is measured by ping, such as in the screenshot below. This measuring is done using ICMP’s echo packet and then ICMP’s echo reply from the target device.
- Once the originating host receives the Echo Reply, it calculates the time difference between when the Echo Request was sent and when the Echo Reply was received. This time difference is the round-trip time (RTT).
pingtypically repeats this process several times (e.g., four times by default) and then reports statistics including the minimum, maximum, and average RTT, as well as packet loss if any of the requests did not receive replies.
Pings can be performed against devices on a network, such as your home network or resources like websites. This tool can be easily used and comes installed on Operating Systems (OSs) such as Linux and Windows. The syntax to do a simple ping is ping IP address or website URL.
1
2
3
4
5
6
7
8
9
Abu@Abuntu:~$ ping -c 4 8.8.8.8
PING 8.8.8.8 (8.8.8.8) 56(84) bytes of data
64 bytes from 8.8.8.8: icmp_seq=1 ttl=56 time=7.94 ms
64 bytes from 8.8.8.8: icmp_seq=1 ttl=56 time=8.12 ms
64 bytes from 8.8.8.8: icmp_seq=1 ttl=56 time=7.74 ms
64 bytes from 8.8.8.8: icmp_seq=1 ttl=56 time=8.19 ms
--- 8.8.8.8 ping statistics ---
4 packets transmitted, 4 received, 0% packet loss, time 4006ms
rtt min/avg/max/mdev = 8.132/9.428/10.957/1.057 ms
1
PING 8.8.8.8 (8.8.8.8) 56(84) bytes of data
PING 8.8.8.8 (8.8.8.8): Indicates the IP address being pinged.56(84) bytes of data: The size of the ICMP Echo Request payload being sent. The 56 bytes refer to the ICMP payload, and 84 bytes include the ICMP header (8 bytes) and the IP header (20 bytes).
Responses
Each line of response indicates that an ICMP Echo Reply packet was received. Let’s break down the first response:
1
64 bytes from 8.8.8.8: icmp_seq=1 ttl=56 time=7.94 ms
64 bytes from 8.8.8.8: The size of the received packet and the source IP address of the reply.icmp_seq=1: The sequence number of the ICMP Echo Request.ttl=56: The Time To Live value. This value indicates the remaining number of hops the packet can traverse. It decreases by one each time the packet passes through a router.time=7.94 ms: The round-trip time for this specific ping in milliseconds.
Linux Fundamentals
After I’ll be going into Linux Fundamentals, which I won’t cover much about, it’s pretty bland. But here’s a fun fact :
Let’s take this Linux Fundamentals module a bit more seriously, I see some good concepts to go through. Refresh.
Downloading Files (Wget)
A pretty fundamental feature of computing is the ability to transfer files. For example, you may want to download a program, a script, or even a picture. Thankfully for us, there are multiple ways in which we can retrieve these files.
We’re going to cover the use of wget . This command allows us to download files from the web via https – as if you were accessing the file in your browser. We simply need to provide the address of the resource that we wish to download. For example, if I wanted to download a file named “myfile.txt” onto my machine, assuming I knew the web address it – it would look something like this:
1
wget https://assets.tryhackme.com/additional/linux-fundamentals/part3/myfile.txt
Transferring Files From Your Host - SCP (SSH)
Secure copy, or SCP, is just that – a means of securely copying files. Unlike the regular cp command, this command allows you to transfer files between two computers using the SSH protocol to provide both authentication and encryption.
Working on a model of SOURCE and DESTINATION, SCP allows you to:
- Copy files & directories from your current system to a remote system
- Copy files & directories from a remote system to your current system
Provided that we know usernames and passwords for a user on your current system and a user on the remote system. For example, let’s copy an example file from our machine to a remote machine, which I have neatly laid out in the table below:
| Variable | Value |
|---|---|
| The IP address of the remote system | 192.168.1.30 |
| User on the remote system | ubuntu |
| Name of the file on the local system | important.txt |
| Name that we wish to store the file as on the remote system | transferred.txt |
With this information, let’s craft our scp command (remembering that the format of SCP is just SOURCE and DESTINATION)
1
scp important.txt ubuntu@192.168.1.30:/home/ubuntu/transferred.txt
And now let’s reverse this and layout the syntax for using scp to copy a file from a remote computer that we’re not logged into
| Variable | Value |
|---|---|
| IP address of the remote system | 192.168.1.30 |
| User on the remote system | ubuntu |
| Name of the file on the remote system | documents.txt |
| Name that we wish to store the file as on our system | notes.txt |
The command will now look like the following:
1
scp ubuntu@192.168.1.30:/home/ubuntu/documents.txt notes.txt
Serving Files From Your Host - WEB
Ubuntu machines come pre-packaged with python3. Python helpfully provides a lightweight and easy-to-use module called “httpserver”. This module turns your computer into a quick and easy web server that you can use to serve your own files, where they can then be downloaded by another computing using commands such as curl and wget.
Python3’s “httpserver” will serve the files in the directory where you run the command, but this can be changed by providing options that can be found within the manual pages. Simply, all we need to do is run python3 -m https.server in the terminal to start the module! In the snippet below, we are serving from a directory called “webserver”, which has a single named “file”.
Using Python to start a web server
1
2
3
abu@Abuntu:~/Documents/TryHackMe/Rooms/JrPenTester$ python3 -m https.server
Serving https on 0.0.0.0 port 8000 (https://0.0.0.0:8000/) ...
127.0.0.1 - - [19/Jun/2024 08:54:48] "GET /flag.txt https/1.1" 200 -
Now, let’s use wget to download the file using the MACHINE_IP address and the name of the file. Remember, because the python3 server is running port 8000, you will need to specify this within your wget command. For example:
Note, you will need to open a new terminal to use wget and leave the one that you have started the Python3 web server in. This is because, once you start the Python3 web server, it will run in that terminal until you cancel it.
Let’s take a look in the snippet below as an example:
Downloading a file from our webserver using wget
1
2
3
4
5
6
7
8
9
10
11
12
13
14
15
16
abu@Abuntu:~/Documents/TryHackMe/Rooms/PreSecurity$ wget https://localhost:8000/flag.txt
--2024-06-19 08:54:48--  https://localhost:8000/flag.txt
Resolving localhost (localhost)... 127.0.0.1
Connecting to localhost (localhost)|127.0.0.1|:8000... connected.
https request sent, awaiting response... 200 OK
Length: 32 [text/plain]
Saving to: ‘flag.txt’

flag.txt            100%[===================>]      32  --.-KB/s    in 0.07s

2024-06-19 08:54:48 (428 B/s) - ‘flag.txt’ saved [32/32]

abu@Abuntu:~/Documents/TryHackMe/Rooms/PreSecurity$ ls
flag.txt
abu@Abuntu:~/Documents/TryHackMe/Rooms/PreSecurity$ cat flag.txt
THM{KEEP_YOUR_SOFTWARE_UPDATED}
Remember, you will need to run the wget command in another terminal (while keeping the terminal that is running the Python3 server active).
One flaw with this module is that you have no way of indexing, so you must know the exact name and location of the file that you wish to use. This is why I prefer to use Updog. What’s Updog? A more advanced yet lightweight webserver. But for now, let’s stick to using Python’s “https Server”.
Processes are the programs that are running on your machine. They are managed by the kernel, where each process will have an ID associated with it, also known as its PID. The PID increments for the order In which the process starts. I.e. the 60th process will have a PID of 60.
Viewing Processes
We can use the friendly ps command to provide a list of the running processes as our user’s session and some additional information such as its status code, the session that is running it, how much usage time of the CPU it is using, and the name of the actual program or command that is being executed:
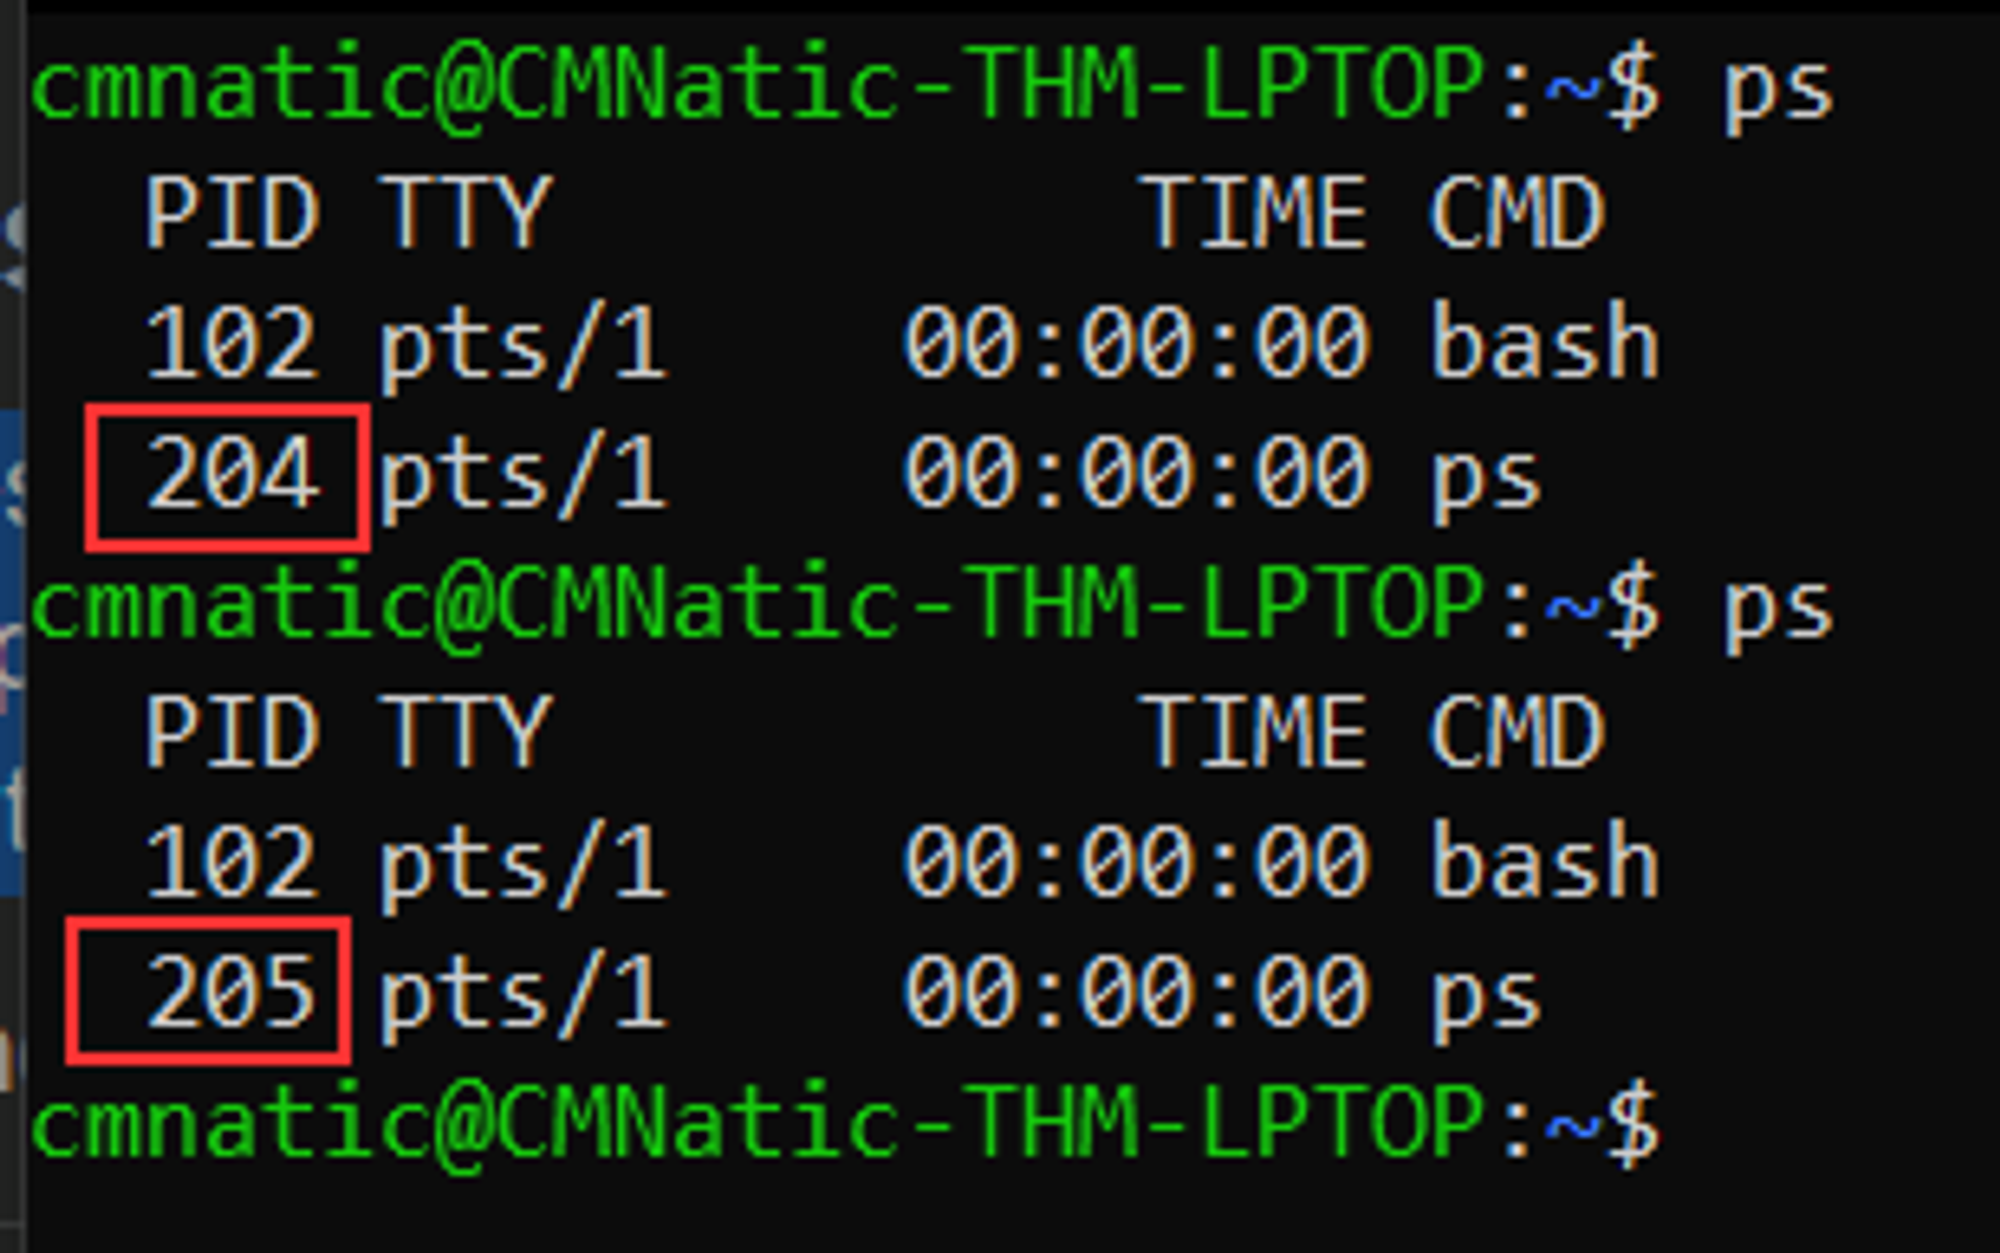
Note how in the screenshot above, the second process ps has a PID of 204, and then in the command below it, this is then incremented to 205.
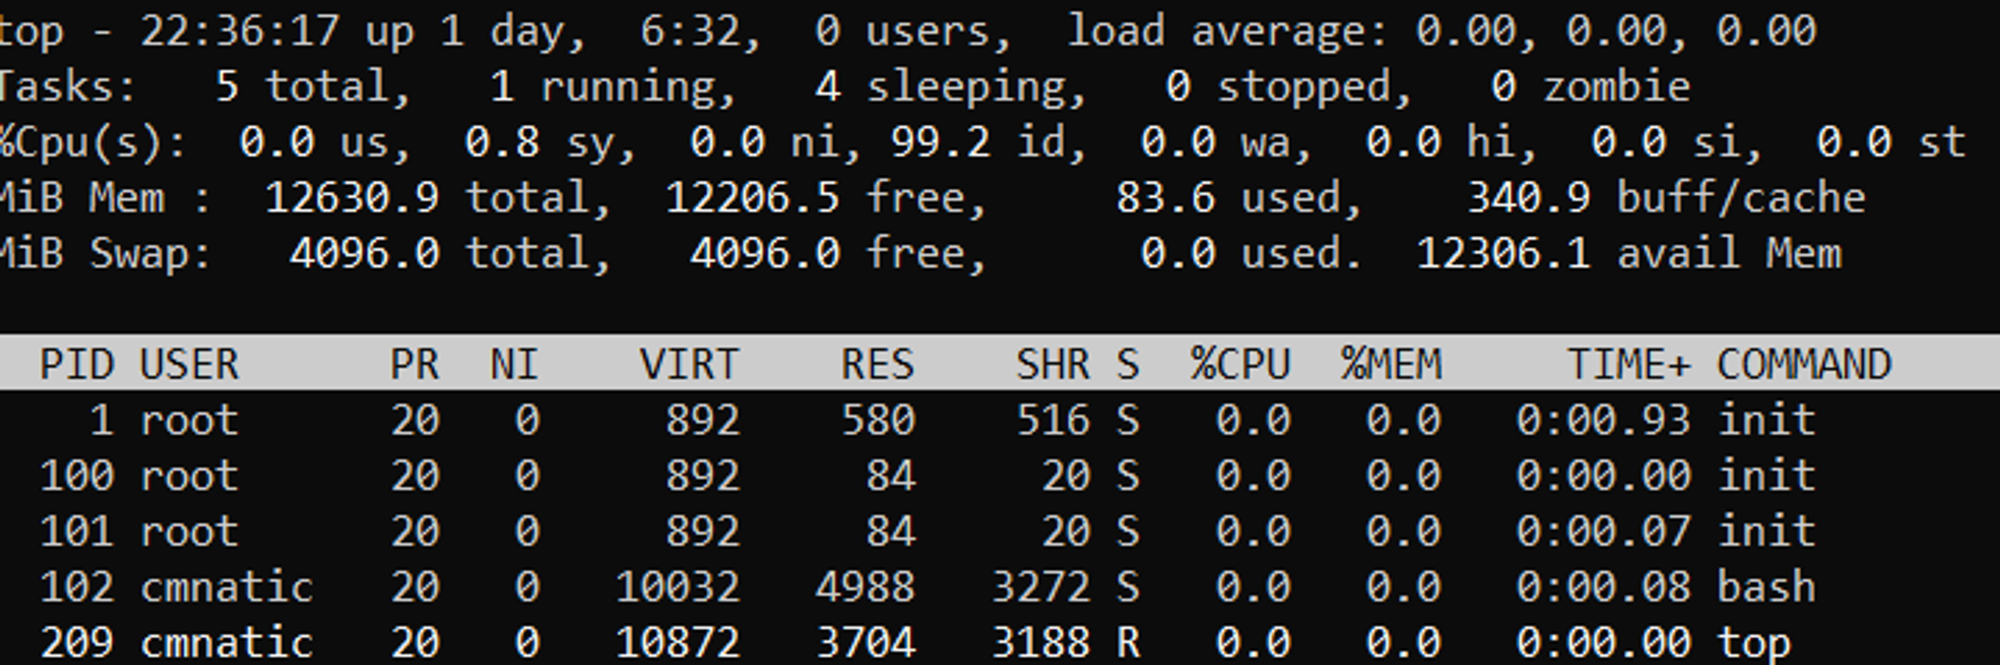
To see the processes run by other users and those that don’t run from a session (i.e. system processes), we need to provide aux to the ps command like so: ps aux
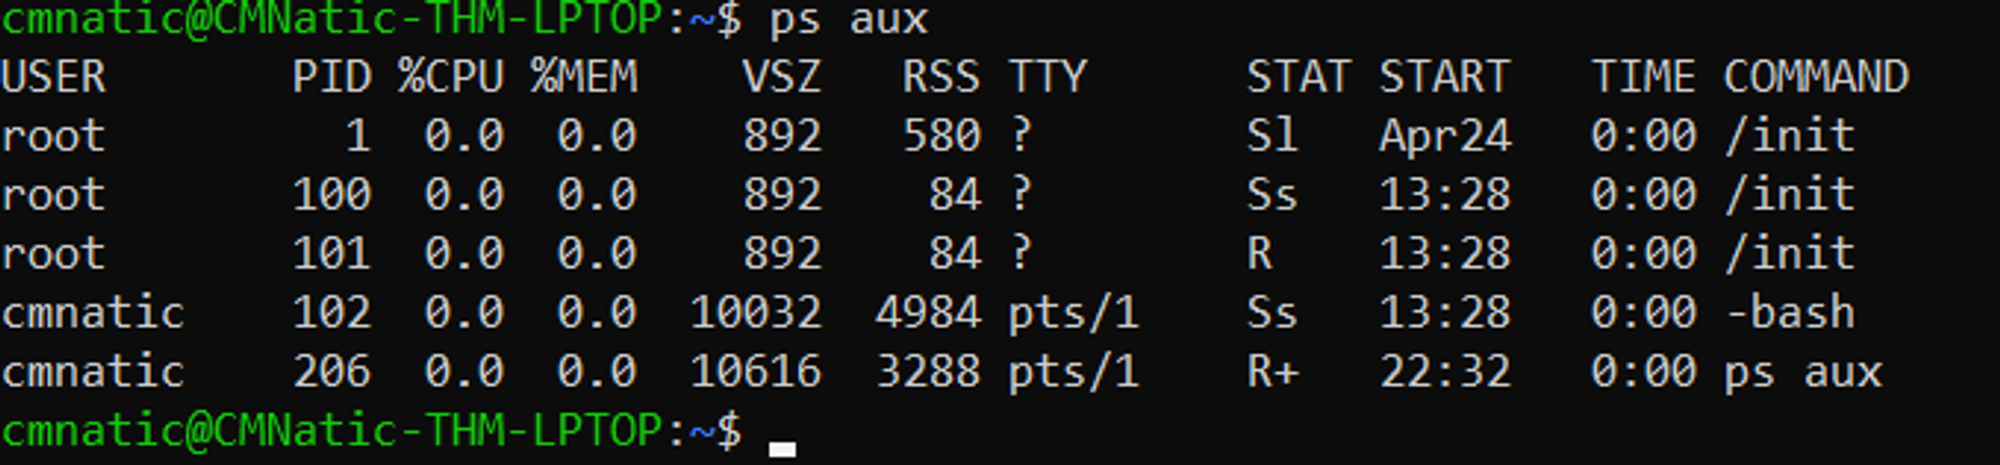
Note we can see a total of 5 processes – note how we now have “root” and “cmnatic”
Another very useful command is the top command; top gives you real-time statistics about the processes running on your system instead of a one-time view. These statistics will refresh every 10 seconds, but will also refresh when you use the arrow keys to browse the various rows. Another great command to gain insight into your system is via the top command
Managing Processes
You can send signals that terminate processes; there are a variety of types of signals that correlate to exactly how “cleanly” the process is dealt with by the kernel. To kill a command, we can use the appropriately named kill command and the associated PID that we wish to kill. i.e., to kill PID 1337, we’d use kill 1337.
Below are some of the signals that we can send to a process when it is killed:
- SIGTERM - Kill the process, but allow it to do some cleanup tasks beforehand
- SIGKILL - Kill the process - doesn’t do any cleanup after the fact
- SIGSTOP - Stop/suspend a process
How do Processes Start?
Let’s start off by talking about namespaces. The Operating System (OS) uses namespaces to ultimately split up the resources available on the computer to (such as CPU, RAM and priority) processes. Think of it as splitting your computer up into slices – similar to a cake. Processes within that slice will have access to a certain amount of computing power, however, it will be a small portion of what is actually available to every process overall.
Namespaces are great for security as it is a way of isolating processes from another – only those that are in the same namespace will be able to see each other.
We previously talked about how PID works, and this is where it comes into play. The process with an ID of 0 is a process that is started when the system boots. This process is the system’s init on Ubuntu, such as systemd, which is used to provide a way of managing a user’s processes and sits in between the operating system and the user.
For example, once a system boots and it initializes, systemd is one of the first processes that are started. Any program or piece of software that we want to start will start as what’s known as a child process of systemd. This means that it is controlled by systemd, but will run as its own process (although sharing the resources from systemd) to make it easier for us to identify and the likes.

Getting Processes/Services to Start on Boot
Some applications can be started on the boot of the system that we own. For example, web servers, database servers or file transfer servers. This software is often critical and is often told to start during the boot-up of the system by administrators.
In this example, we’re going to be telling the apache web server to be starting apache manually and then telling the system to launch apache2 on boot.
Enter the use of systemctl – this command allows us to interact with the systemd process/daemon. Continuing on with our example, systemctl is an easy to use command that takes the following formatting: systemctl [option] [service]
For example, to tell apache to start up, we’ll use systemctl start apache2. Seems simple enough, right? Same with if we wanted to stop apache, we’d just replace the [option] with stop (instead of start like we provided)
We can do four options with systemctl:
- Start
- Stop
- Enable
- Disable
An Introduction to Backgrounding and Foregrounding in Linux
Processes can run in two states: In the background and in the foreground. For example, commands that you run in your terminal such as “echo” or things of that sort will run in the foreground of your terminal as it is the only command provided that hasn’t been told to run in the background. “Echo” is a great example as the output of echo will return to you in the foreground, but wouldn’t in the background - take the screenshot below, for example.
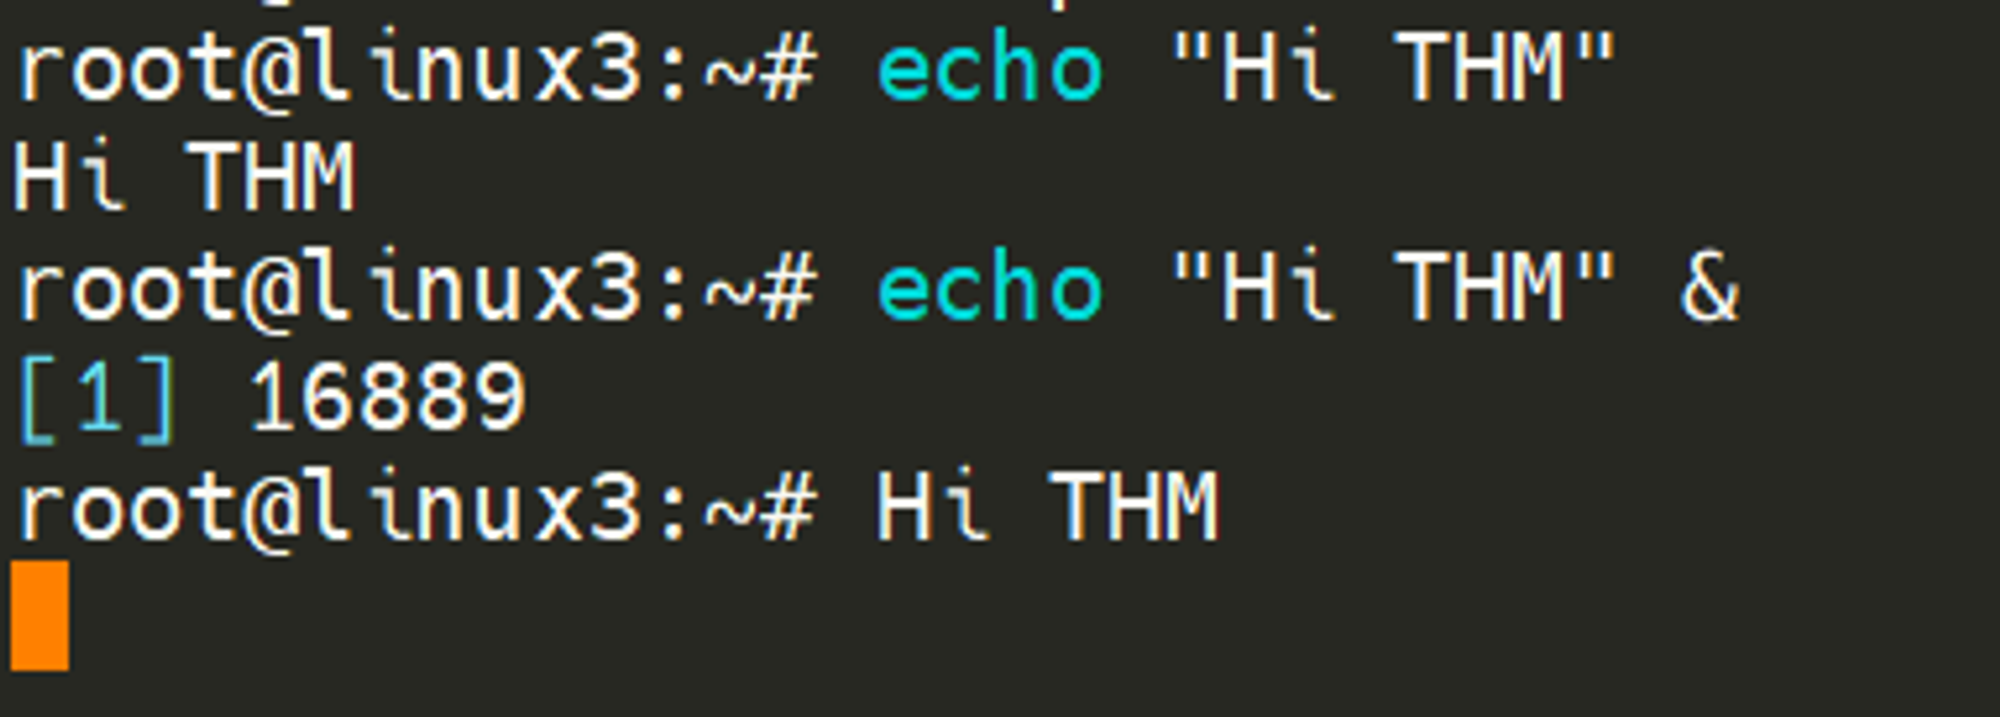
Here we’re running echo "Hi THM" , where we expect the output to be returned to us like it is at the start. But after adding the & operator to the command, we’re instead just given the ID of the echo process rather than the actual output – as it is running in the background.
This is great for commands such as copying files because it means that we can run the command in the background and continue on with whatever further commands we wish to execute (without having to wait for the file copy to finish first)
We can do the exact same when executing things like scripts – rather than relying on the & operator, we can use Ctrl + Z on our keyboard to background a process. It is also an effective way of “pausing” the execution of a script or command like in the example below:
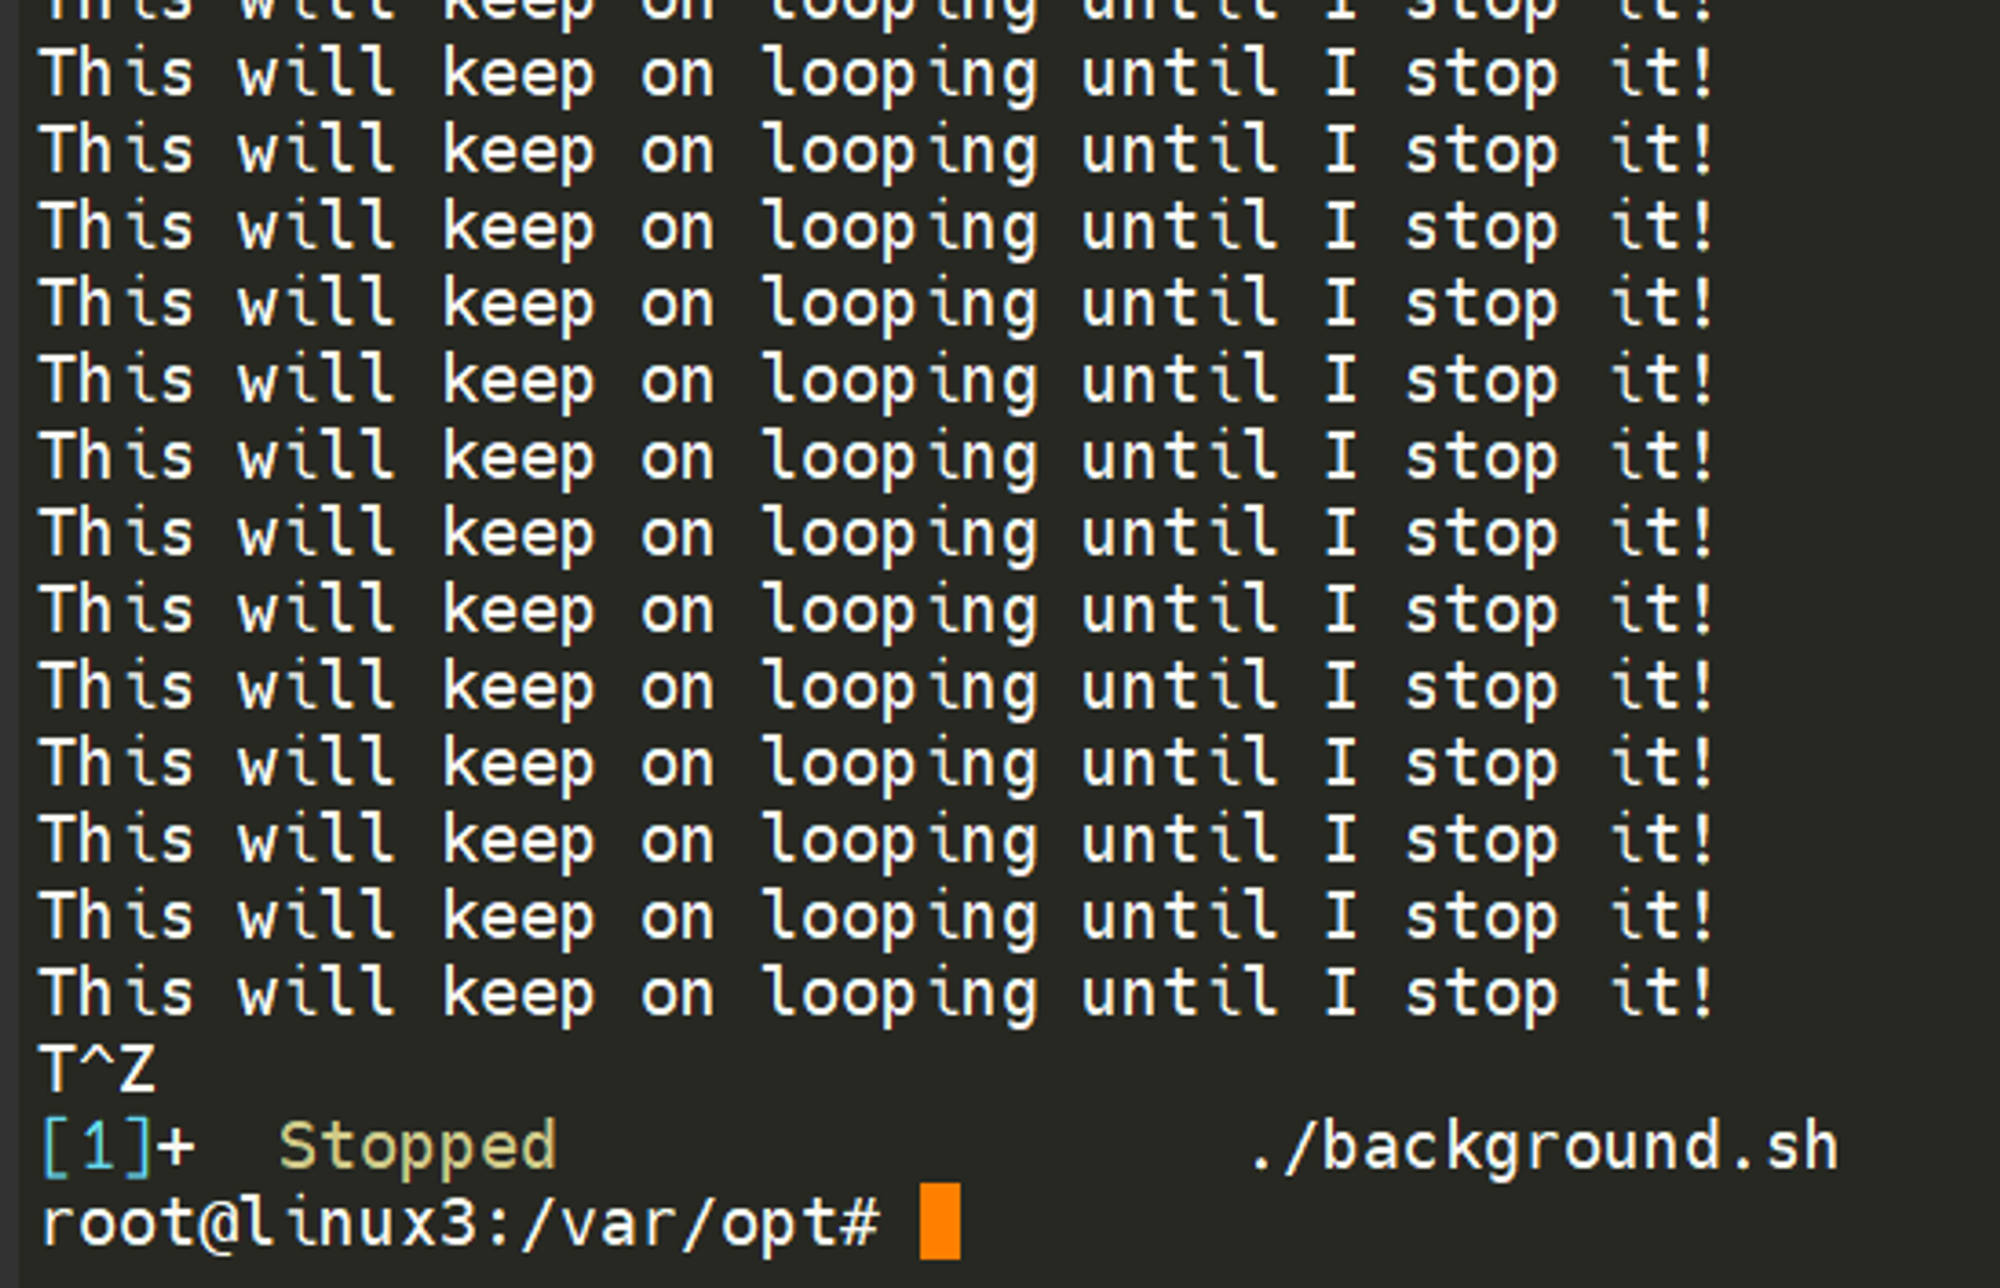
This script will keep on repeating “This will keep on looping until I stop!” until I stop or suspend the process. By using Ctrl + Z (as indicated by T^Z). Now our terminal is no longer filled up with messages – until we foreground it, which we will discuss below.
Foregrounding a process
Now that we have a process running in the background, for example, our script “background.sh” which can be confirmed by using the ps aux command, we can back-pedal and bring this process back to the foreground to interact with.

With our process backgrounded using either Ctrl + Z or the & operator, we can use fg to bring this back to focus like below, where we can see the fg command is being used to bring the background process back into use on the terminal, where the output of the script is now returned to us.
Crontabs
Users may want to schedule a certain action or task to take place after the system has booted. Take, for example, running commands, backing up files, or launching your favorite programs on, such as Spotify or Google Chrome.
We’re going to be talking about the cron process, but more specifically, how we can interact with it via the use of crontabs . Crontab is one of the processes that is started during boot, which is responsible for facilitating and managing cron jobs.
This can be confusing to begin with, which is why there are some great resources such as the online
that allows you to use a friendly application to generate your formatting for you! As well as the site
Crontab.guru - The cron schedule expression generator
Crontab Generator - Generate crontab syntax
Crontabs can be edited by using crontab -e, where you can select an editor (such as Nano) to edit your crontab.
Here’s a bit of knowledge,
Introducing Packages & Software Repos
When developers wish to submit software to the community, they will submit it to an “apt” repository. If approved, their programs and tools will be released into the wild. Two of the most redeeming features of Linux shine to light here: User accessibility and the merit of open source tools.
When using the ls command on a Ubuntu 20.04 Linux machine, these files serve as the gateway/registry.

Whilst Operating System vendors will maintain their own repositories, you can also add community repositories to your list! This allows you to extend the capabilities of your OS. Additional repositories can be added by using the add-apt-repositorycommand or by listing another provider! For example, some vendors will have a repository that is closer to their geographical location.
Managing Your Repositories (Adding and Removing)
Normally we use the apt command to install software onto our Ubuntu system. The apt command is a part of the package management software also named apt. Apt contains a whole suite of tools that allows us to manage the packages and sources of our software, and to install or remove software at the same time.
One method of adding repositories is to use the add-apt-repository command we illustrated above, but we’re going to walk through adding and removing a repository manually. Whilst you can install software through the use of package installers such as dpkg, the benefits of apt means that whenever we update our system – the repository that contains the pieces of software that we add also gets checked for updates.
Removing packages is as easy as reversing. This process is done by using the add-apt-repository --remove ppa:PPA_Name/ppa command or by manually deleting the file that we previously added to. Once removed, we can just use apt remove [software-name-here] i.e. apt remove sublime-text
We briefly touched upon log files and where they can be found in Linux Fundamentals Part 1. However, let’s quickly recap. Located in the /var/log directory, these files and folders contain logging information for applications and services running on your system. The Operating System (OS) has become pretty good at automatically managing these logs in a process that is known as “rotating”.
I have highlighted some logs from three services running on a Ubuntu machine:
- An Apache2 web server
- Logs for the fail2ban service, which is used to monitor attempted brute forces, for example
- The UFW service which is used as a firewall
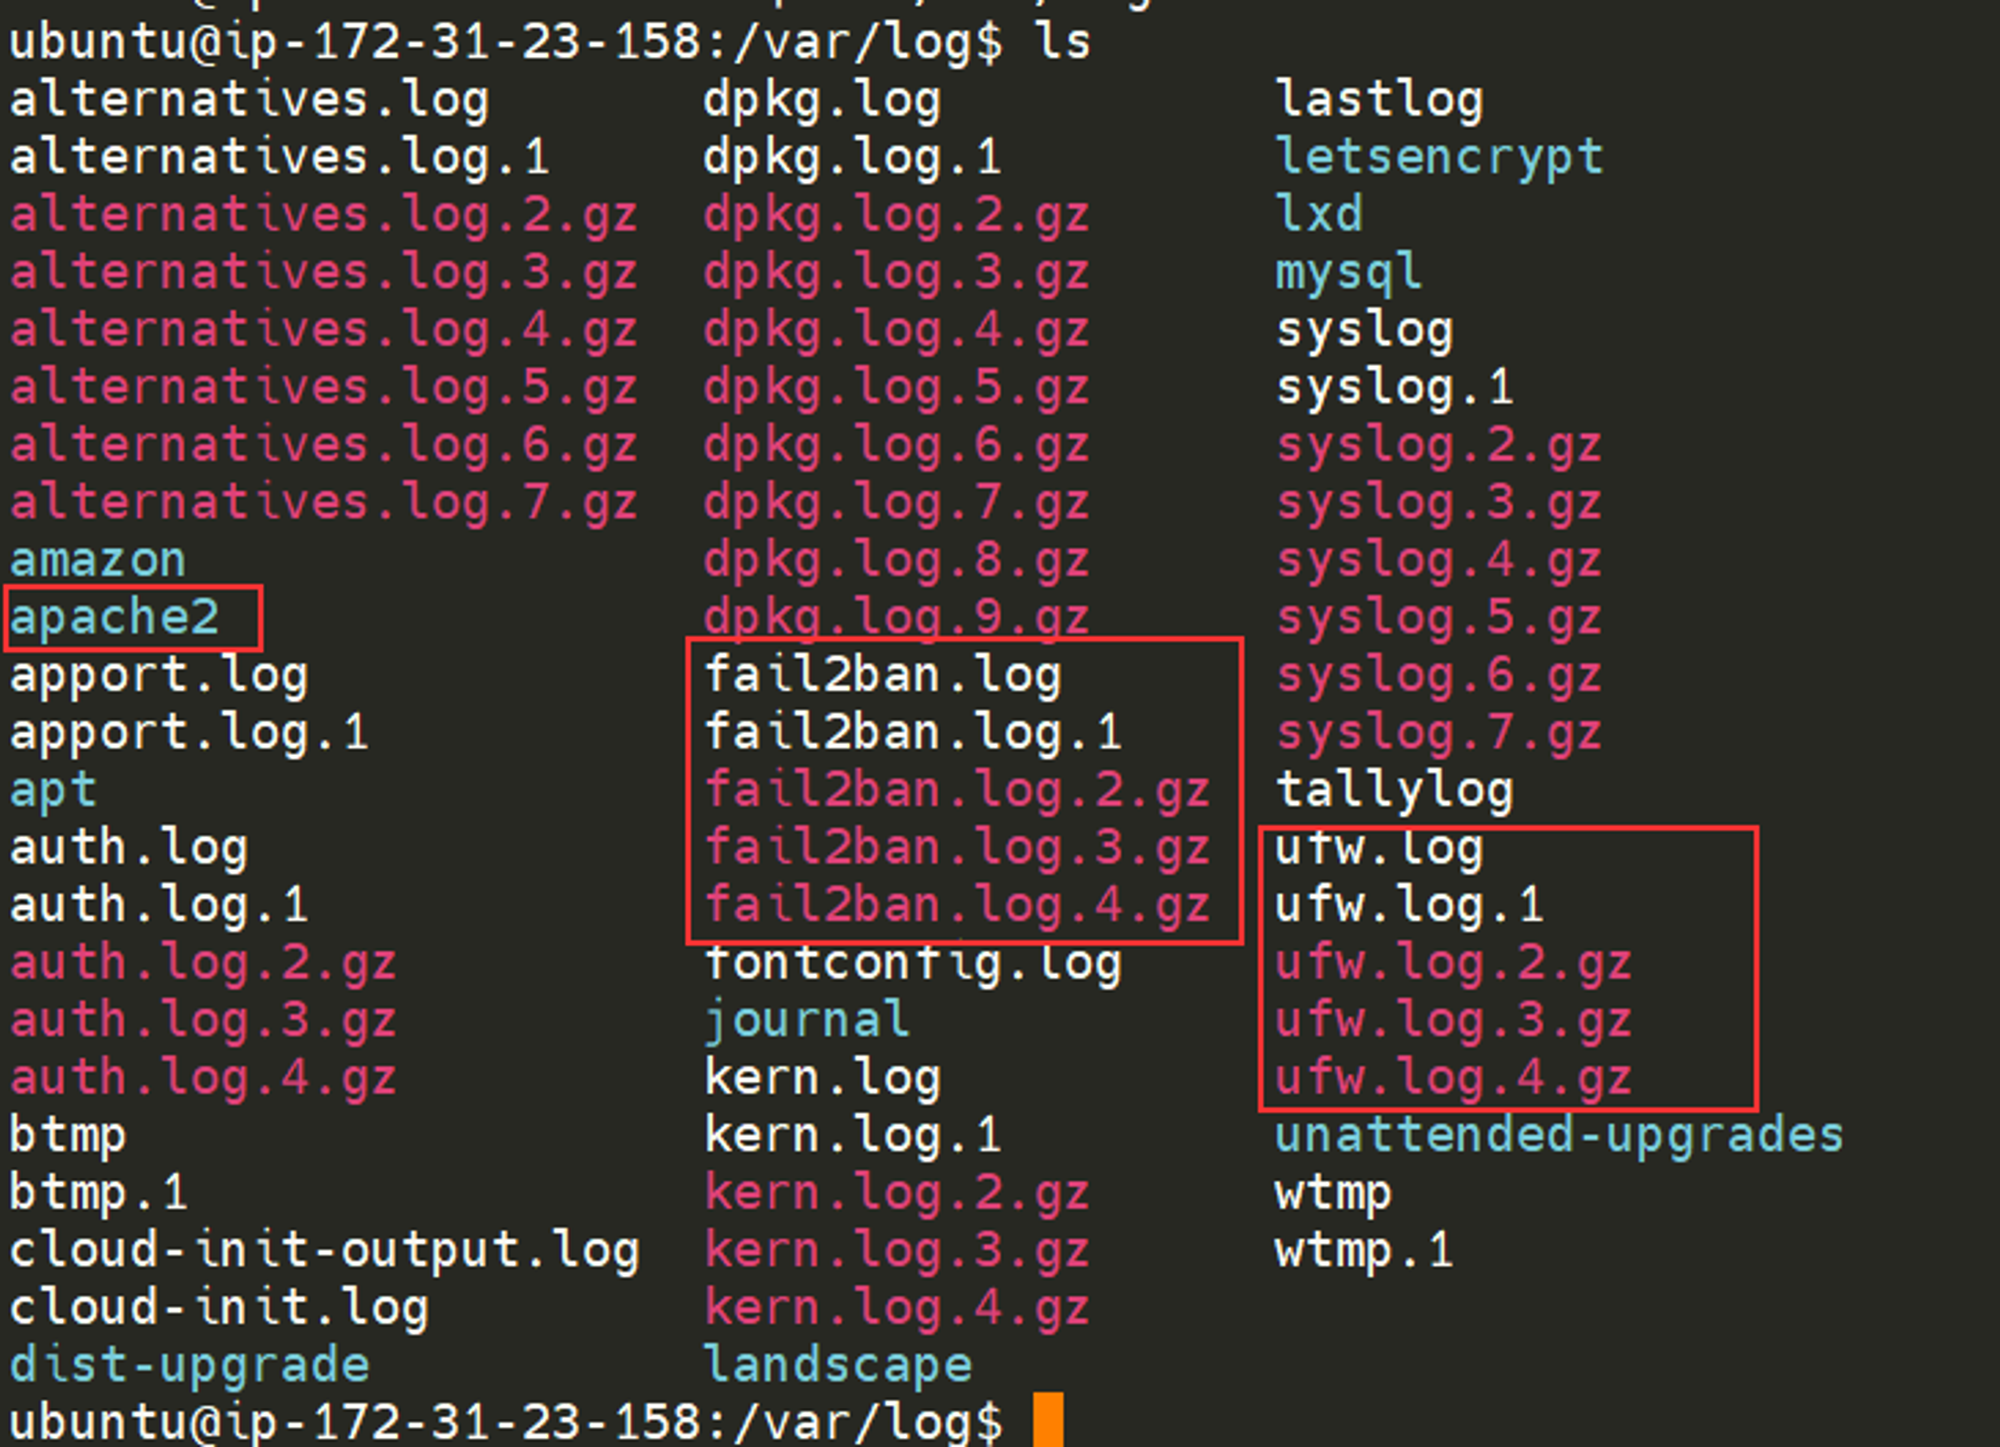
These services and logs are a great way in monitoring the health of your system and protecting it. Not only that, but the logs for services such as a web server contain information about every single request - allowing developers or administrators to diagnose performance issues or investigate an intruder’s activity. For example, the two types of log files below that are of interest:
- access log
- error log
So that is it on Linux Fundamentals, let’s dive into Windows Fundamentals. This OS I’ve been using my whole life ( I’m not that old lol ), and I’m pretty sure that there a ton of things I don’t know.
Windows Fundamentals
The first thing I come across this module, is about RDP [ Remote Desktop Protocol ] and it’s a interesting concept that I’m hearing for the first time. Seems like it was quite common as well. Ah this journey, is the really what I wanted. This new bits of information’s is kind of like a dopamine droplet entering the mind. The Journey is the Goal, not the Destination. Well, got a little excited listening to epic music haha. Here,
It’s better to just visit the following site, to learn more about RDP.
Explain Like I’m 5: Remote Desktop Protocol (RDP)
So I’m on my Ubuntu VM, and to access a remote server through RDP, we need Remmina software to enable us to RDP from the Linux host.
1
2
abu@Abuntu:~/Documents/TryHackMe/Rooms/PreSecurity$ sudo snap install remmina
remmina v1.4.35+git1.e0692befd from Remmina Upstream Developers (remmina✓) installed
I’ve just realized that I forgot or haven’t set a root password in my Ubuntu VM. I’m screwed !
Wait, is this piece of information valid to share in a public blog, I don’t know, whatever.
Connected to the remote THM machine using RDP. It’s pretty cool, bit different from a VM. Try it out !
Don’t make the mistake of installing OpenVPN Connect, that’s quite similar but different and the TryHackMeovpn file doesn’t work. Use the OpenVPN GUI instead. Ah, software and their users…
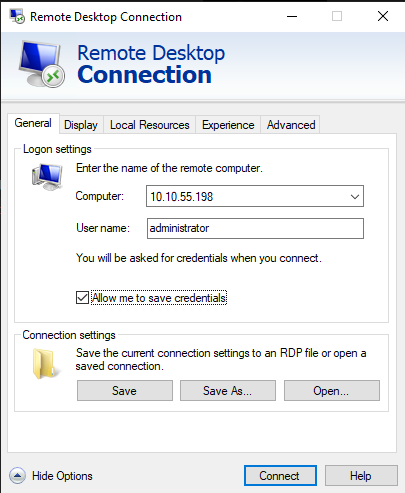
Use the Remote Desktop Connection application in Windows to connect to that remote machine.
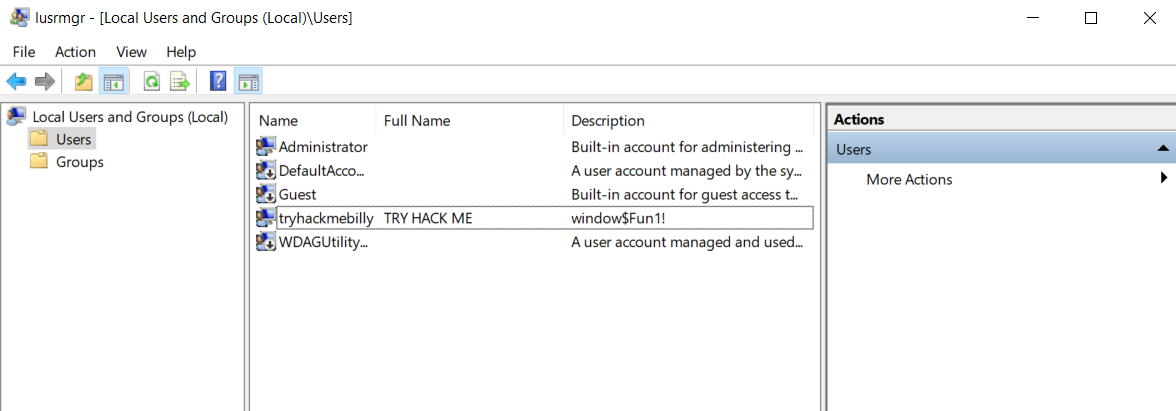
LUSRMGR
Method to access other users and groups in the machine, is using Local User and Group Management.
Right-click on the Start Menu and click Run. Type lusrmgr.msc. See below
UAC
Microsoft introduced **User Account Control** (UAC). This concept was first introduced with the short-lived Windows Vista and continued with versions of Windows that followed.
This shield icon is an indicator that UAC will prompt to allow higher-level privileges to install the program.
Double-click the program, and you’ll see the UAC prompt. Notice that the built-in administrator account is already set as the user name and prompts the account’s password. See below.

After some time, if a password is not entered, the UAC prompt disappears, and the program does not install.
This feature reduces the likelihood of malware successfully compromising your system. You can read more about UAC here.
How User Account Control works - Windows Security
Here’s something on Task Manager in Windows,
Windows Task Manager: The Complete Guide
Windows File System
The file system used in modern versions of Windows is the New Technology File System or simply NTFS.
Before NTFS, there was FAT16/FAT32 (File Allocation Table) and HPFS (High Performance File System).
You still see FAT partitions in use today. For example, you typically see FAT partitions in USB devices, MicroSD cards, etc. but traditionally not on personal Windows computers/laptops or Windows servers.
NTFS is known as a journaling file system. In case of a failure, the file system can automatically repair the folders/files on disk using information stored in a log file. This function is not possible with FAT.
NTFS addresses many of the limitations of the previous file systems; such as:
- Supports files larger than 4GB
- Set specific permissions on folders and files
- Folder and file compression
- Encryption (Encryption File System or EFS)
If you’re running Windows, what is the file system your Windows installation is using? You can check the Properties (right-click) of the drive your operating system is installed on, typically the C drive (C:).
You can read Microsoft’s official documentation on FAT, HPFS, and NTFS here.
Let’s speak briefly on some features that are specific to NTFS.
On NTFS volumes, you can set permissions that grant or deny access to files and folders.
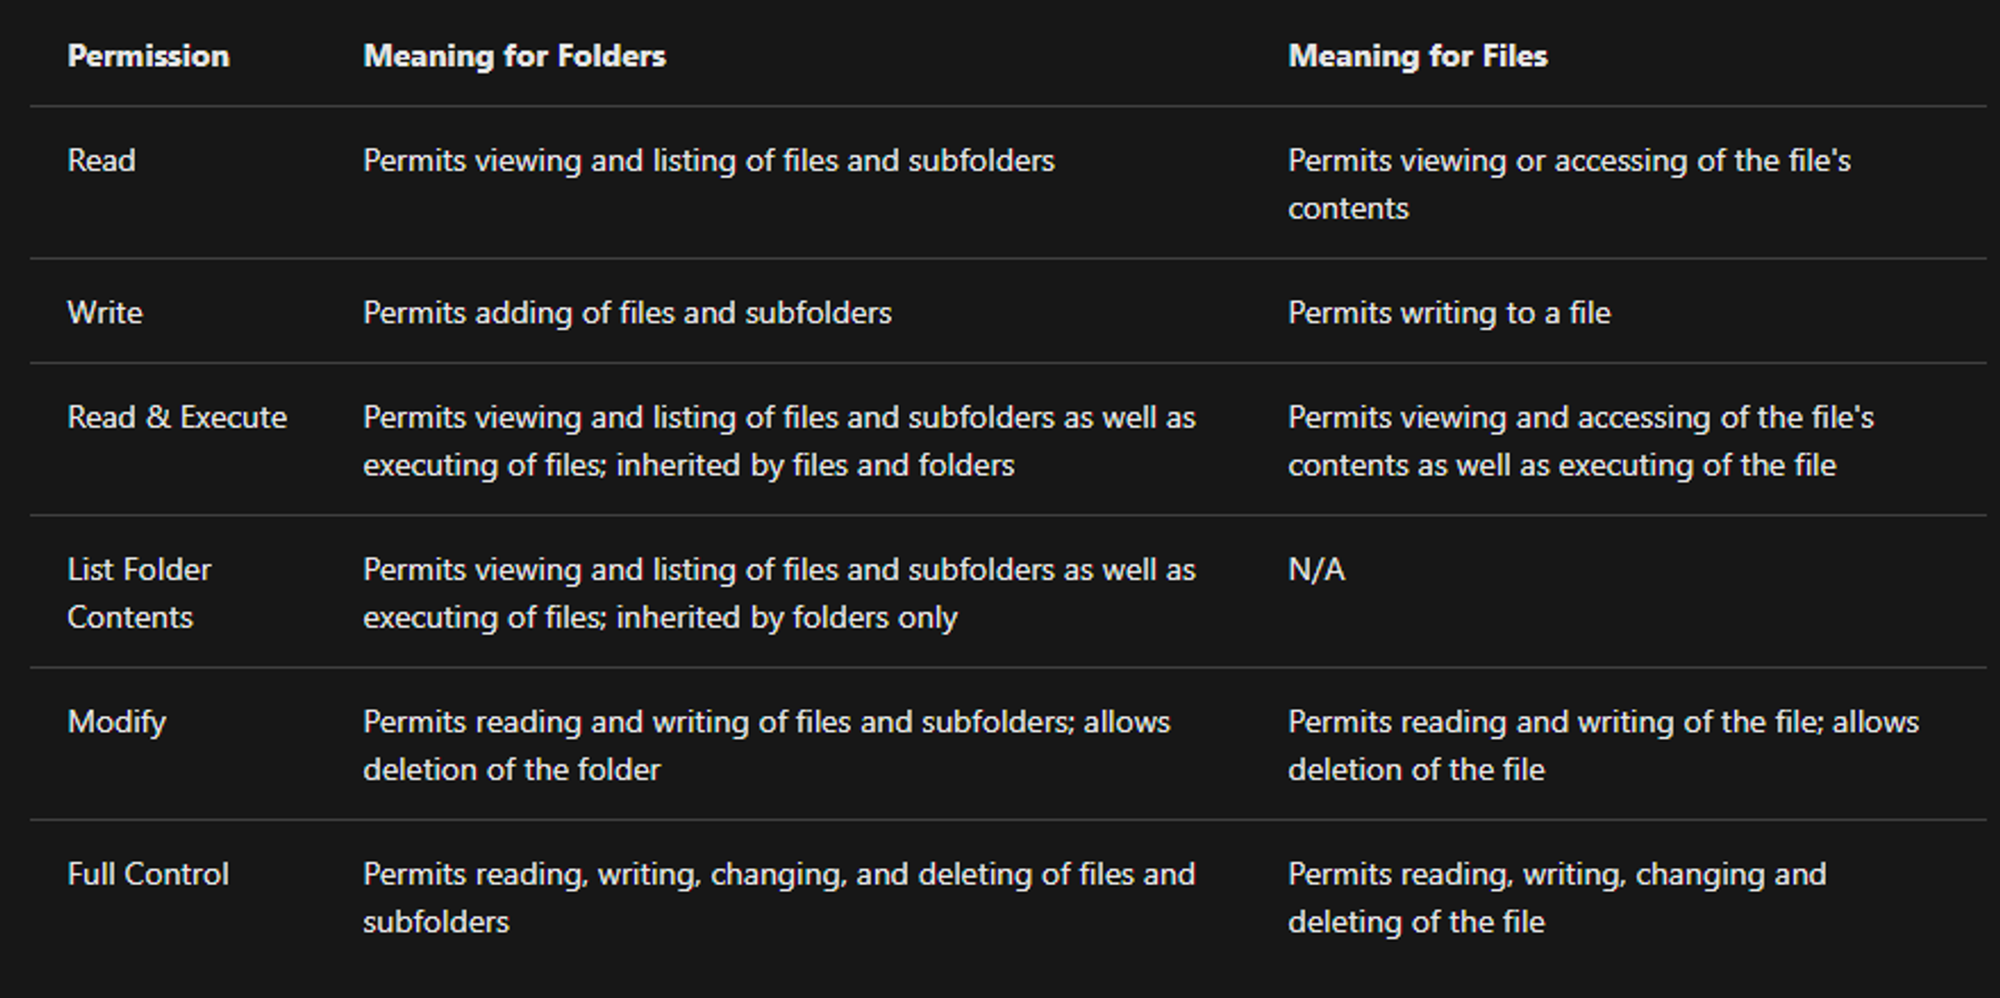
The permissions are:
- Full control
- Modify
- Read & Execute
- List folder contents
- Read
- Write
The below image lists the meaning of each permission on how it applies to a file and a folder. (credit Microsoft)
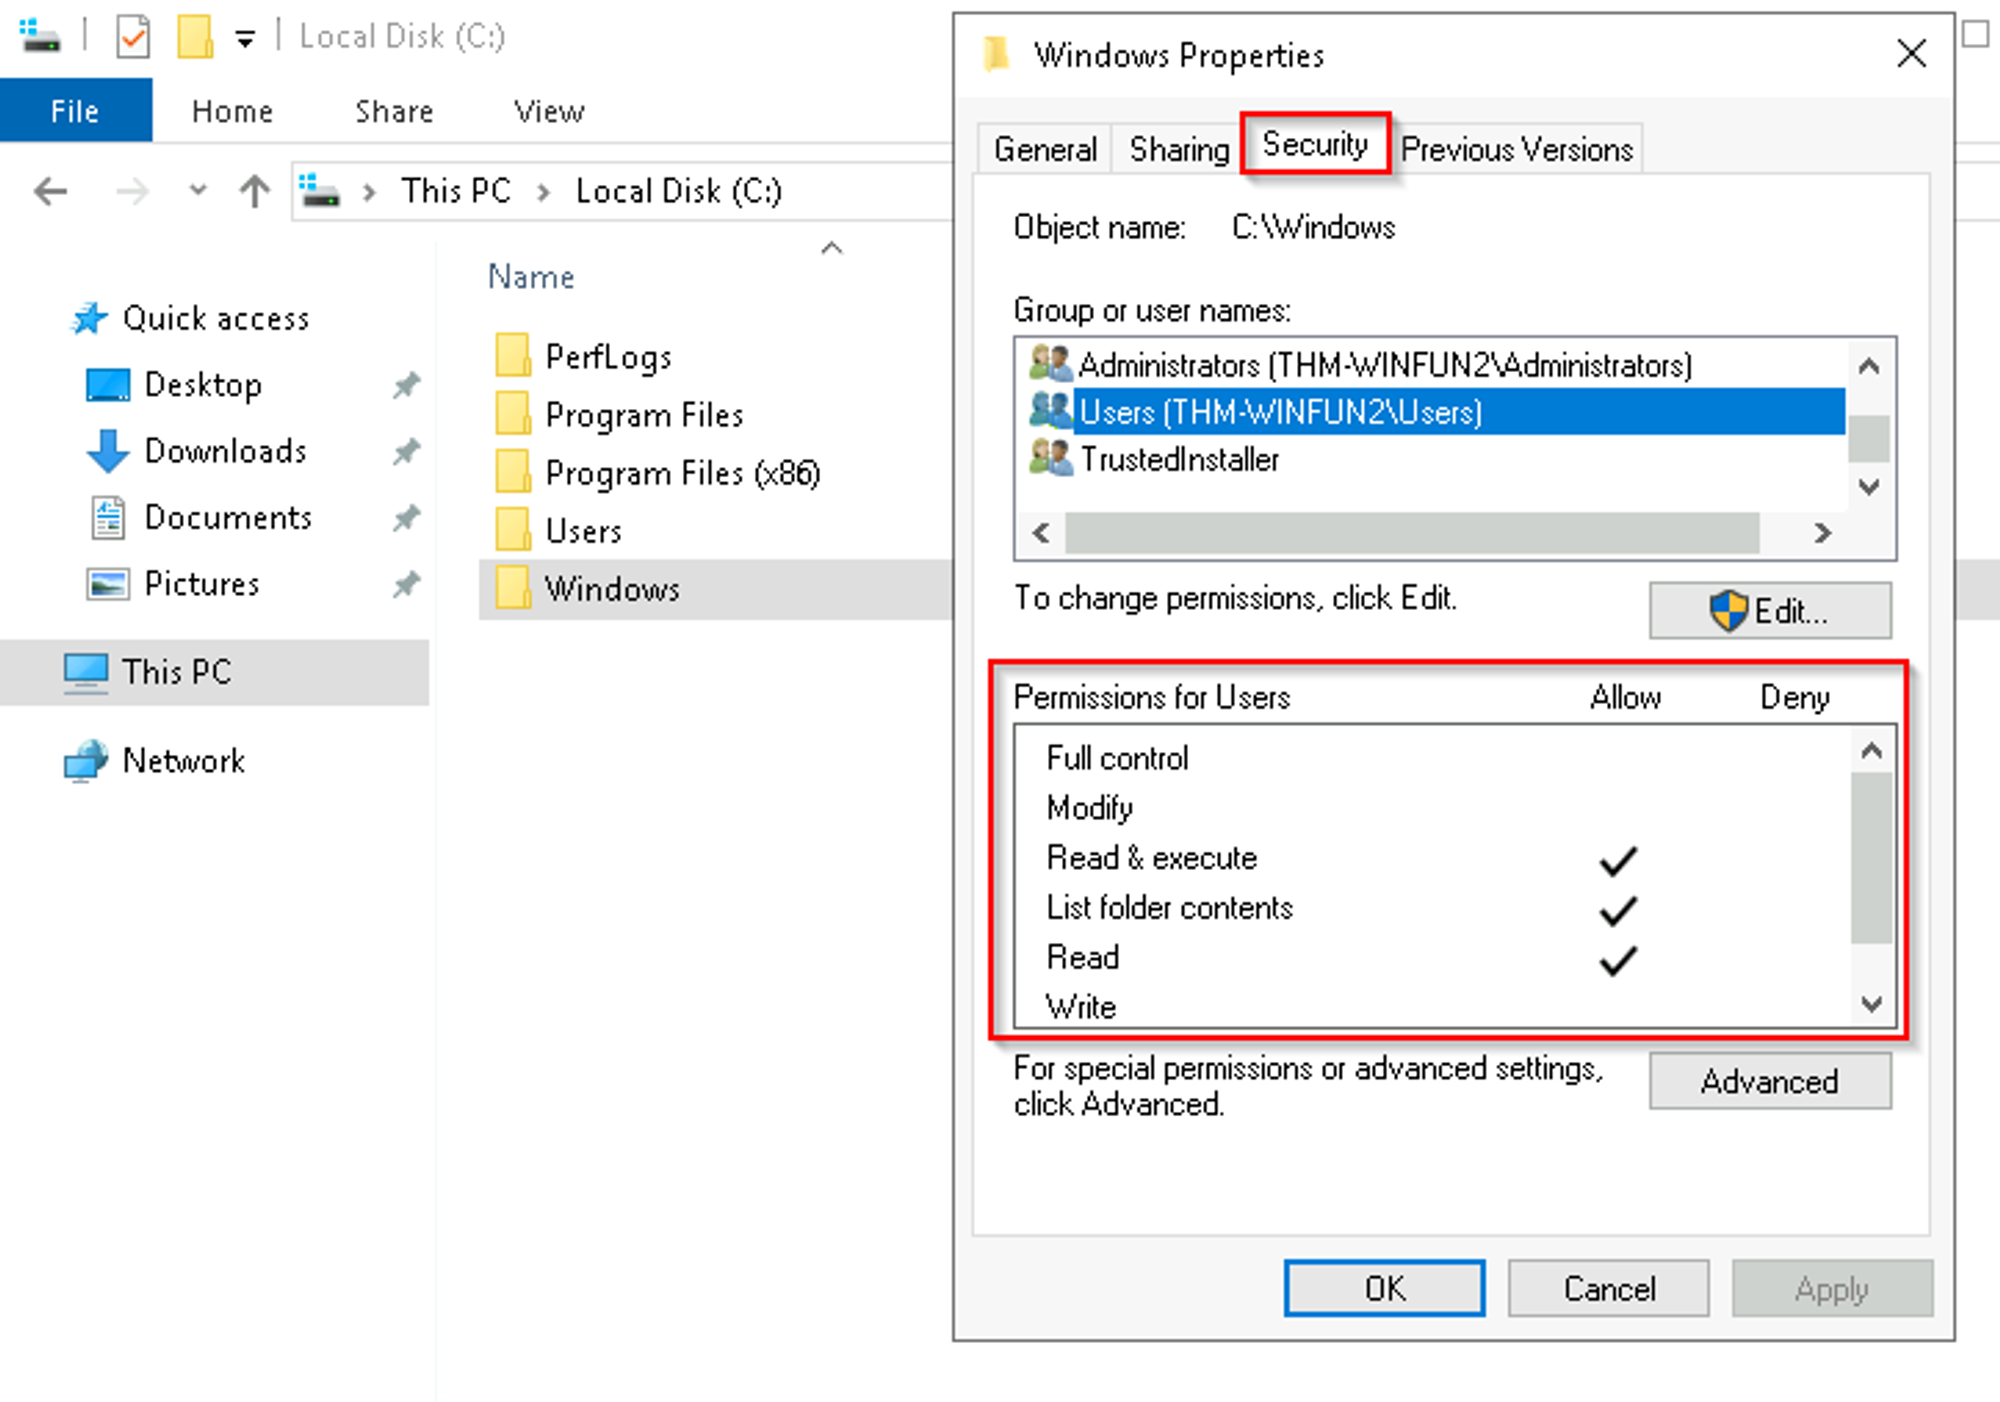
How can you view the permissions for a file or folder?
- Right-click the file or folder you want to check for permissions.
- From the context menu, select
Properties. - Within Properties, click on the
Securitytab. - In the
Group or user nameslist, select the user, computer, or group whose permissions you want to view.
In the below image, you can see the permissions for the Users group for the Windows folder.
Refer to the Microsoft documentation to get a better understanding of the NTFS permissions for Special Permissions.
Another feature of NTFS is Alternate Data Streams (ADS).
Alternate Data Streams (ADS) is a file attribute specific to Windows NTFS (New Technology File System).
Every file has at least one data stream ($DATA), and ADS allows files to contain more than one stream of data. Natively Window Explorer doesn’t display ADS to the user. There are 3rd party executables that can be used to view this data, but PowerShell gives you the ability to view ADS for files.
From a security perspective, malware writers have used ADS to hide data.
Not all its uses are malicious. For example, when you download a file from the Internet, there are identifiers written to ADS to identify that the file was downloaded from the Internet.
To learn more about ADS, refer to the following link from MalwareBytes here.
| [Introduction to Alternate Data Streams | Malwarebytes Labs](https://blog.malwarebytes.com/101/2015/07/introduction-to-alternate-data-streams/) |
Went through the link, seemed really interesting. Let me just do it here.
Alternate Data Streams (ADS) are a file attribute only found on the NTFS file system.
In this system a file is built up from a couple of attributes, one of them is $Data, aka the data attribute. Looking at the regular data stream of a text file there is no mystery. It simply contains the text inside the text file. But that is only the primary data stream.
This one is sometimes referred to as the unnamed data stream since the name string of this attribute is empty ( “” ) . So any data stream that has a name is considered alternate.
These data streams suffer from a bad reputation since they have been used and abused to write hidden data. Varying from data about where a file came from to complete malware files (e.g. Backdoor.Rustock.A)
If you are up for an experiment, we can easily create and read an alternate data stream.
Streams
The first tool you can use was developed by Sysinternals (later bought by Microsoft) and is called Streams .
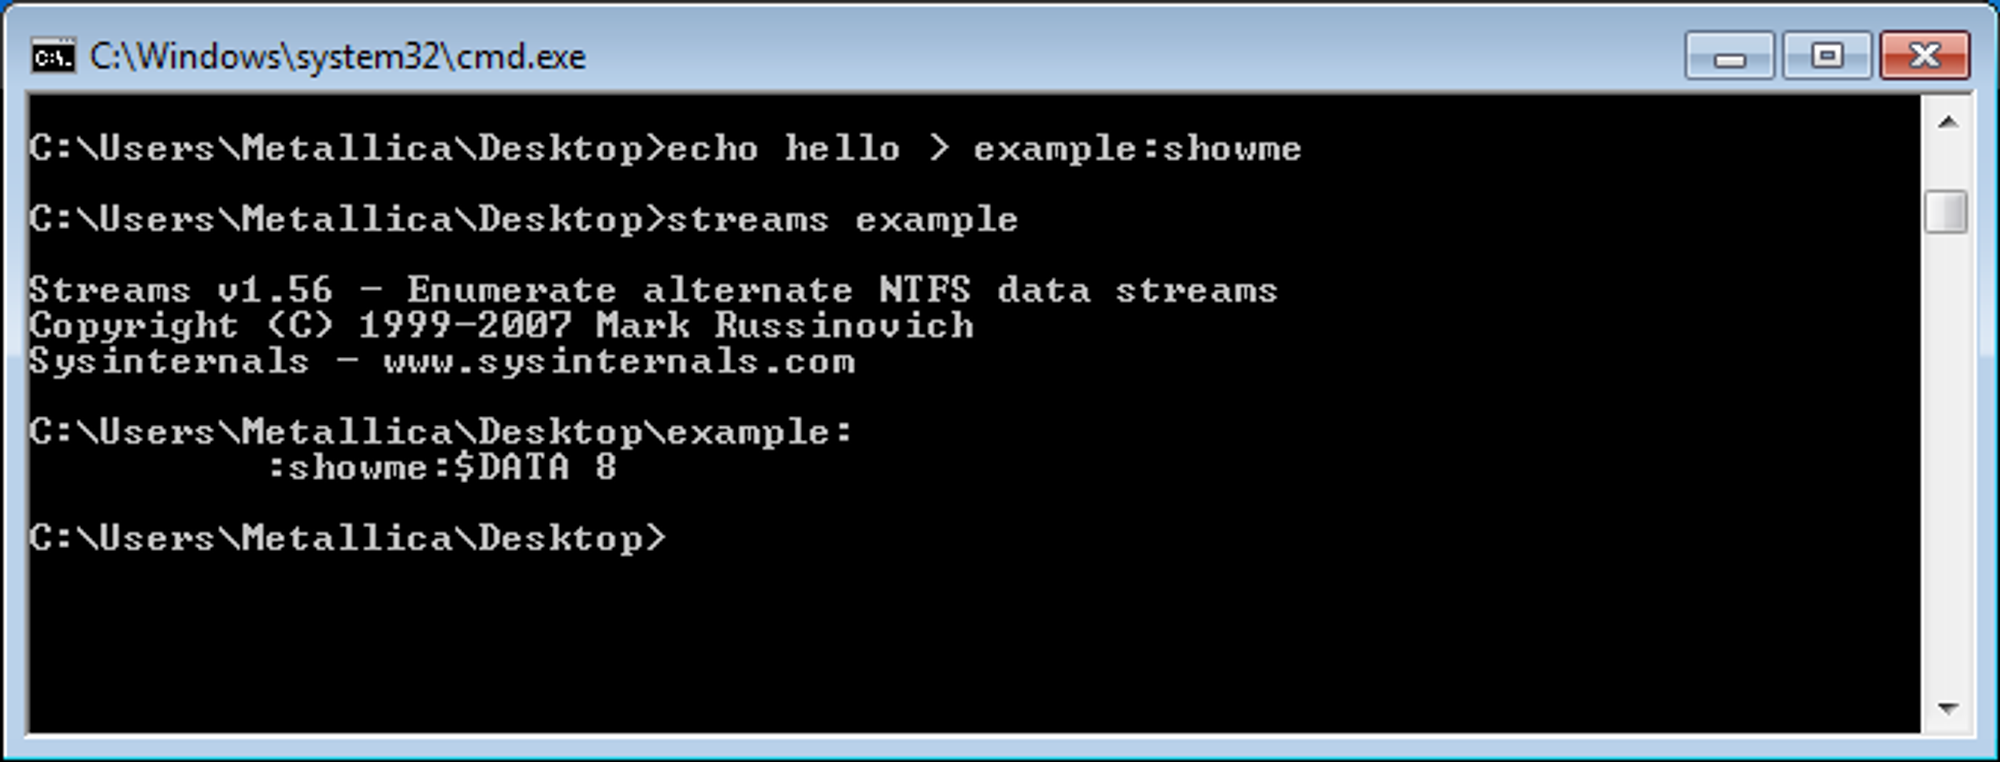
In the example above we used the echo command to create an empty file called example with an alternate data stream called showme.
By using streams we can check which files have alternate data-streams. In the results visible in the above command prompt, $Data is the name of the attribute (as discussed earlier) and the 8 tells us the size.
But since we are looking at it, we obviously would like to see what is inside the alternate data streams. Unfortunately, streams do not offer that option.
Get-Item
If you are using Windows 8 (or newer) there is a built-in option to read ADS. You can use PowerShell commands to achieve this. For those that have no experience with it, you can start it by typing PowerShell in the Run box (Windows key + R) and follow the lines in this screenshot.

Set-item
Another thing that you can do with Powershell is add streams to a file. The Powershell command syntax is:
1
set-content - path {path to the file} - stream {name of the stream}
Doing so will initiate a cmdlet where you can enter the content of the stream under Value[i]

Search for ADS
If you want to search a directory or drive for ADS you can use this command in the root of the target:
1
gci -recurse | % { gi $_.FullName -stream * } | where stream -ne ':$Data'

Be warned that if you include the Windows directory in your search you will likely receive an enormous list.
Remove ADS
A word of warning here. Removing ADS is not always advisable. Some of them are needed for the proper use of the software that created the streams. So make sure you have done your research before removing them. The syntax is:
1
remove-item –path {path to the file} –stream {name of the stream}
Malwarebytes Anti-Malware scans for and removes unwanted ADS (as Rootkit.ADS). Some Ad going on here LOL.
Summary
Alternate Data Streams (ADS) have been given a bad reputation because their capability to hide data from us on our own computer, has been abused by malware writers in the past. Hopefully this article will clear up some of the questions and mystique you had about ADS.
The Windows folder (C:\Windows) is traditionally known as the folder which contains the Windows operating system.
The folder doesn’t have to reside in the C drive necessarily. It can reside in any other drive and technically can reside in a different folder.
This is where environment variables, more specifically system environment variables, come into play. Even though not discussed yet, the system environment variable for the Windows directory is %windir%.
Per Microsoft, “Environment variables store information about the operating system environment. This information includes details such as the operating system path, the number of processors used by the operating system, and the location of temporary folders”.
One of the many folders is System32.
The System32 folder holds the important files that are critical for the operating system.
You should proceed with extreme caution when interacting with this folder. Accidentally deleting any files or folders within System32 can render the Windows OS in-operational. Read more about this action here.
What is the System32 Directory? (and Why You Shouldn’t Delete It)

Way to get the first meme in the blog haha.
We have covered a decent amount of concepts over here, if you are reading this, know that you are focused and one of the very few to travel this far into the journey. Let’s continue partner,
MSConfig
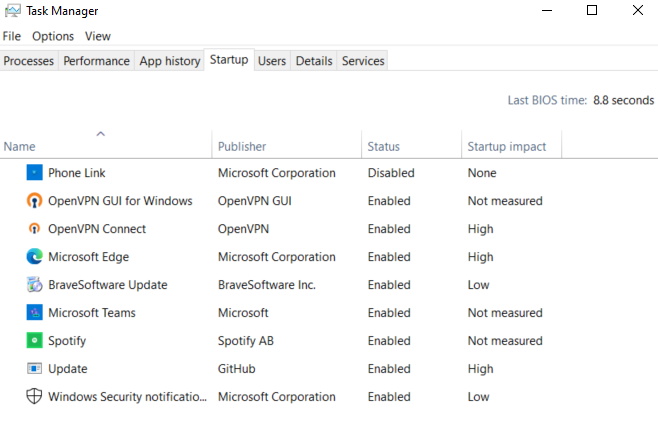
The System Configuration utility (MSConfig) is for advanced troubleshooting, and its main purpose is to help diagnose startup issues.
Reference the following document here for more information on the System Configuration utility.
use the System Configuration utility - Windows Client
The Computer Management (compmgmt) **utility has three primary sections: System Tools, Storage, and Services and Applications. Usage is compmgmt.msc from the **Run dialog box.
WMI Control configures and controls the Windows Management Instrumentation (WMI) service.
Per Wikipedia, “WMI allows scripting languages (such as VBScript or Windows PowerShell) to manage Microsoft Windows personal computers and servers, both locally and remotely. Microsoft also provides a command-line interface to WMI called Windows Management Instrumentation Command-line (WMIC).”
Note: The WMIC tool is deprecated in Windows 10, version 21H1. Windows PowerShell supersedes this tool for WMI.
We’re continuing with Tools that are available through the System Configuration panel.
What is the System Information (msinfo32) tool?
Per Microsoft, “Windows includes a tool called Microsoft System Information (Msinfo32.exe). This tool gathers information about your computer and displays a comprehensive view of your hardware, system components, and software environment, which you can use to diagnose computer issues.”
Usage is msinfo32.exe from the Run dialog box.
The information in System Summary is divided into three sections:
- Hardware Resources
- Components
- Software Environment
System Summary will display general technical specifications for the computer, such as processor brand and model.
We’re continuing with Tools that are available through the System Configuration panel.
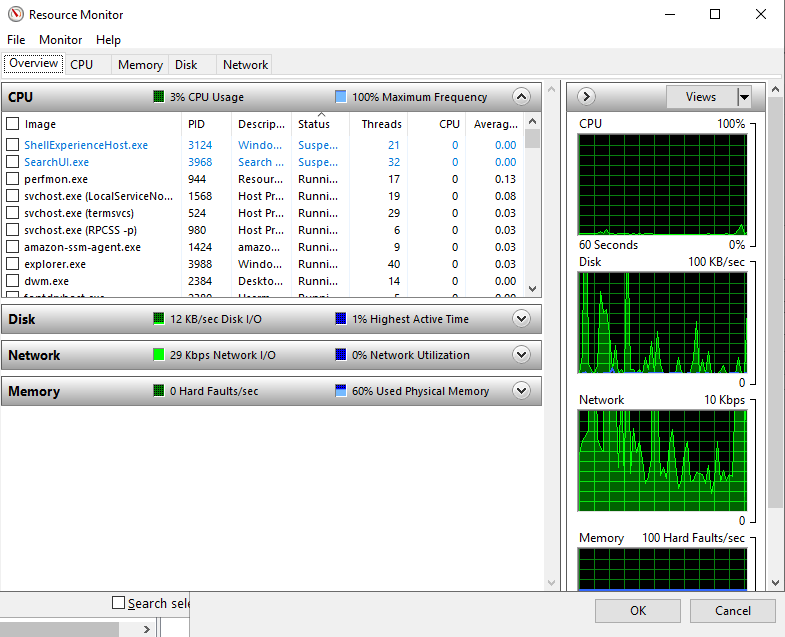
What is Resource Monitor (resmon)?
Per Microsoft, “Resource Monitor displays per-process and aggregate CPU, memory, disk, and network usage information, in addition to providing details about which processes are using individual file handles and modules. Advanced filtering allows users to isolate the data related to one or more processes (either applications or services), start, stop, pause, and resume services, and close unresponsive applications from the user interface. It also includes a process analysis feature that can help identify deadlocked processes and file locking conflicts so that the user can attempt to resolve the conflict instead of closing an application and potentially losing data.”
As some of the other tools mentioned in this room, this utility is geared primarily to advanced users who need to perform advanced troubleshooting on the computer system.
In the Overview tab, Resmon has four sections:
- CPU
- Disk
- Network
- Memory
The Windows Registry (per Microsoft) is a central hierarchical database used to store information necessary to configure the system for one or more users, applications, and hardware devices.
The registry contains information that Windows continually references during operation, such as:
- Profiles for each user
- Applications installed on the computer and the types of documents that each can create
- Property sheet settings for folders and application icons
- What hardware exists on the system
- The ports that are being used.
Warning: The registry is for advanced computer users. Making changes to the registry can affect normal computer operations.
There are various ways to view/edit the registry. One way is to use the Registry Editor (regedit).
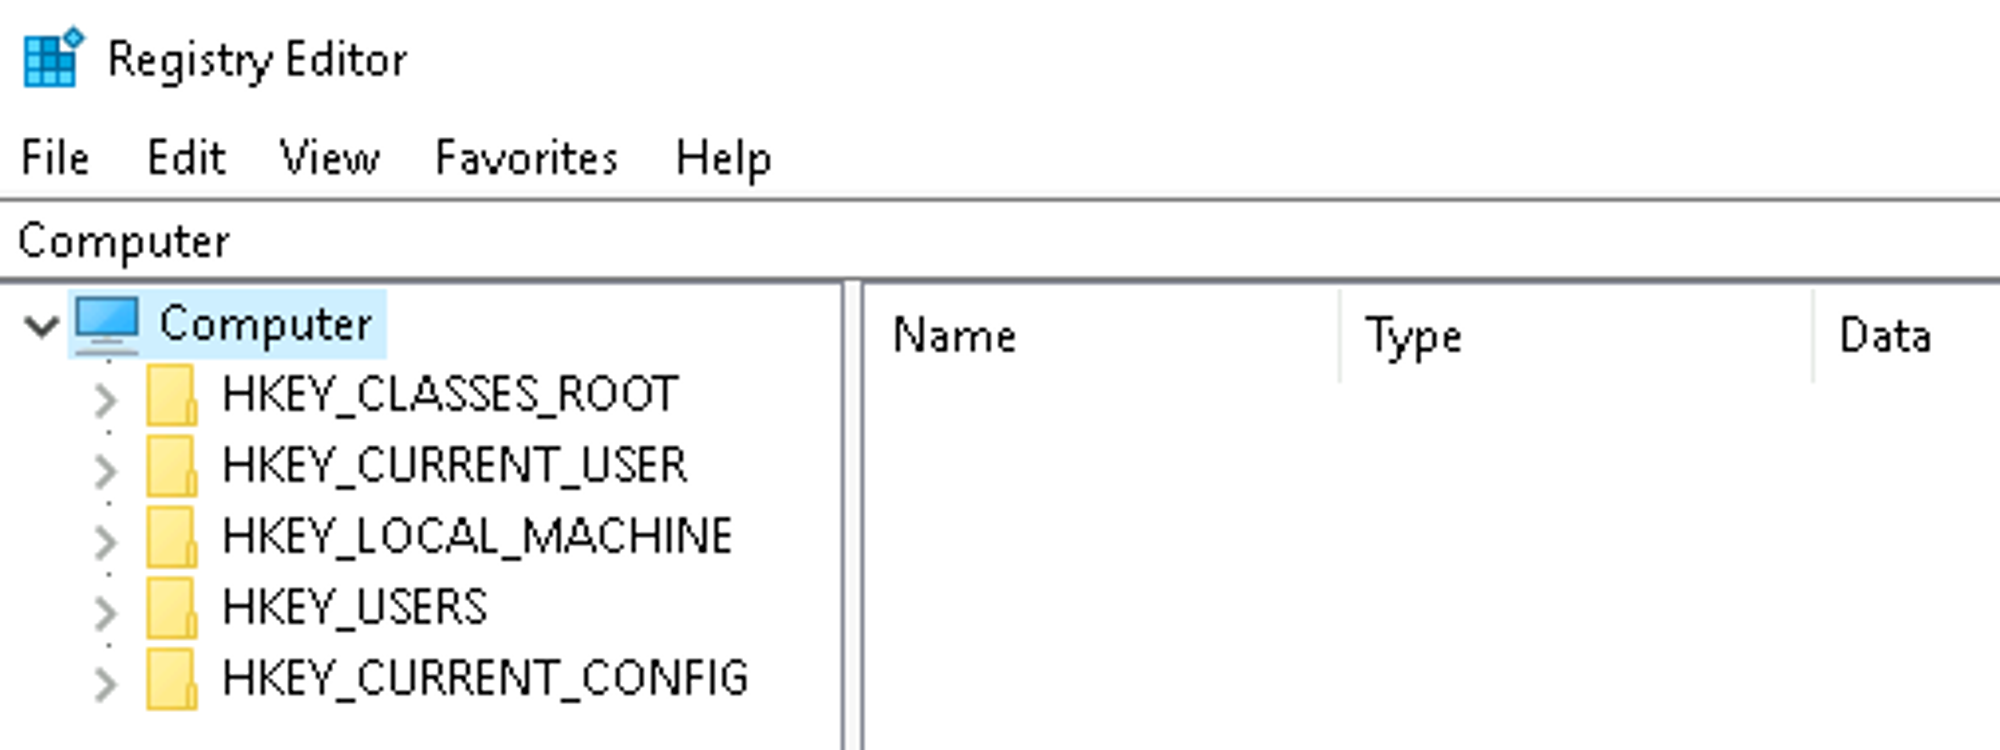
Usage is regedt32.exe or just regedit is fine from the Run dialog box.
And lastly before we move from MSConfig, here’s an ending note.

Just saw this another one, it’s so relatable ahaha.

But not everything in the meme, for me the ones that open up are Spotify, Discord, Teams, OpenVPN. Here.
Okay, bit of a distraction there, but let’s keep moving solider.
Let’s start things off with Windows Update.
Windows Update is a service provided by Microsoft to provide security updates, feature enhancements, and patches for the Windows operating system and other Microsoft products, such as Microsoft Defender.
Updates are typically released on the 2nd Tuesday of each month. This day is called Patch Tuesday. That doesn’t necessarily mean that a critical update/patch has to wait for the next Patch Tuesday to be released. If the update is urgent, then Microsoft will push the update via the Windows Update service to the Windows devices.
Tip: Another way to access Windows Update is from the Run dialog box, or CMD, by running the command control /name Microsoft.WindowsUpdate. Though, no one in their right mind actually use this LOL.
Here comes a big one,
What is a firewall?
Per Microsoft, “Traffic flows into and out of devices via what we call ports. A firewall is what controls what is - and more importantly isn’t - allowed to pass through those ports. You can think of it like a security guard standing at the door, checking the ID of everything that tries to enter or exit”.
The below image will reflect what you will see when you navigate to Firewall & network protection.
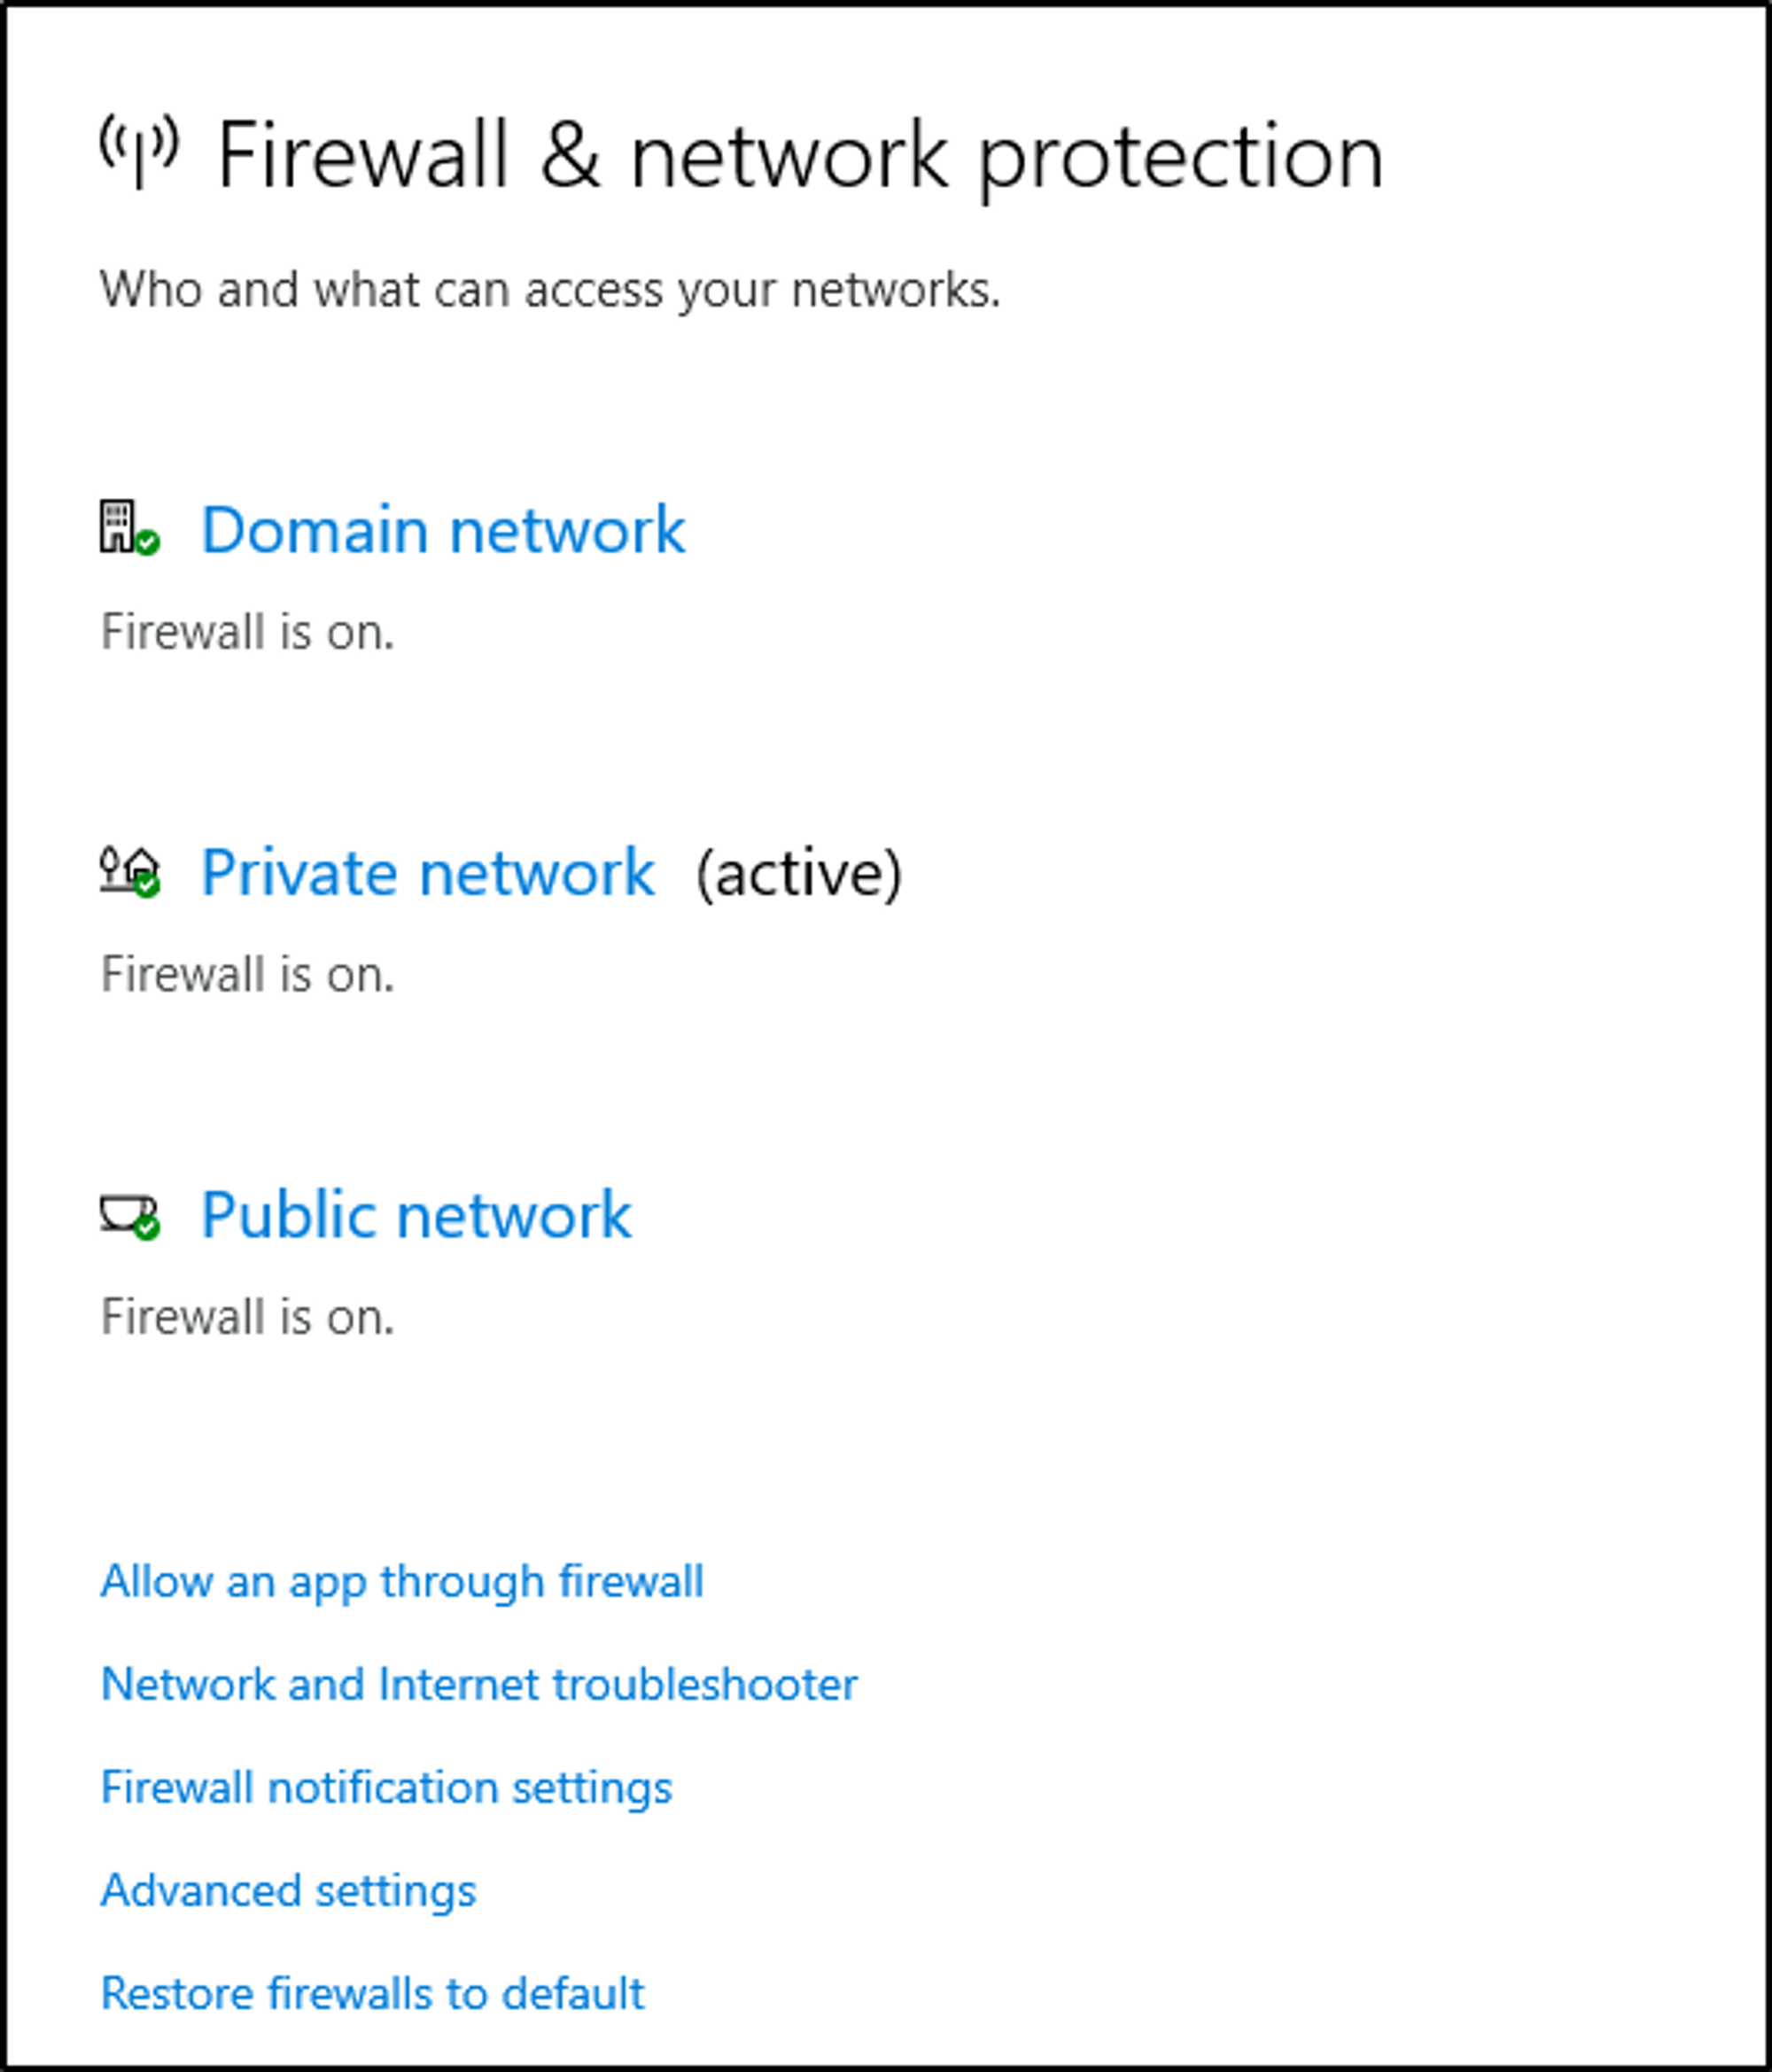
Note: Each network may have different status icons for you.
What is the difference between the 3 (Domain, Private, and Public)?
Per Microsoft, “Windows Firewall offers three firewall profiles: domain, private and public”.
- Domain - The domain profile applies to networks where the host system can authenticate to a domain controller.
- Private - The private profile is a user-assigned profile and is used to designate private or home networks.
- Public - The default profile is the public profile, used to designate public networks such as Wi-Fi hotspots at coffee shops, airports, and other locations.
If you click on any firewall profile, another screen will appear with two options: turn the firewall on/off and block all incoming connections.
Warning: Unless you are 100% confident in what you are doing, it is recommended that you leave your Windows Defender Firewall enabled.
Allow an app through firewall

You can view what the current settings for any firewall profile are. In the above image, several apps have access in the Private and/or Public firewall profile. Some of the apps will provide additional information if it’s available via the Details button.
Advanced Settings
Tip: Command to open the Windows Defender Firewall is WF.msc.
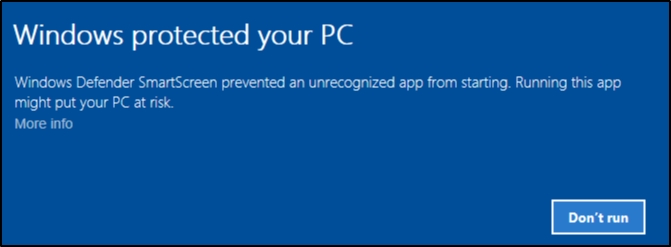
Check apps and files
- Windows Defender SmartScreen helps protect your device by checking for unrecognized apps and files from the web.
Core isolation
- Memory Integrity - Prevents attacks from inserting malicious code into high-security processes.
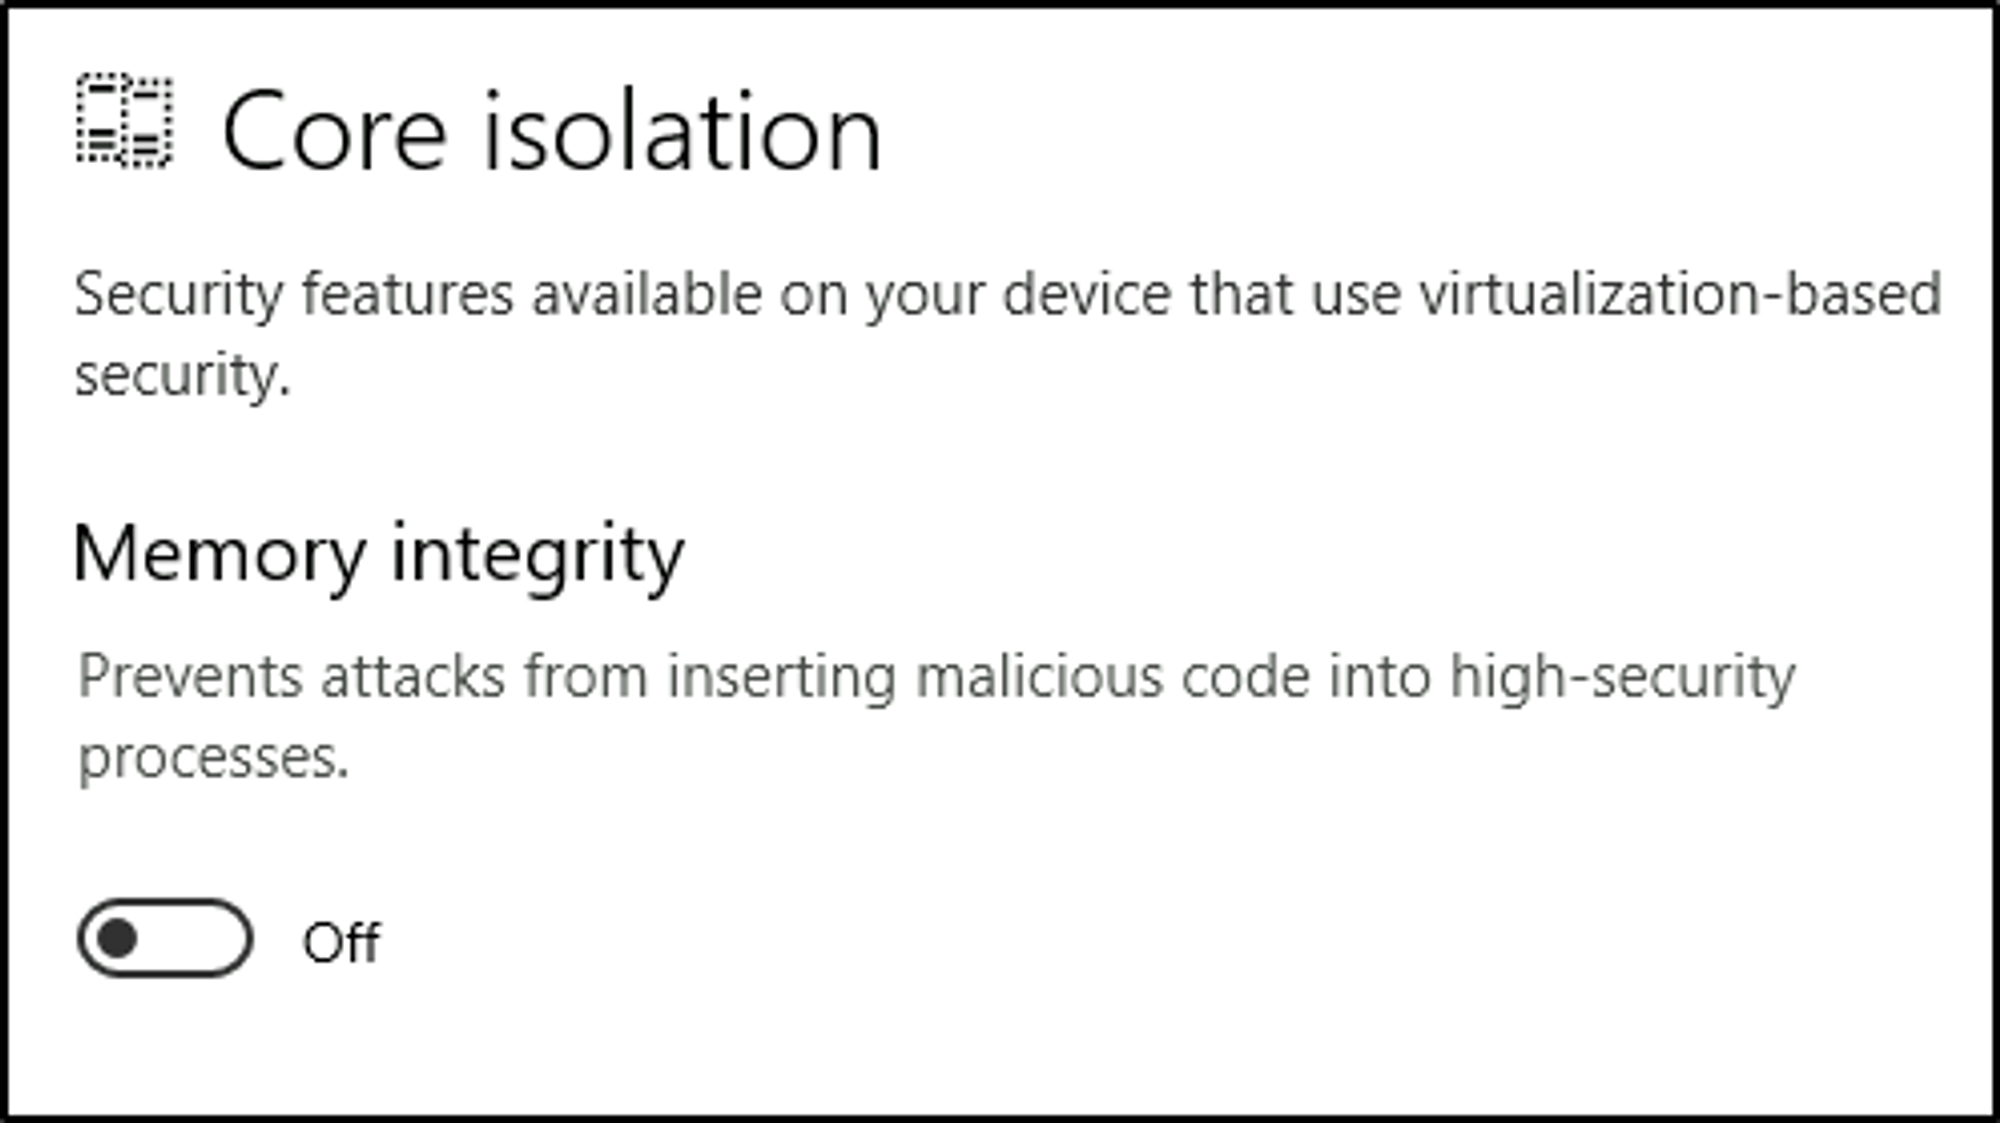
Warning: Unless you are 100% confident in what you are doing, it is recommended that you leave the default settings.
The below images are from another machine to show another security feature that should be available in a personal Windows 10 device.
Security processor
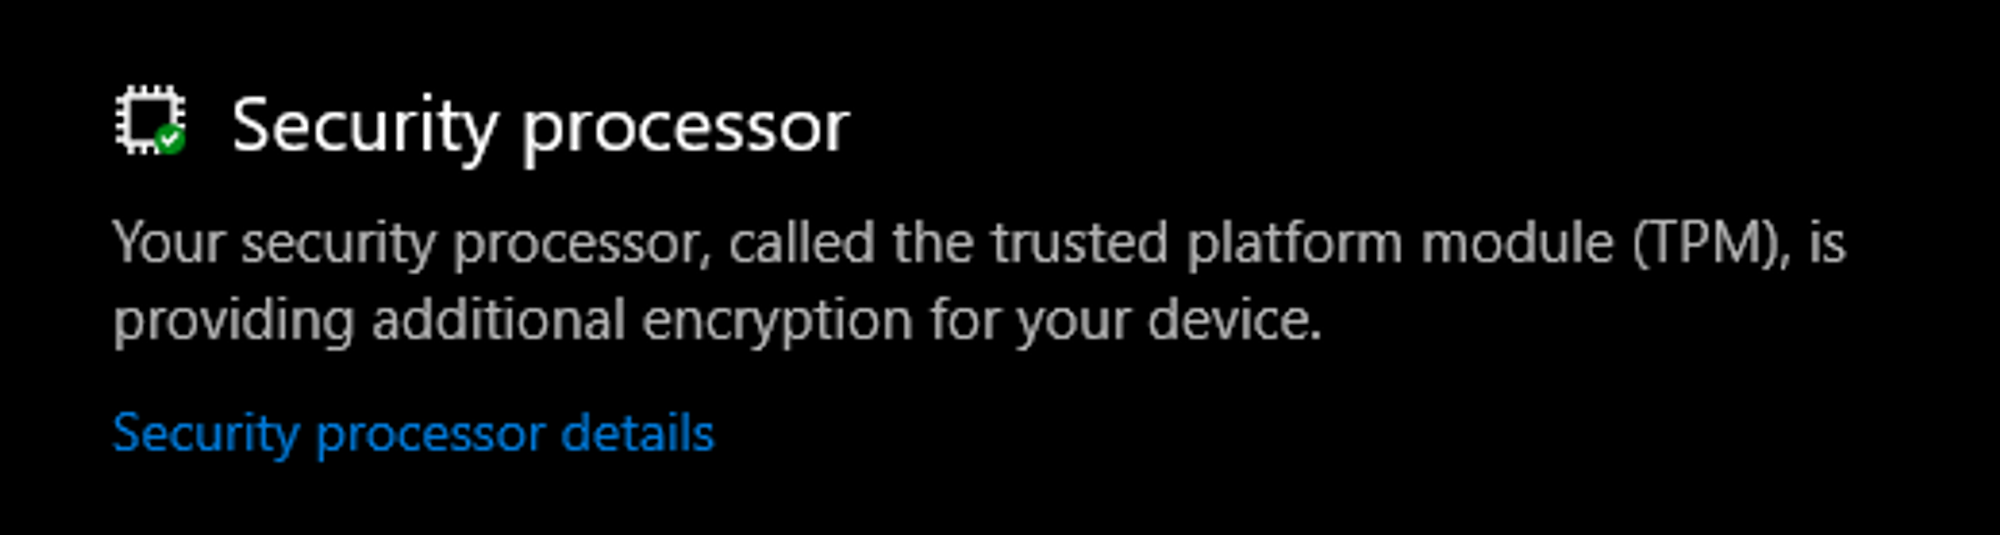
Below are the Security processor details.
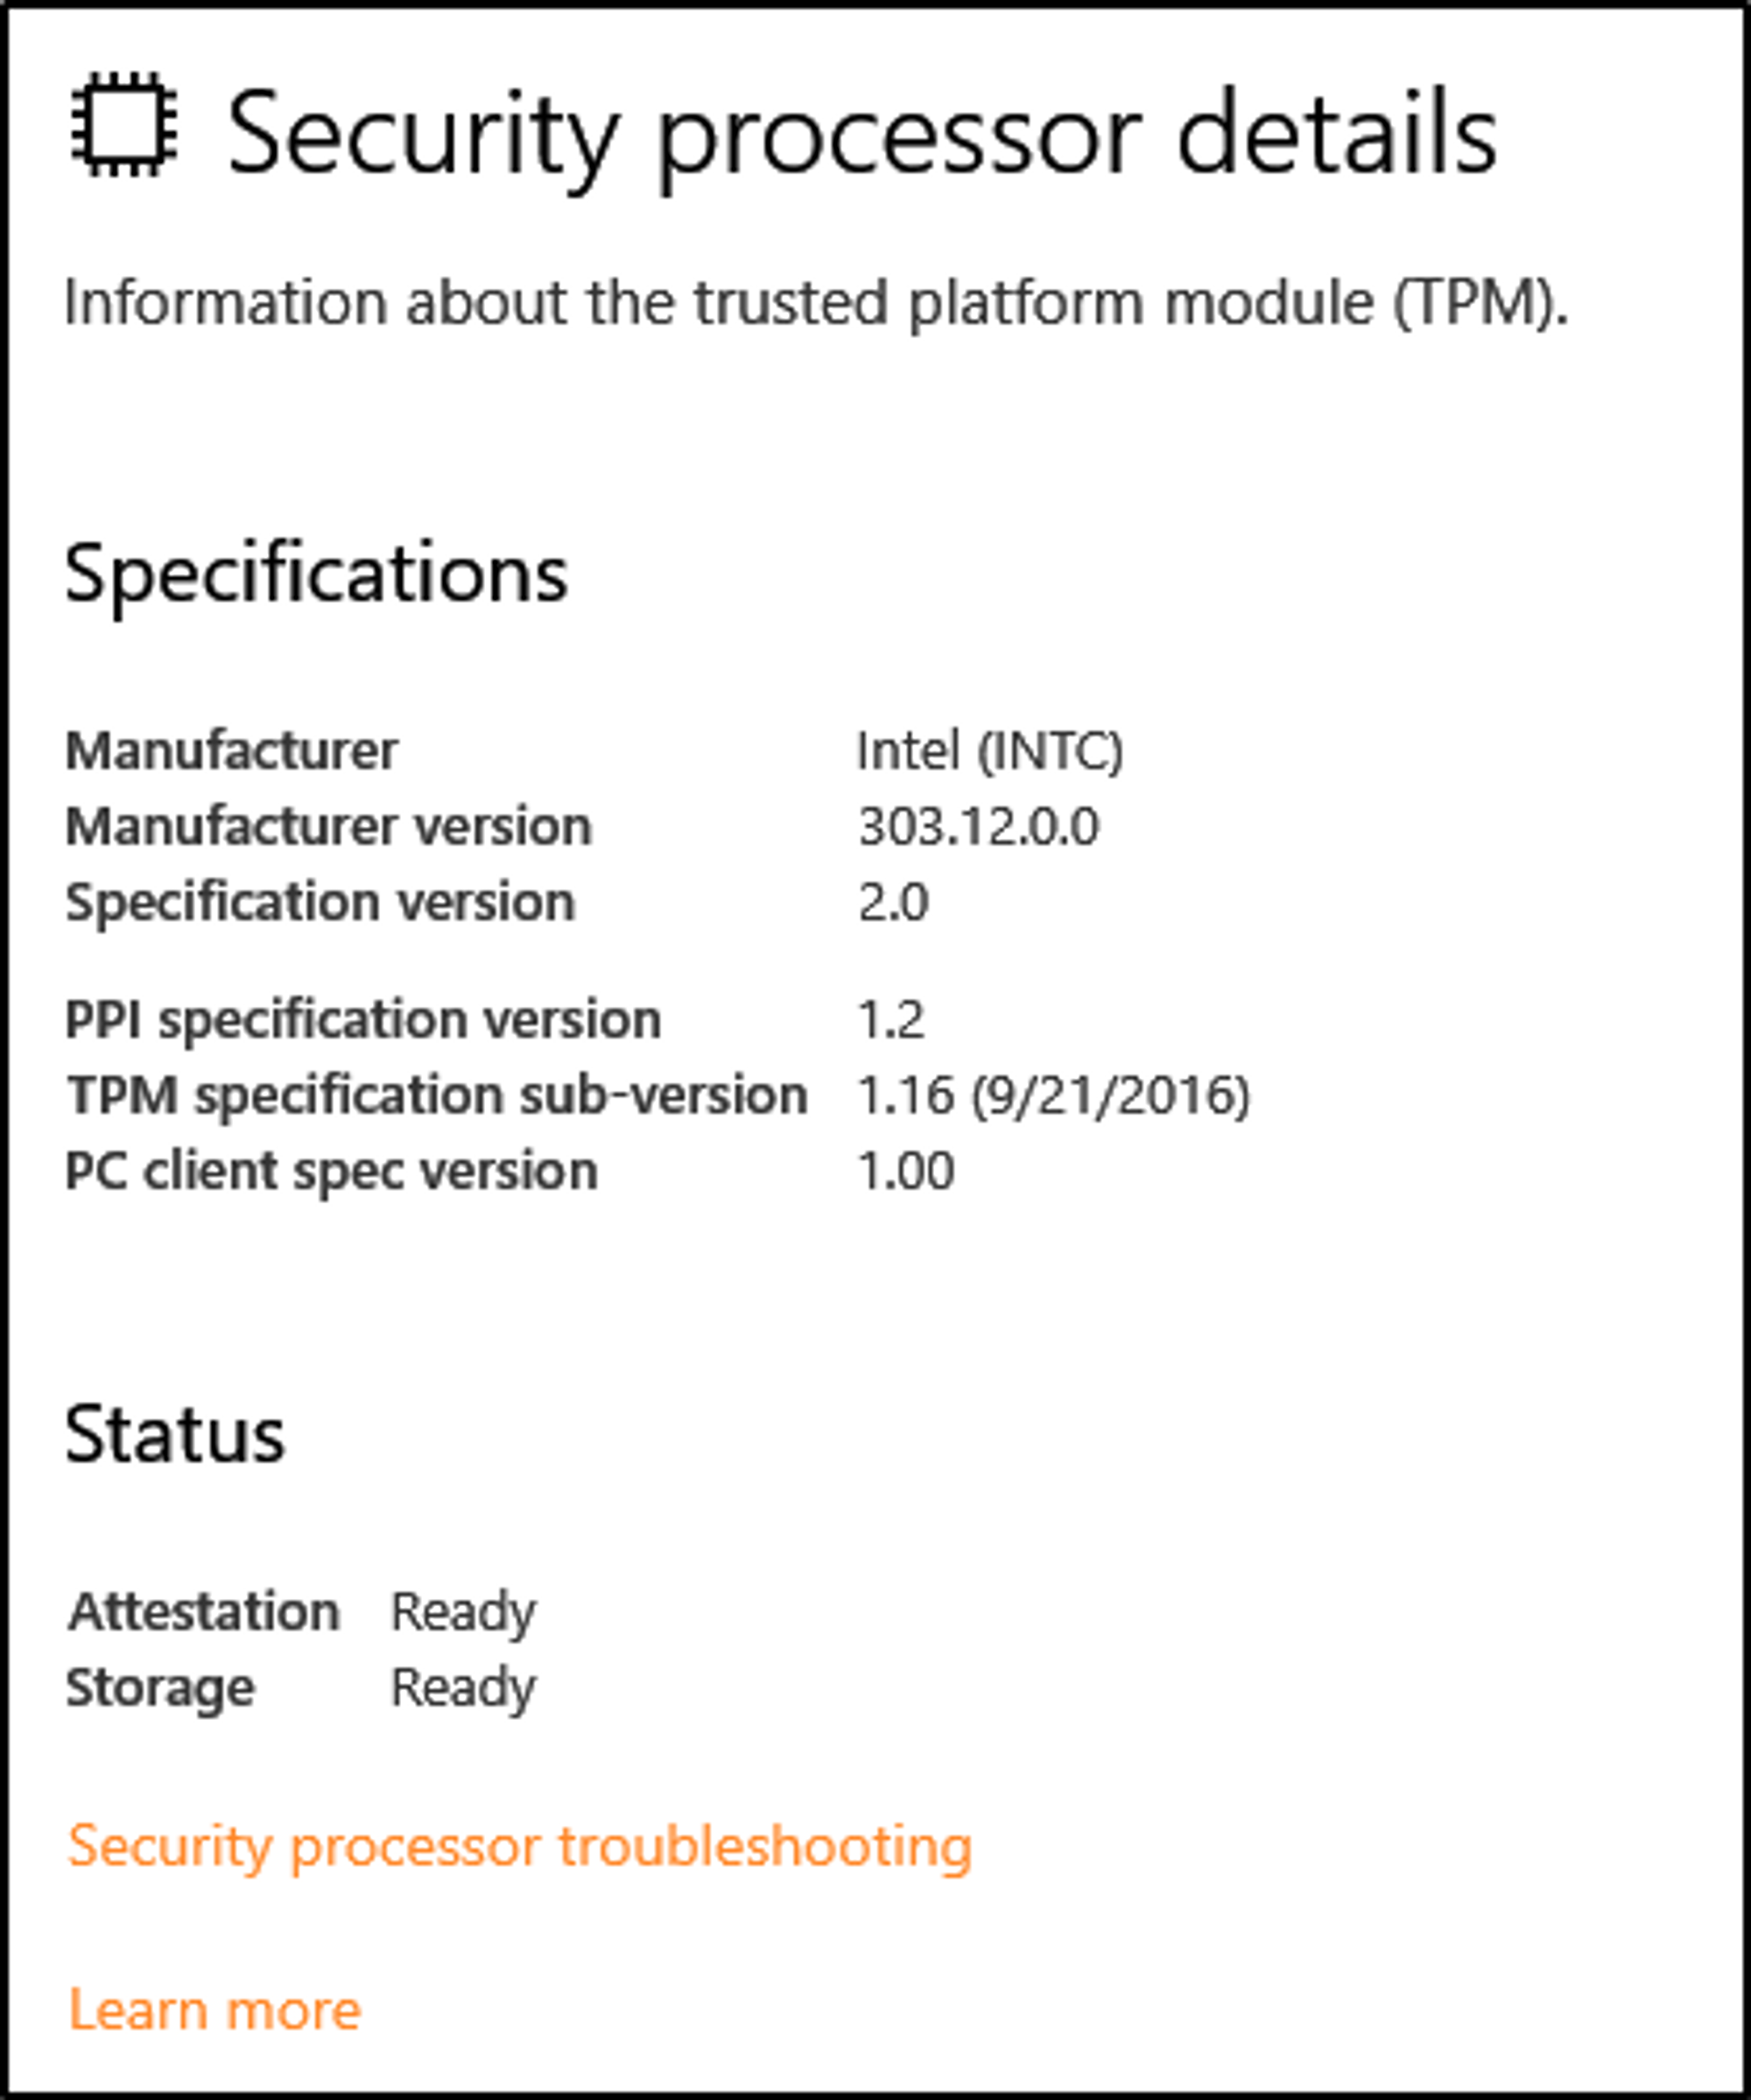
What is the Trusted Platform Module (TPM)?
Per Microsoft, “Trusted Platform Module (TPM) technology is designed to provide hardware-based, security-related functions. A TPM chip is a secure crypto-processor that is designed to carry out cryptographic operations. The chip includes multiple physical security mechanisms to make it tamper-resistant, and malicious software is unable to tamper with the security functions of the TPM”.
What is BitLocker?
Per Microsoft, ”BitLocker Drive Encryption is a data protection feature that integrates with the operating system and addresses the threats of data theft or exposure from lost, stolen, or inappropriately decommissioned computers”.
On devices with TPM installed, BitLocker offers the best protection.
Per Microsoft, ”BitLocker provides the most protection when used with a Trusted Platform Module (TPM) version 1.2 or later. The TPM is a hardware component installed in many newer computers by the computer manufacturers. It works with BitLocker to help protect user data and to ensure that a computer has not been tampered with while the system was offline”.
Refer to the official Microsoft documentation to learn more about BitLocker here.
BitLocker overview - Windows Security
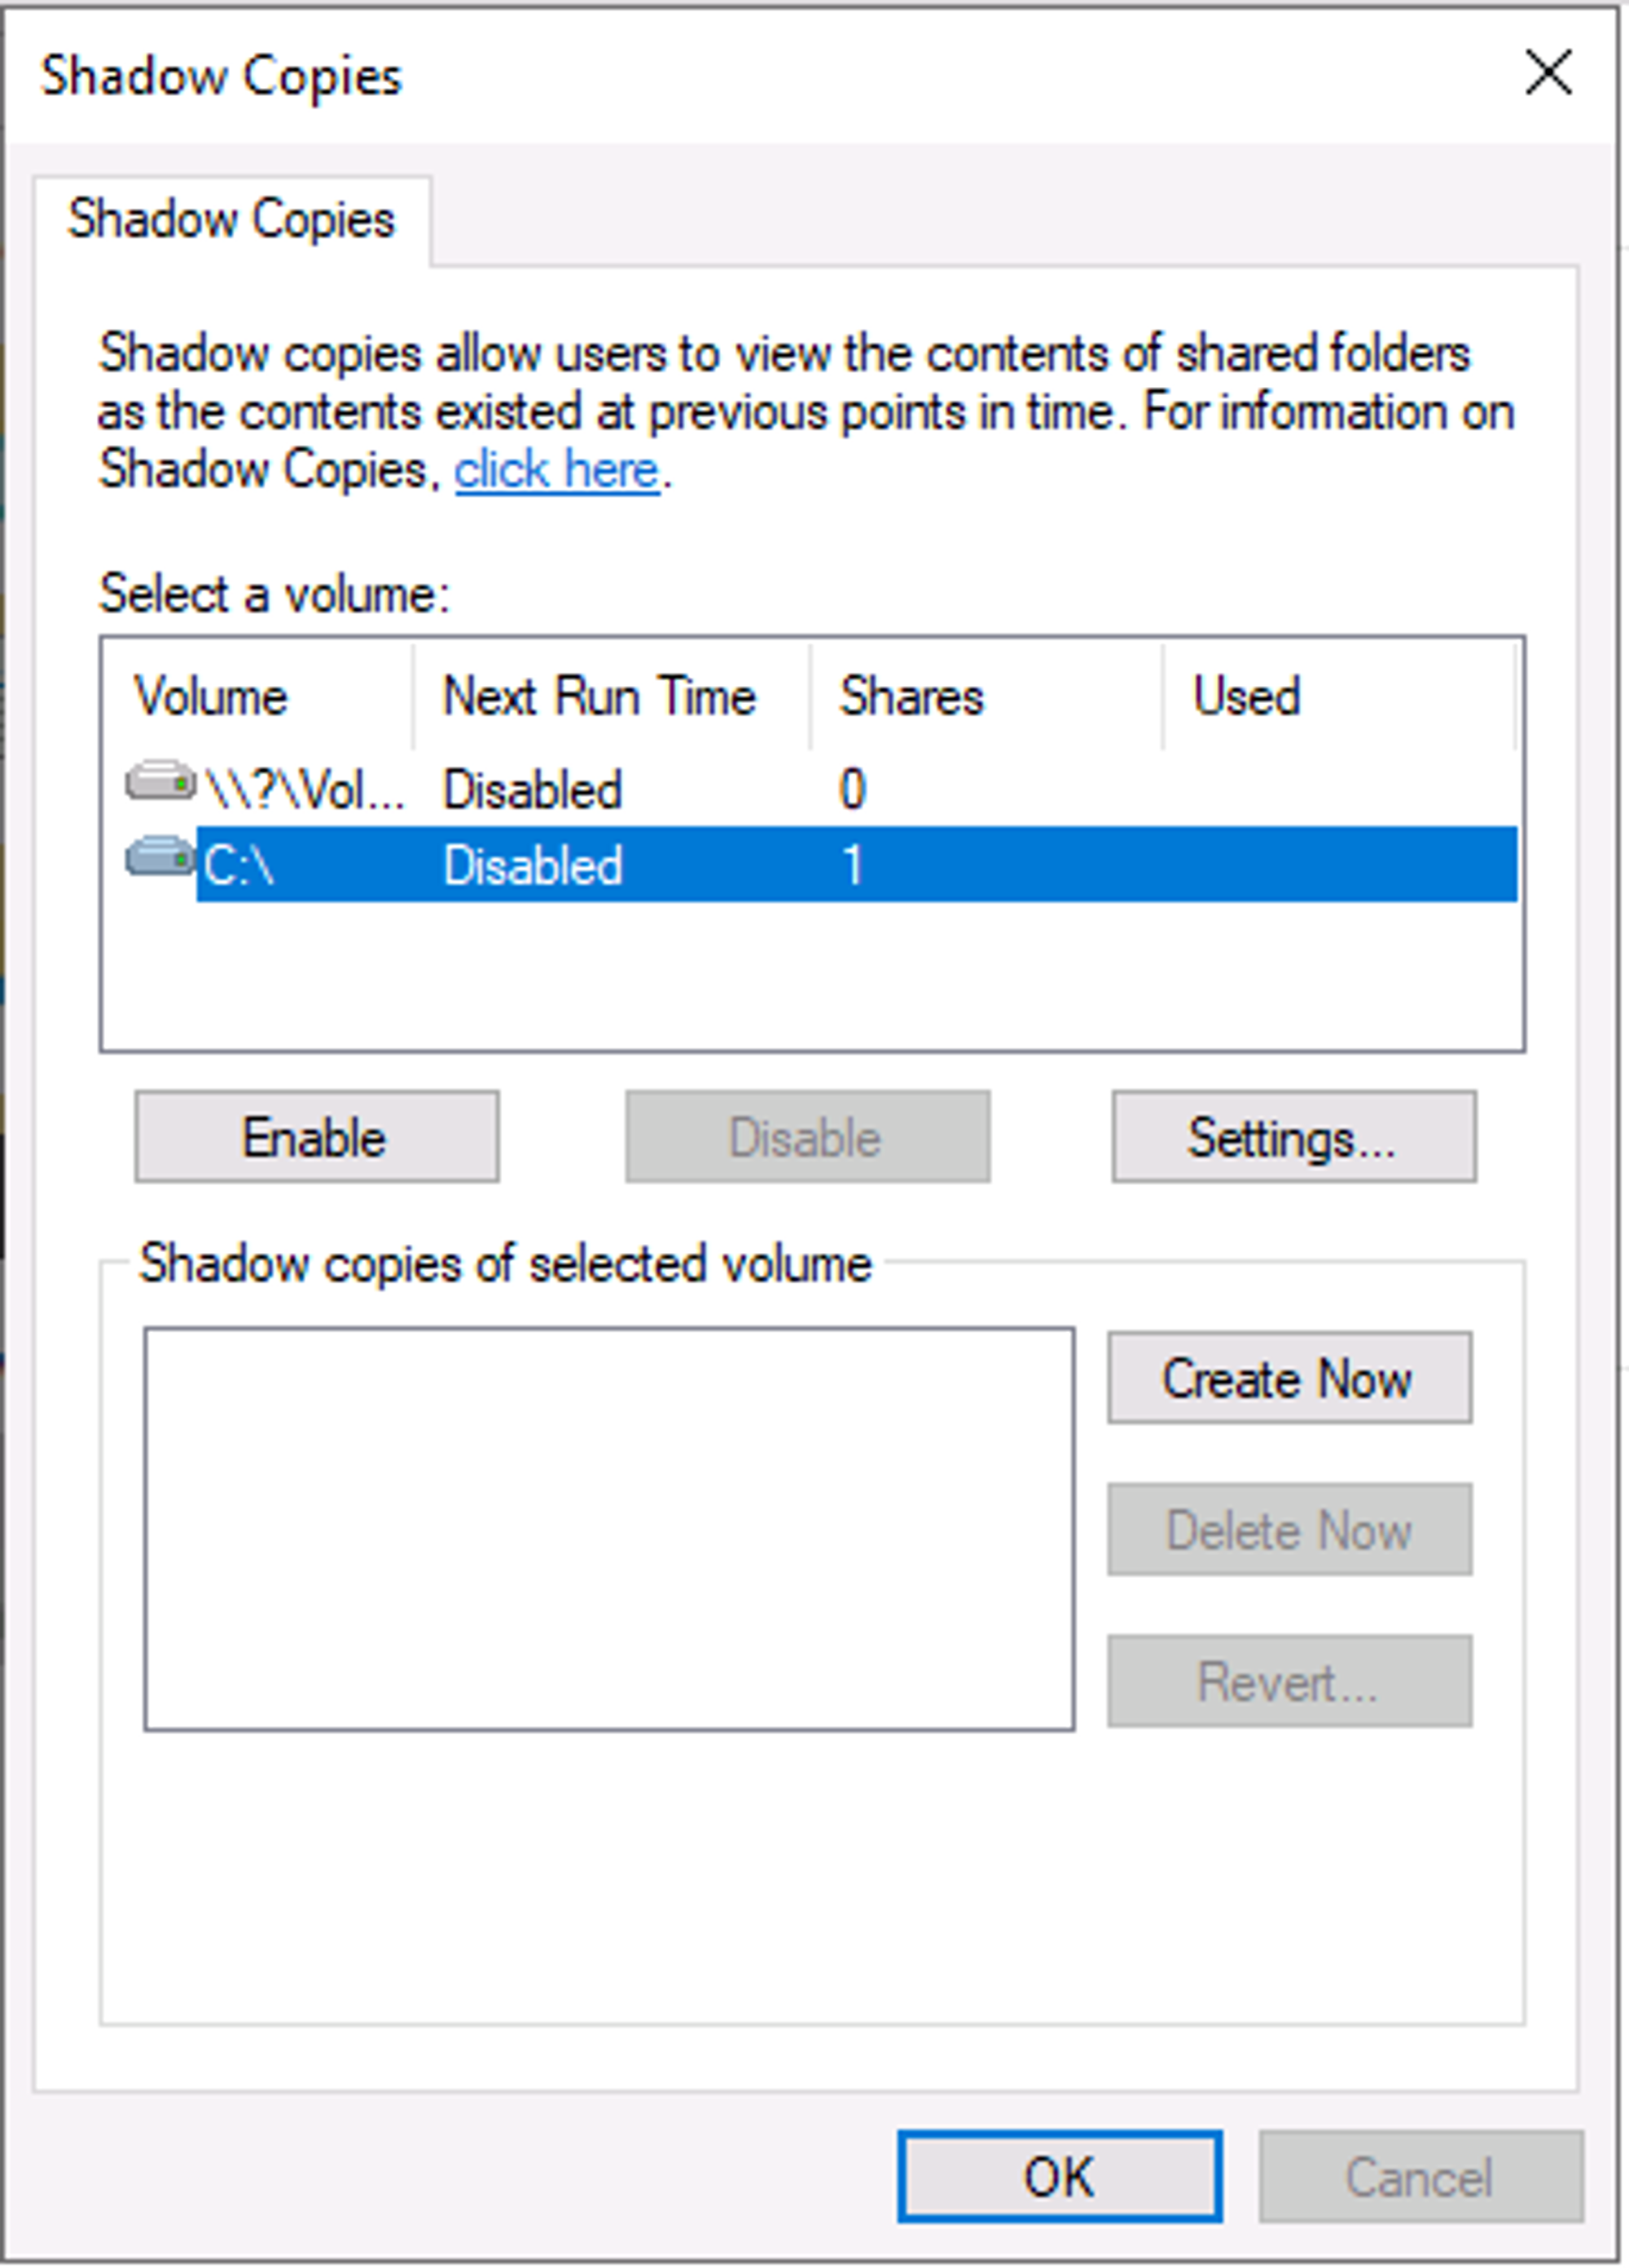
Per Microsoft, the Volume Shadow Copy Service (VSS) coordinates the required actions to create a consistent shadow copy (also known as a snapshot or a point-in-time copy) of the data that is to be backed up.
Volume Shadow Copies are stored on the System Volume Information folder on each drive that has protection enabled.
If VSS is enabled (System Protection turned on), you can perform the following tasks from within advanced system settings.
- Create a restore point
- Perform system restore
- Configure restore settings
- Delete restore points
From a security perspective, malware writers know of this Windows feature and write code in their malware to look for these files and delete them. Doing so makes it impossible to recover from a ransomware attack unless you have an offline/off-site backup.
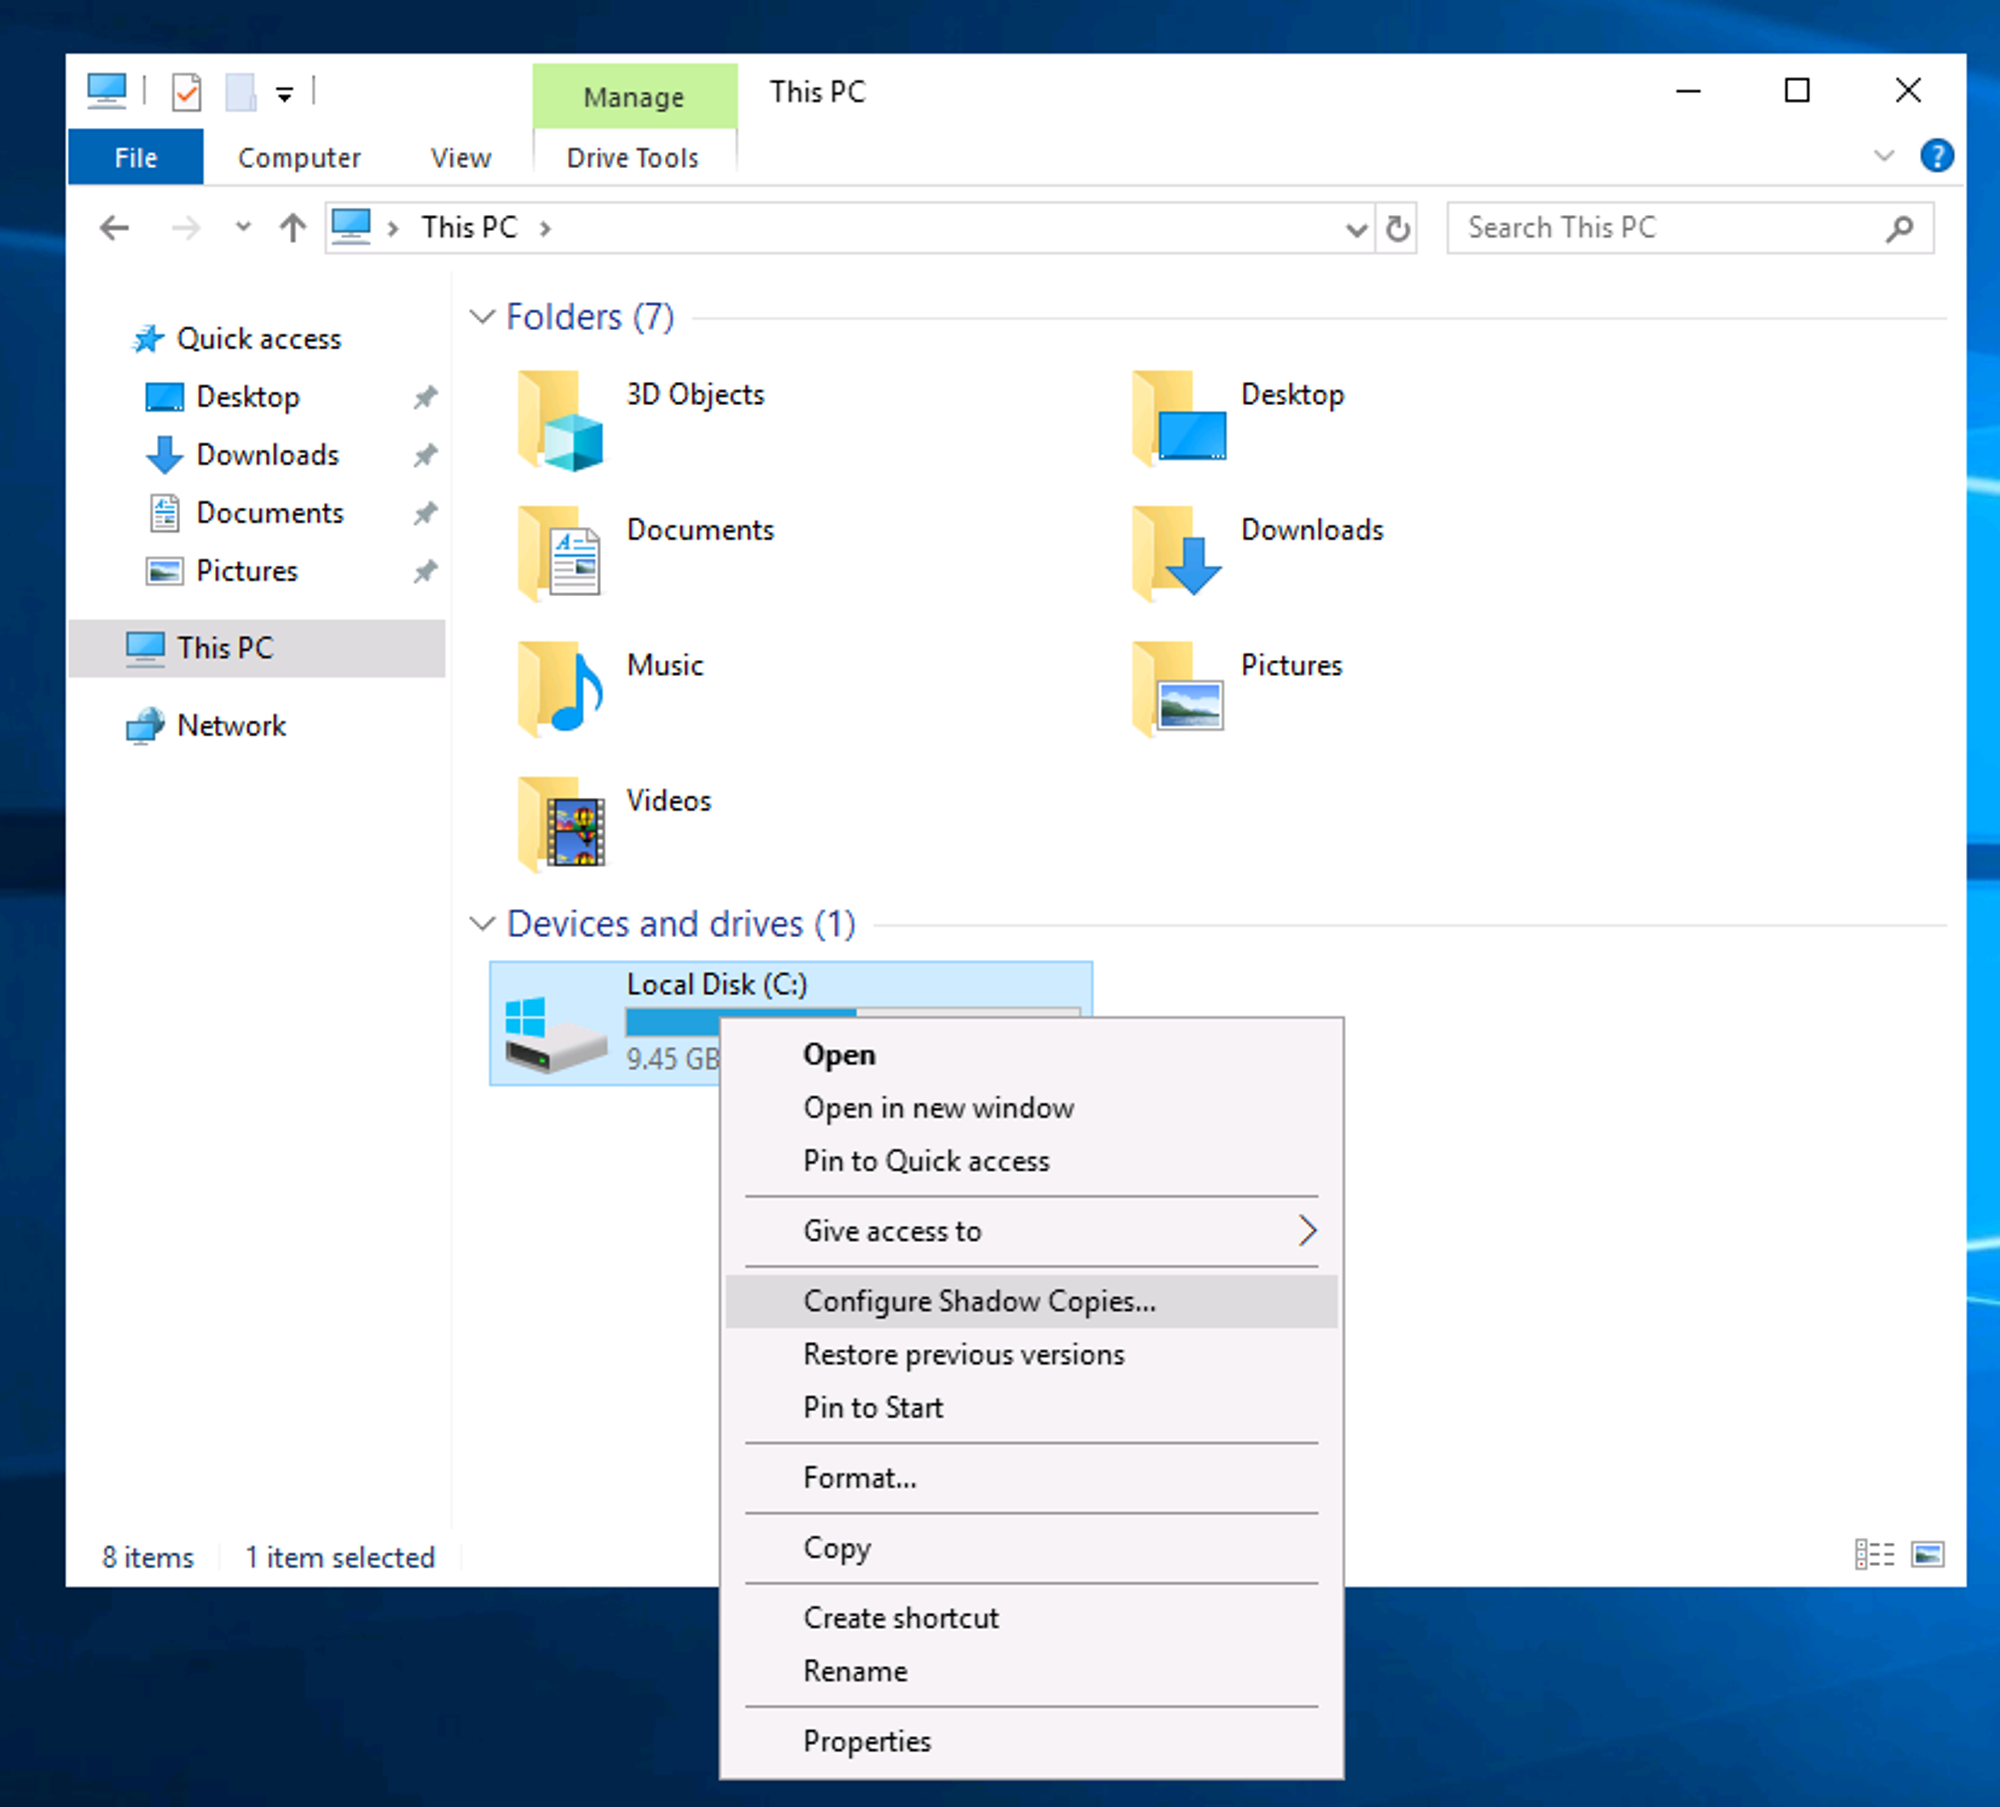
If you wish to configure Shadow Copies within the attached VM, see below.
Bonus: If you wish to interact hands-on with VSS, I suggest exploring Day 23 of Advent of Cyber 2.
Finally,
To learn more about the Windows OS, you’ll need to continue the journey on your own.
Further reading material:
Antimalware Scan Interface (AMSI) - Win32 apps
Configure Credential Guard - Windows Security
Note: Attackers use built-in Windows tools and utilities in an attempt to go undetected within the victim environment. This tactic is known as Living Off The Land. Refer to the following resource here to learn more about this.
Miscellaneous
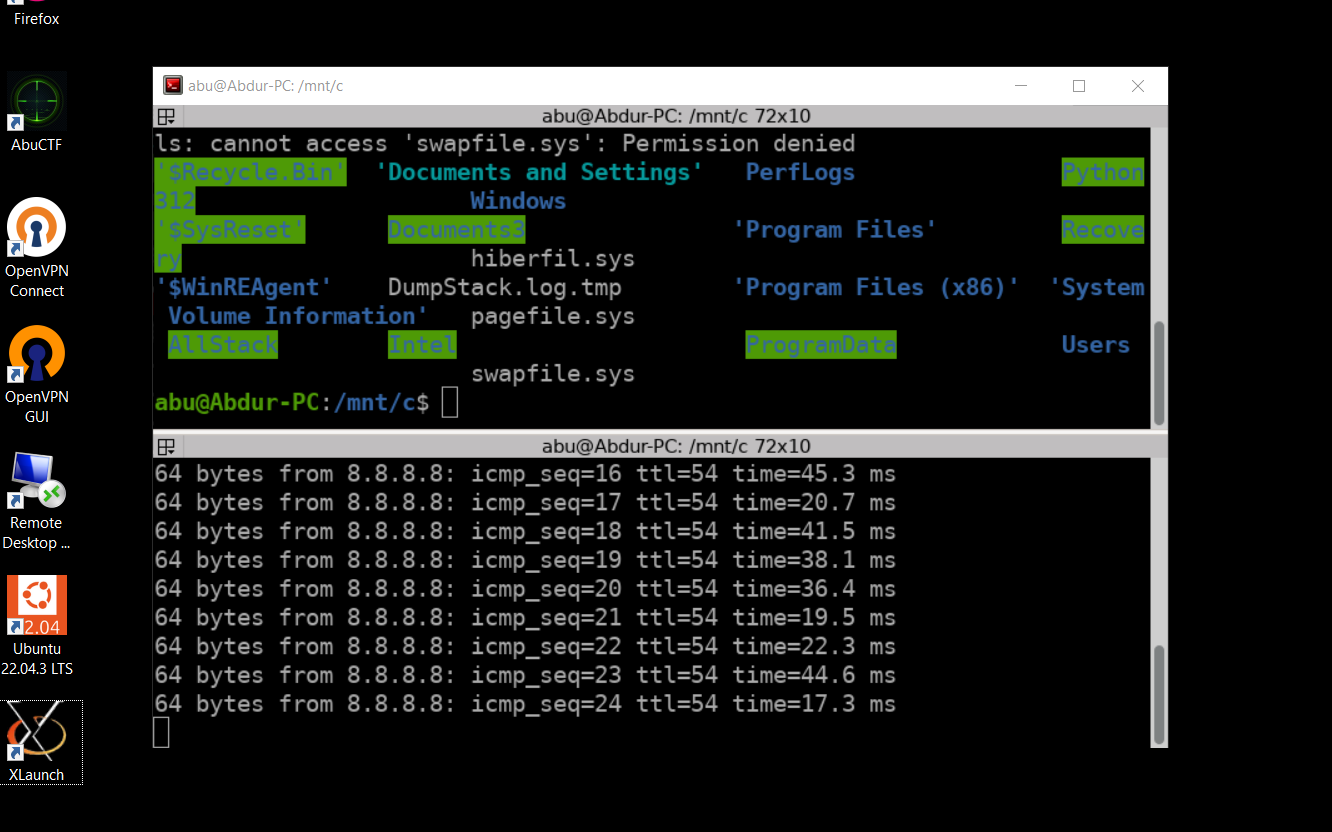
Time for another lil break, I set up WSL2 in my Windows OS. It’s pretty cool haha.
WSL2 Setup
Learn more about setting up WSL on Windows from the link below.
How to Install and Use the Linux Bash Shell on Windows 10
Cool Fact: WSL2 was just released 3 months back.
1
2
3
4
5
6
7
8
9
10
11
12
13
14
15
16
17
18
19
20
21
22
23
24
25
26
abu@Abdur-PC:/mnt/c$ uname -r
5.10.16.3-microsoft-standard-WSL2
abu@Abdur-PC:/mnt/c$ sudo su
[sudo] password for abu:
root@Abdur-PC:/mnt/c# passwd
New password:
Retype new password:
passwd: password updated successfully
root@Abdur-PC:/mnt/c# exit
exit
abu@Abdur-PC:/mnt/c$ su root
Password:
root@Abdur-PC:/mnt/c# exit
exit
abu@Abdur-PC:/mnt/c$ sudo apt update
sudo apt upgrade
sudo apt upgrade
Hit:1 https://archive.ubuntu.com/ubuntu jammy InRelease
Hit:2 https://security.ubuntu.com/ubuntu jammy-security InRelease
Get:3 https://archive.ubuntu.com/ubuntu jammy-updates InRelease [128 kB]
Hit:4 https://archive.ubuntu.com/ubuntu jammy-backports InRelease
Fetched 128 kB in 2s (63.2 kB/s)
Reading package lists... Done
Building dependency tree... Done
Reading state information... Done
All packages are up to date.
This is so cool, I should’ve tried this out much earlier in the journey.
1
2
3
PS C:\> wsl --list --verbose
  NAME            STATE           VERSION
* Ubuntu-22.04    Running         2
Now, setting up a Display Server with WSL2 would be even cooler. At the last, if Terminator works, then I’ll be so happy. Grinning from ear to ear right now !
On a side note,
This is becoming a really long break, but it’s fun doing it haha.
Custom Prompt
Let’s break down the custom prompt PS1='\\u@\\h:\\w\\$ ' and explain each component.
PS1 Variable
The PS1 variable defines the primary prompt string in the Bash shell. This is the prompt you see each time the shell is ready to accept a command. By customizing PS1, you can change how your shell prompt looks.
Components of the Prompt
The custom prompt PS1='\\u@\\h:\\w\\$ ' includes several special characters that are replaced by specific information when the prompt is displayed.
- \u: This is replaced by the current username.
- \h: This is replaced by the hostname up to the first
.. If your machine’s full hostname isyour-machine.example.com,\\hwould displayyour-machine. - \w: This is replaced by the current working directory, with
$HOMEabbreviated as~. - $: This displays a
#if the effective user ID is 0 (root), otherwise a$.
Putting It All Together
The prompt PS1='\\u@\\h:\\w\\$ ' would be interpreted as follows:
- \u: Current username (e.g.,
user) - @: The
@symbol, as is - \h: Hostname (e.g.,
hostname) - :: The
:symbol, as is - \w: Current working directory (e.g.,
~/projects) - $: The
$symbol if a regular user, or#if the root user
Example
Let’s say your username is abu, your hostname is Abuntu, and your current working directory is /home/abu/Documents3.
With the prompt PS1='\\u@\\h:\\w\\$ ', you would see:
1
abu@Abuntu:~/Documents3$
If you switch to the root user, the prompt might look like:
1
root@Abuntu:/home/abu/Documents3$
How to Set the Custom Prompt
To set this custom prompt in your shell, you can add the following line to your .bashrc file:
1
PS1='\\u@\\h:\\w\\$
After adding this line, make sure to reload your .bashrc file or restart your terminal session to apply the changes:
1
source ~/.bashrc
Additional Customizations
You can further customize your prompt by using other special characters and escape sequences. Here are some commonly used sequences:
- \d: The date in “Weekday Month Date” format (e.g., “Tue May 26”)
- \t: The current time in 24-hour format (e.g., “14:36:21”)
- \T: The current time in 12-hour format (e.g., “02:36:21”)
- \A: The current time in 24-hour format without seconds (e.g., “14:36”)
- !: The history number of the current command
- #: The command number of the current command
For example, if you want your prompt to show the time and be colored, you might use:
1
PS1='\\[\\e[32m\\]\\u@\\h:\\w \\t\\$ \\[\\e[0m\\]'
This prompt will display the username, hostname, current working directory, and the time, all in green, followed by a $ or # symbol in the default color.
By customizing your prompt, you can make your terminal more informative and visually appealing to suit your preferences.
X Server Setup
An X server is responsible for managing graphical display and input devices on Linux systems. It provides the infrastructure needed to run graphical applications like Terminator.
1
2
echo "export DISPLAY=$(awk '/nameserver / {print $2; exit}' /etc/resolv.conf 2>/dev/null):0" >> ~/.bashrc
source ~/.bashrc
Never thought this day would come true, Terminator actually work on Windows OS !
It was a real fun experience, the journey on finding the perfect way to use Linux, it started with Live Booting Kali on my Sandisk PenDrive. Then, figured that was slow, moved on to Dual Booting, but my Windows OS, wasn’t compatible, or to be specific, we needed more storage and disk hierarchy. Then comes the VM, it still works good, no complaints. But my machine is pretty old and it takes quite a while to setup. Finally, now WSL, honestly it feels like it’s going to be a game-changer. Well, that’s too big of a break haha. Let’s get back to it. One Last Push.
Here’s a start on 3-Way Handshake in TCP/IP.
Next, we’ll come on to discuss the Three-way handshake - the term given for the process used to establish a connection between two devices. The Three-way handshake communicates using a few special messages - the table below highlights the main ones:
| Step | Message | Description |
|---|---|---|
| 1 | SYN | A SYN message is the initial packet sent by a client during the handshake. This packet is used to initiate a connection and synchronize the two devices together (we’ll explain this further later on). |
| 2 | SYN/ACK | This packet is sent by the receiving device (server) to acknowledge the synchronization attempt from the client. |
| 3 | ACK | The acknowledgement packet can be used by either the client or server to acknowledge that a series of messages/packets have been successfully received. |
| 4 | DATA | Once a connection has been established, data (such as bytes of a file) is sent via the “DATA” message. |
| 5 | FIN | This packet is used to cleanly (properly) close the connection after it has been complete. |
| # | RST | This packet abruptly ends all communication. This is the last resort and indicates there was some problem during the process. For example, if the service or application is not working correctly, or the system has faults such as low resources. |
By the way, I skipped some LAN, OSI Model. Please go look it up. It’s Fundamental.
VPN technology has improved over the years. Let’s explore some existing VPN technologies below:
| VPN Tech | Description |
|---|---|
| PPP | This technology is used by PPTP (explained below) to allow for authentication and provide encryption of data. VPNs work by using a private key and public certificate (similar to SSH). A private key & certificate must match for you to connect. |
| This technology is not capable of leaving a network by itself (non-routable). | |
| PPTP | The Point-to-Point Tunneling Protocol (PPTP) is the technology that allows the data from PPP to travel and leave a network. |
| PPTP is very easy to set up and is supported by most devices. It is, however, weakly encrypted in comparison to alternatives. | |
| IPSec | Internet Protocol Security (IPsec) encrypts data using the existing Internet Protocol (IP) framework. |
| IPSec is difficult to set up in comparison to alternatives; however, if successful, it boasts strong encryption and is also supported on many devices. |
Now, we go into the most important part of the Pre-Security Journey, Learning How The Web Works !
How The Web Works ?
After a three-day break, let’s get back into it. RVCE CTF held in Bangalore, came 29th. Still a lot to learn, it was a fun experience though. But at the end of the day, it’s only truly fun, if one wins.
DNS In Detail
DNS (Domain Name System) provides a simple way for us to communicate with devices on the internet without remembering complex numbers. Much like every house has a unique address for sending mail directly to it, every computer on the internet has its own unique address to communicate with it called an IP address.
Domain Hierarchy

TLD (Top-Level Domain)
A TLD is the most righthand part of a domain name. So, for example, the tryhackme.com TLD is .com. There are two types of TLD, gTLD (Generic Top Level) and ccTLD (Country Code Top Level Domain). Historically a gTLD was meant to tell the user the domain name’s purpose; for example, a .com would be for commercial purposes, .org for an organisation, .edu for education and .gov for government. And a ccTLD was used for geographical purposes, for example, .ca for sites based in Canada, .co.uk for sites based in the United Kingdom and so on. Due to such demand, there is an influx of new gTLDs ranging from .online , .club , .website , .biz and so many more. For a full list of over 2000 TLDs.
Second-Level Domain
Taking tryhackme.com as an example, the .com part is the TLD, and tryhackme is the Second Level Domain. When registering a domain name, the second-level domain is limited to 63 characters + the TLD and can only use a-z 0-9 and hyphens (cannot start or end with hyphens or have consecutive hyphens).
Subdomain
A subdomain sits on the left-hand side of the Second-Level Domain using a period to separate it; for example, in the name admin.tryhackme.com the admin part is the subdomain. A subdomain name has the same creation restrictions as a Second-Level Domain, being limited to 63 characters and can only use a-z 0-9 and hyphens (cannot start or end with hyphens or have consecutive hyphens). You can use multiple subdomains split with periods to create longer names, such as jupiter.servers.tryhackme.com. But the length must be kept to 253 characters or less. There is no limit to the number of subdomains you can create for your domain name.
DNS Record Types
DNS isn’t just for websites though, and multiple types of DNS record exist. We’ll go over some of the most common ones that you’re likely to come across.
A Record
These records resolve to IPv4 addresses, for example 104.26.10.229
AAAA Record
These records resolve to IPv6 addresses, for example 2606:4700:20::681a:be5
CNAME Record
These records resolve to another domain name, for example, TryHackMe’s online shop has the subdomain name store.tryhackme.com which returns a CNAME record shops.shopify.com. Another DNS request would then be made to shops.shopify.com to work out the IP address.
MX Record
These records resolve to the address of the servers that handle the email for the domain you are querying, for example an MX record response for tryhackme.com would look something like alt1.aspmx.l.google.com. These records also come with a priority flag. This tells the client in which order to try the servers, this is perfect for if the main server goes down and email needs to be sent to a backup server.
TXT Record
TXT records are free text fields where any text-based data can be stored. TXT records have multiple uses, but some common ones can be to list servers that have the authority to send an email on behalf of the domain (this can help in the battle against spam and spoofed email). They can also be used to verify ownership of the domain name when signing up for third party services.
Here is a practical simulation of what happens when you look up a Domain Name.
What happens when you make a DNS request

- When you request a domain name, your computer first checks its local cache to see if you’ve previously looked up the address recently; if not, a request to your Recursive DNS Server will be made.
- A Recursive DNS Server is usually provided by your ISP, but you can also choose your own. This server also has a local cache of recently looked up domain names. If a result is found locally, this is sent back to your computer, and your request ends here (this is common for popular and heavily requested services such as Google, Facebook, Twitter). If the request cannot be found locally, a journey begins to find the correct answer, starting with the internet’s root DNS servers.
- The root servers act as the DNS backbone of the internet; their job is to redirect you to the correct Top Level Domain Server, depending on your request. If, for example, you request www.tryhackme.com, the root server will recognize the Top Level Domain of .com and refer you to the correct TLD server that deals with .com addresses.
- The TLD server holds records for where to find the authoritative server to answer the DNS request. The authoritative server is often also known as the nameserver for the domain. For example, the name server for tryhackme.com is kip.ns.cloudflare.com and uma.ns.cloudflare.com. You’ll often find multiple nameservers for a domain name to act as a backup in case one goes down.
- An authoritative DNS server is the server that is responsible for storing the DNS records for a particular domain name and where any updates to your domain name DNS records would be made. Depending on the record type, the DNS record is then sent back to the Recursive DNS Server, where a local copy will be cached for future requests and then relayed back to the original client that made the request. DNS records all come with a TTL (Time To Live) value. This value is a number represented in seconds that the response should be saved for locally until you have to look it up again. Caching saves on having to make a DNS request every time you communicate with a server.
HTTPS In Detail
What is a URL? (Uniform Resource Locator)
If you’ve used the internet, you’ve used a URL before. A URL is predominantly an instruction on how to access a resource on the internet. The below image shows what a URL looks like with all of its features (it does not use all features in every request).
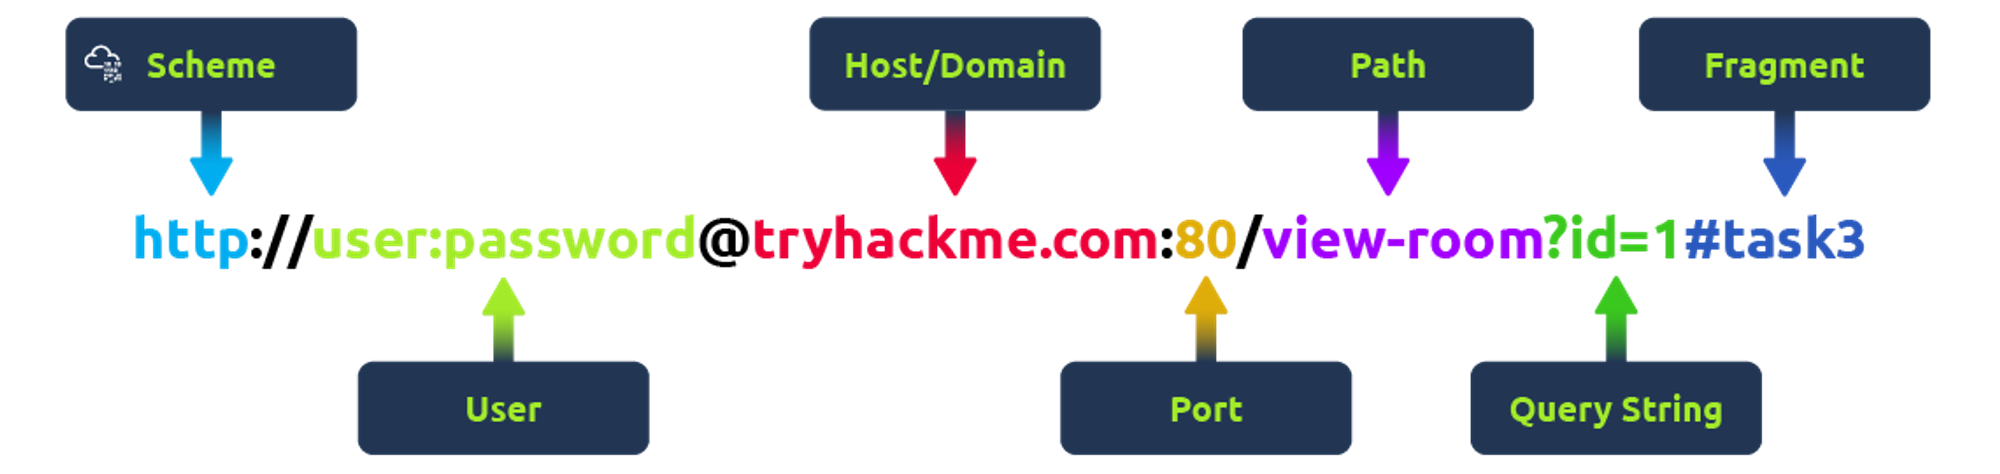
Query String: Extra bits of information that can be sent to the requested path. For example, /blog?**id=1** would tell the blog path that you wish to receive the blog article with the id of 1.
Example Request:
1
GET / https/1.1Host: tryhackme.comUser-Agent: Mozilla/5.0 Firefox/87.0Referer: https://tryhackme.com/
To breakdown each line of this request:
Line 1: This request is sending the GET method ( more on this in the https Methods task ), request the home page with / and telling the web server we are using https protocol version 1.1.
Line 2: We tell the web server we want the website tryhackme.com
Line 3: We tell the web server we are using the Firefox version 87 Browser
Line 4: We are telling the web server that the web page that referred us to this one is https://tryhackme.com
Line 5: https requests always end with a blank line to inform the web server that the request has finished.
Example Response:
1
2
3
4
https/1.1 200 OKServer: nginx/1.15.8Date: Fri, 09 Apr 2021 13:34:03 GMTContent-Type: text/htmlContent-Length: 98
<html><head><title>TryHackMe</title></head><body>
    Welcome To TryHackMe.com
</body></html>
To breakdown each line of the response:
Line 1: https 1.1 is the version of the https protocol the server is using and then followed by the https Status Code in this case “200 Ok” which tells us the request has completed successfully.
Line 2: This tells us the web server software and version number.
Line 3: The current date, time and time-zone of the web server.
Line 4: The Content-Type header tells the client what sort of information is going to be sent, such as HTML, images, videos, pdf, XML.
Line 5: Content-Length tells the client how long the response is, this way we can confirm no data is missing.
Line 6: https response contains a blank line to confirm the end of the https response.
Lines 7-14: The information that has been requested, in this instance the homepage.
Common HTTP Methods
GET, POST, PUT, DELETE
HTTP Status Codes:
In the previous task, you learnt that when a https server responds, the first line always contains a status code informing the client of the outcome of their request and also potentially how to handle it. These status codes can be broken down into 5 different ranges:
| Status Code Range | Description |
|---|---|
| 100 - 199 - Information Response | These are sent to tell the client the first part of their request has been accepted and they should continue sending the rest of their request. These codes are no longer very common. |
| 200 - 299 - Success | This range of status codes is used to tell the client their request was successful. |
| 300 - 399 - Redirection | These are used to redirect the client’s request to another resource. This can be either to a different webpage or a different website altogether. |
| 400 - 499 - Client Errors | Used to inform the client that there was an error with their request. |
| 500 - 599 - Server Errors | This is reserved for errors happening on the server-side and usually indicate quite a major problem with the server handling the request. |
Common HTTP Status Codes:
There are a lot of different https status codes and that’s not including the fact that applications can even define their own, we’ll go over the most common https responses you are likely to come across:
| Status Code | Description |
|---|---|
| 200 - OK | The request was completed successfully. |
| 201 - Created | A resource has been created (for example, a new user or new blog post). |
| 301 - Moved Permanently | This redirects the client’s browser to a new webpage or tells search engines that the page has moved somewhere else and to look there instead. |
| 302 - Found | Similar to the above permanent redirect, but as the name suggests, this is only a temporary change and it may change again in the near future. |
| 400 - Bad Request | This tells the browser that something was either wrong or missing in their request. This could sometimes be used if the web server resource that is being requested expected a certain parameter that the client didn’t send. |
| 401 - Not Authorised | You are not currently allowed to view this resource until you have authorised with the web application, most commonly with a username and password. |
| 403 - Forbidden | You do not have permission to view this resource whether you are logged in or not. |
| 404 - Page Not Found | The page/resource you requested does not exist. |
| 405 - Method Not Allowed | The resource does not allow this method request, for example, you send a GET request to the resource /create-account when it was expecting a POST request instead. |
| 500 - Internal Service Error | The server has encountered some kind of error with your request that it doesn’t know how to handle properly. |
| 503 - Service Unavailable | This server cannot handle your request as it’s either overloaded or down for maintenance. |
Common Request Headers
These are headers that are sent from the client (usually your browser) to the server.
Host: Some web servers host multiple websites so by providing the host headers you can tell it which one you require, otherwise you’ll just receive the default website for the server.
User-Agent: This is your browser software and version number, telling the web server your browser software helps it format the website properly for your browser and also some elements of HTML, JavaScript and CSS are only available in certain browsers.
Content-Length:
When sending data to a web server such as in a form, the content length tells the web server how much data to expect in the web request. This way the server can ensure it isn’t missing any data.
Accept-Encoding: Tells the web server what types of compression methods the browser supports so the data can be made smaller for transmitting over the internet.
Cookie:
Data sent to the server to help remember your information.
Common Response Headers
These are the headers that are returned to the client from the server after a request.
Set-Cookie:
Information to store which gets sent back to the web server on each request.
Cache-Control:
How long to store the content of the response in the browser’s cache before it requests it again.
Content-Type: This tells the client what type of data is being returned, i.e., HTML, CSS, JavaScript, Images, PDF, Video, etc. Using the content-type header the browser then knows how to process the data.
Content-Encoding:
What method has been used to compress the data to make it smaller when sending it over the internet.
How Websites Work
There are two major components that make up a website:
- Front End (Client-Side) - the way your browser renders a website.
- Back End (Server-Side) - a server that processes your request and returns a response.
Tags can contain attributes such as the class attribute which can be used to style an element (e.g. make the tag a different color) <p class="bold-text">, or the src attribute which is used on images to specify the location of an image: <img src="img/cat.jpg">.An element can have multiple attributes each with its own unique purpose, e.g.,
<p attribute1="value1" attribute2="value2">
Elements can also have an id attribute (<p id="example">), which is unique to the element. Unlike the class attribute, where multiple elements can use the same class, an element must have different id’s to identify them uniquely. Element id’s are used for styling and to identify it by JavaScript.
JavaScript
JavaScript (JS) is one of the most popular coding languages in the world and allows pages to become interactive. HTML is used to create the website structure and content, while JavaScript is used to control the functionality of web pages - without JavaScript, a page would not have interactive elements and would always be static. JS can dynamically update the page in real-time, giving functionality to change the style of a button when a particular event on the page occurs (such as when a user clicks a button) or to display moving animations.
JavaScript is added within the page source code and can be either loaded within <script> tags or can be included remotely with the src attribute: <script src="/location/of/javascript_file.js"></script>The following JavaScript code finds a HTML element on the page with the id of “demo” and changes the element’s contents to “Hack the Planet”: document.getElementById("demo").innerHTML = "Hack the Planet";
HTML elements can also have events, such as “onclick” or “onhover” that execute JavaScript when the event occurs. The following code changes the text of the element with the demo ID to Button Clicked: <button onclick='document.getElementById("demo").innerHTML = "Button Clicked";'>Click Me!</button> - on-click events can also be defined inside the JavaScript script tags, and not on elements directly.
Sensitive Data Exposure
Sensitive Data Exposure occurs when a website doesn’t properly protect (or remove) sensitive clear-text information to the end-user; usually found in a site’s frontend source code.
We now know that websites are built using many HTML elements (tags), all of which we can see simply by “viewing the page source”. A website developer may have forgotten to remove login credentials, hidden links to private parts of the website or other sensitive data shown in HTML or JavaScript.
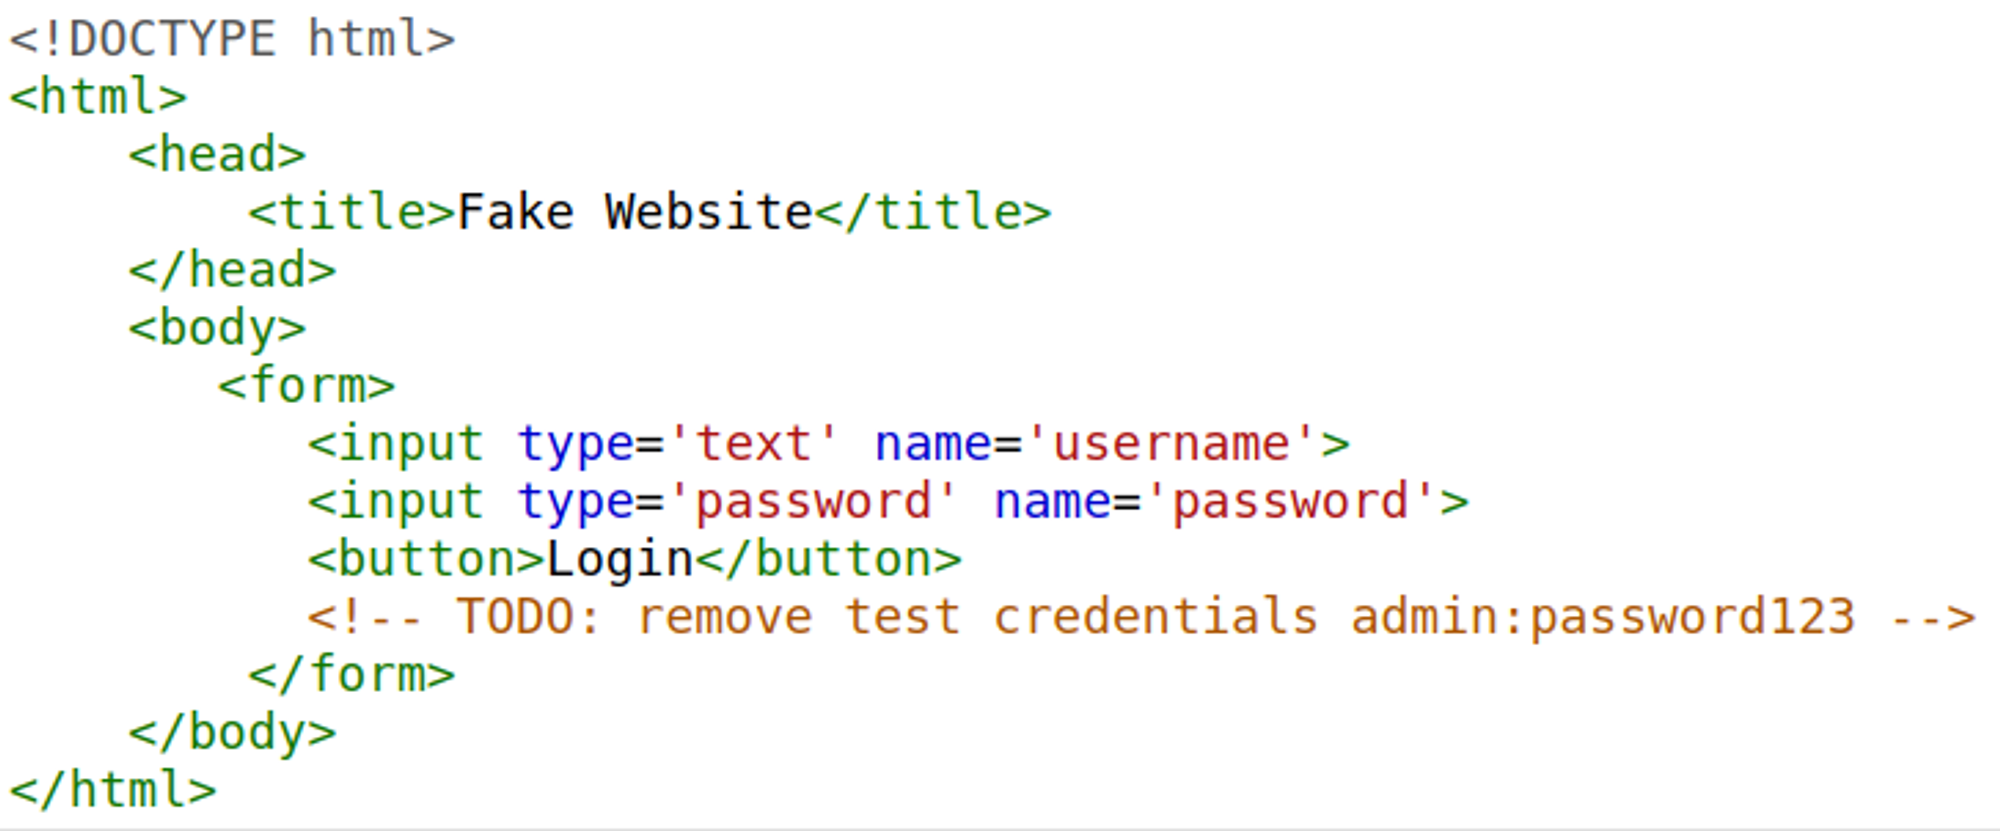
Sensitive information can be potentially leveraged to further an attacker’s access within different parts of a web application. For example, there could be HTML comments with temporary login credentials, and if you viewed the page’s source code and found this, you could use these credentials to log in elsewhere on the application (or worse, used to access other backend components of the site).
Whenever you’re assessing a web application for security issues, one of the first things you should do is review the page source code to see if you can find any exposed login credentials or hidden links.
Load Balancers
When a website’s traffic starts getting quite large or is running an application that needs to have high availability, one web server might no longer do the job. Load balancers provide two main features, ensuring high traffic websites can handle the load and providing a failover if a server becomes unresponsive.
When you request a website with a load balancer, the load balancer will receive your request first and then forward it to one of the multiple servers behind it. The load balancer uses different algorithms to help it decide which server is best to deal with the request. A couple of examples of these algorithms are round-robin, which sends it to each server in turn, or weighted, which checks how many requests a server is currently dealing with and sends it to the least busy server.
Load balancers also perform periodic checks with each server to ensure they are running correctly; this is called a health check. If a server doesn’t respond appropriately or doesn’t respond, the load balancer will stop sending traffic until it responds appropriately again.
CDN (Content Delivery Networks)
A CDN can be an excellent resource for cutting down traffic to a busy website. It allows you to host static files from your website, such a JavaScript, CSS, Images, Videos, and host them across thousands of servers all over the world. When a user requests one of the hosted files, the CDN works out where the nearest server is physically located and sends the request there instead of potentially the other side of the world.
Databases
Often websites will need a way of storing information for their users. Webservers can communicate with databases to store and recall data from them. Databases can range from just a simple plain text file up to complex clusters of multiple servers providing speed and resilience. You’ll come across some common databases: MySQL, MSSQL, MongoDB, GraphQL, Postgres, and more; each has its specific features.
WAF (Web Application Firewall)
A WAF sits between your web request and the web server; its primary purpose is to protect the webserver from hacking or denial of service attacks. It analyses the web requests for common attack techniques, whether the request is from a real browser rather than a bot. It also checks if an excessive amount of web requests are being sent by utilizing something called rate limiting, which will only allow a certain amount of requests from an IP per second. If a request is deemed a potential attack, it will be dropped and never sent to the webserver.
What is a Web Server?
A web server is a software that listens for incoming connections and then utilizes the https protocol to deliver web content to its clients. The most common web server software you’ll come across is Apache, Nginx, IIS and NodeJS. A Web server delivers files from what’s called its root directory, which is defined in the software settings. For example, Nginx and Apache share the same default location of /var/www/html in Linux operating systems, and IIS uses C:\inetpub\wwwroot for the Windows operating systems. So, for example, if you requested the file https://www.example.com/picture.jpg, it would send the file /var/www/html/picture.jpg from its local hard drive.
Virtual Hosts
Web servers can host multiple websites with different domain names; to achieve this, they use virtual hosts. The web server software checks the hostname being requested from the https headers and matches that against its virtual hosts (virtual hosts are just text-based configuration files). If it finds a match, the correct website will be provided. If no match is found, the default website will be provided instead.
Virtual Hosts can have their root directory mapped to different locations on the hard drive. For example, one.com being mapped to /var/www/website_one, and two.com being mapped to /var/www/website_two. There’s no limit to the number of different websites you can host on a web server.
Static Vs Dynamic Content
Static content, as the name suggests, is content that never changes. Common examples of this are pictures, javascript, CSS, etc., but can also include HTML that never changes. Furthermore, these are files that are directly served from the webserver with no changes made to them.
Dynamic content, on the other hand, is content that could change with different requests. Take, for example, a blog. On the homepage of the blog, it will show you the latest entries. If a new entry is created, the home page is then updated with the latest entry, or a second example might be a search page on a blog. Depending on what word you search, different results will be displayed.
These changes to what you end up seeing are done in what is called the Backend with the use of programming and scripting languages. It’s called the Backend because what is being done is all done behind the scenes. You can’t view the websites’ HTML source and see what’s happening in the Backend, while the HTML is the result of the processing from the Backend. Everything you see in your browser is called the Frontend.
Scripting and Backend Languages
There’s not much of a limit to what a backend language can achieve, and these are what make a website interactive to the user. Some examples of these languages (in no particular order :p) are PHP, Python, Ruby, NodeJS, Perl and many more. These languages can interact with databases, call external services, process data from the user, and so much more. A very basic PHP example of this would be if you requested the website
https://example.com/index.php?name=Abu
If index.php was built like this:
<html><body>Hello <?php echo $_GET["name"]; ?></body></html>
It would output the following to the client:
<html><body>Hello Abu</body></html>
You’ll notice that the client doesn’t see any PHP code because it’s on the Backend. This interactivity opens up a lot more security issues for web applications that haven’t been created securely, as you learn in further modules.

With this, we have come to an end in this fun journey. Keep going, Traveler. Peace.